An All-New Sophos Central Automate Plug-in is in the works. We're looking to have it released in December 2019.
Thanks,
Steve Weber
Global MSP Sales Engineer
--------------------------------------------------------------------------------------------------------------------------------------
Overview
This post describes the steps to set up the Sophos Central Deployment Addon from the ConnectWise Automate Solutions Center.
Note: Sophos ConnectWise Automate Plugin is certified via the ConnectWise Invent Program. If you need assistance with plugin implementation, please contact MSP.SE@sophos.com for support.
What to do
Step one: Download the Customer CSV File from the Partner Dashboard.
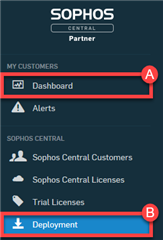
- Go to the Deployment section from the left menu of the dashboard.
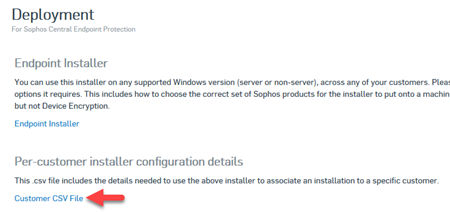
- Click the Customer CSV File to download. This will need to be redownloaded as new customers are added.
- Open the file. Expand the columns to see the following information:
- Customer Name
- Example Command Line
- Customer Token
- Management Server (also known as Location)
- Right-click on the Example Command Line column and select Hide. You will now have the Customer Name, Customer Token, and Management Server columns. These are the information needed when filling in the EDF Field in Connectwise Automate.

Step two: Clean up virus scan definitions for Sophos.
Note: Don't do this after installing the Addon from the Solutions Central.
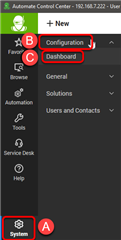
- In the ConnectWise Automate Control Center, click on System > Configuration > Dashboard.
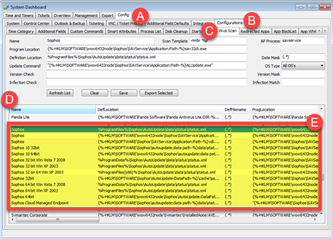
- In the System Dashboard, go to the Config tab > Configurations tab > Virus Scan tab.
- Sort by Name and scroll to Sophos.
- Highlight all the listed Sophos definitions then right-click and select Delete. If the Sophos Central Addon is already installed, do not delete the Sophos Central Viruses Definitions.
Note:
- Software inventory runs every 24 hours by default. So it might take a day for existing workstations and servers to be listed correctly.
- You can remove all of the other Sophos virus definitions prior to installing the Sophos Central Deployment Addon.
Step three: Install the Sophos Central Addon from the Solutions Center.
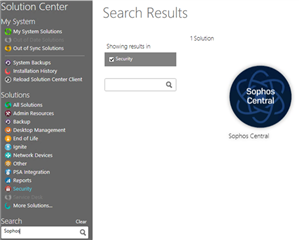
- Search and click on the Sophos Central Addon or look for it under Security.
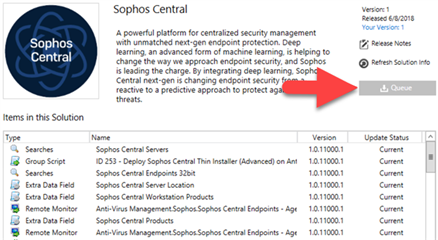
- At the top right corner, click on Queue to install the addon.
Step four: Enabling the Sophos Central Deployment process.
- Open a client.
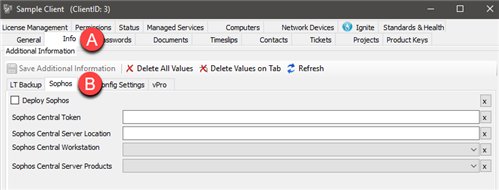
- Click the Info tab > Sophos tab.
- Fill in the Sophos Central Token and Sophos Central Server Location fields.
- Click the drop-down for Sophos Central Workstation and Sophos Central Server Products.
- If you want to start the deployment now, tick the Deploy Sophos checkbox then click the Save Additional Information button.
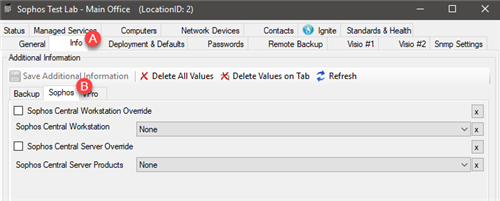
- Open the Location > Info tab > Sophos tab.
- Tick on the checkbox of what you need to override then select the products from the drop-down list. The Sophos Central Add-on gives the ability to override the client level products at both the Location and Workstation/Server level.
- Open the workstation or server where you need to apply this.
- Click the automation gear icon at the top.
- Click on the Extra Data Fields tile.
- Select Sophos on the left side > tick on Sophos Central Product Override > select the product from the drop-down list. If you select None, it will stop Sophos from installing on the workstation/server.
- Click on Save.
Step five: Enabling the Remote Monitors.
There are two types of remote monitors - the Service Monitor and the Reboot Monitor.
How to enable the Service Monitors
- Open the ConnectWise Automate Solutions Center.
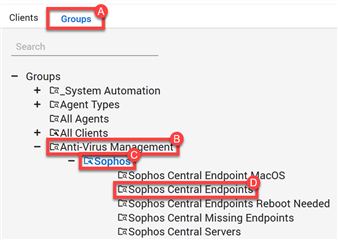
- Go to the Groups tab > expand Anti-Virus Management > Sophos > double-click on Sophos Central Endpoints.
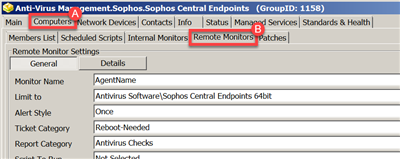
- Click on the Computers tab then Remote Monitors tab. At the bottom is a list of the remote monitors.
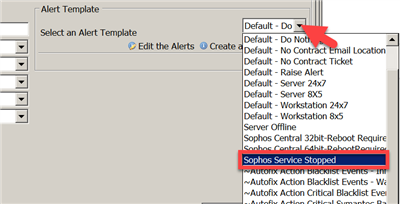
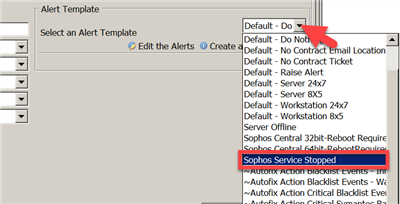
- Select each item that have the Service Host type. Then click the drop-down for Select an Alert Template and select Sophos Service Stopped.
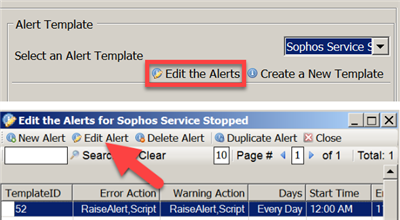
- Click on Edit the Alerts and then Edit Alert.
Note: If you want to have a ticket created, leave the Raise Alert checked. If you don't need a ticket just for a Service Stopped then uncheck Warning and Error for Raise Alert. This alert will auto execute the restart Service Action. Next Select Contact and select a Contact from the Drop Down list.
-
Don't make any changes to anything other than the Raise Alert then click Save.
-
Click Update.
Note: For the Remaining Services, you don't need to Edit the Alert. Simply select the service and assign the Sophos Service Stopped and click Update.
How to enable the Reboot Monitors
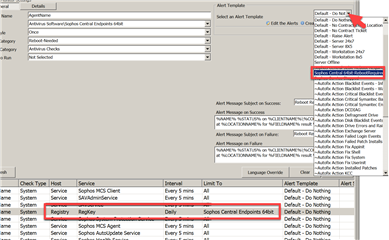
Reboot Monitors are the Remote Monitors listed as Registry. These monitors are for 32bit and 64bit systems and each has its own Alert Action. Just ensure that when you select the Alert Template, select the appropriate one.
- Still in the Remote Monitors tab, select each item that have the Registry Host type.
- Then click the drop-down for Select an Alert Template and ensure to select the 64bit Alert for the 64bit Registry Monitor.
- Click the Update button.
- Repeat this for the 32bit Registry Monitors.
- Close the Sophos Central Endpoints Group.
Note: The Reboot Monitor that has just been enabled does not actually force the reboot of the workstation. Instead, it sets the Reboot Flag under the Workstation EDF field. This triggers the search for the Reboot Need Group to populate. As this group is populated, the scheduled script will run every 2 hours on workstations, not servers. The script doesn't force a reboot but instead prompts the user to reboot their system as an update is needed. Users will have the choice to accept and reboot now or cancel. If they canceled the reboot, they will be prompted again in 2 hours. If there is no response in 60 seconds the action will be canceled and they will be prompted again in 2 hours.

