Sophos Central Thin Installer for Kaseya
This article will guide you through the import and then setup of the Central Thin Installer Script XML and then the creation of the Public Managed Variables.
Importing the XML Script
The first step with be to import the XML Agent Procedure into Kaseya.
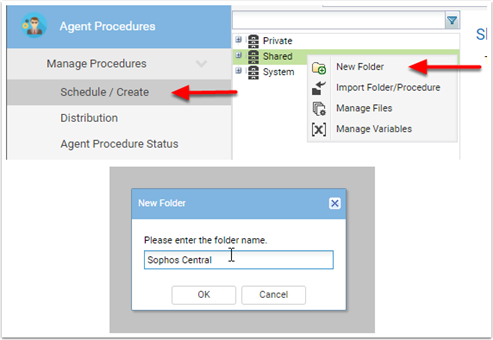
Start by going to Agent Procedures - Schedule / Create
Right Click on Shared and Click New Folder - Folder Name: Sophos Central (You can put it where ever you want)
Then Right Click on the Sophos Central Folder and Click Import Folder/Procedure
Click on the Camera Search Button to the right, select the Sophos Central Thin Installer.xml and Click Save
At this point you have the Agent Procedure Installed
Upload the SophosSetup.exe Thin Installer
From the Sophos Partner Dashboard, Click Deployment and then Click on the Endpoint Installer
Save the SophosSetup.exe to your desktop.
Next you'll go into Kaseya and Agent Procedures - Schedule/Create
Click on Manage Files
Click Shared files, then Upload a file.
Upload the SophosSetup.exe, which will then appear under the Current Folder Contents.
Managed Variables Setup
In this next section please ensure that you copy the Managed Variables exactly or else the Script won't work.
Click on the Manage Variables
Next we need to manually create the New Variables and Apply a few Place Holder Variables
We'll start with the Sophos-Central-Deploy variable
- On the right side under Rename/Create Variable enter Sophos-Central-Deploy
- Select the Public option
- Set Variable Value to No
- Select Unnamed.root
- Then Click Apply
Next the Sophos-Central-Token variable.
- On the right side under Rename/Create Variable enter Sophos-Central-Token
- Select the Public option
- Set Variable Value to Token Code Here
- Select Unnamed.root
- Then Click Apply
Next the Sophos-Central-Location variable.
- On the right side under Rename/Create Variable enter Sophos-Central-Location
- Select the Public option
- Set Variable Value to Location Here
- Select Unnamed.root
- Then Click Apply
Next the Sophos-Central-Product variable.
- On the right side under Rename/Create Variable enter Sophos-Central-Product
- Select the Public option
- Set Variable Value to antivirus,intercept
- Select Unnamed.root
- Then Click Apply
There are a few different options for this field. This is important because it will direct the Agent on which components need to be installed.
The options are as follows:
- antivirus - This indicates that you want Endpoint Advanced or Standard depending on the license selected under Licensing.
- intercept - This indicates that you want Intercept X
- deviceencryption - This indicates that you want Device Encryption
- all - This indicates that you want to install all three components
***For Termed licenses, all will only install the components available on the License ID***
Customer Additions
For the Next Step you will need to download the Customer CSV File.
In the Custom CSV File there will be three column that are needed. The Customer Name, Customer Token and Management Server.
Applying the Customer CSV Values to the correct Customer or Group
Taking a look at the Agent below, we can see that the Win10Kaseya workstation belong to the root.sophoslab
So for this Customer: sophoslab the workstations are in the root group. So on the Manage Variables set the Deploy, Customer Token, MgmtServer, and Products
To provide different Variable Options for a Customer, you can create Machine Groups and then group those systems under that Machine Group.
For Example if we have certian workstations or servers that don't get Sophos installed Create a Machine Group for no sophos
or if you need Intercept X only installed create a Machine Group called intercept only
Then apply the Manage Variables to those Machine Groups under the Agent Procedures. (Refer to Managed Variables Setup)

