

Disclaimer: This information is provided as-is for the benefit of the Community. Please contact Sophos Professional Services if you require assistance with your specific environment.
Table of Contents
- Pre-requisites
- Step 1: Create Azure Local Network Gateway (with Sophos Firewall public IP address)
- Step 2: Create a Gateway Subnet
- Step 3: Create the VPN Gateway
- Step 4: Create the VPN connection (Azure)
- Step 5: Download and extract the needed information from the configuration file (Azure)
- Step 6: Create the VPN connection (Sophos Firewall)
- Step 7: Create firewall rules to allow inbound and outbound traffic through the VPN (Sophos Firewall)
- Step 8: Configure the xfrm tunnel interface (Sophos Firewall)
- Step 9: Configure static routing to the Azure network (Sophos Firewall)
- Step 10: Verify the VPN connection
- Things to watch out for
Pre-requisites
1. Sophos Firewall firmware
- A supported firmware version
- You can register for and download from this URL: Firewall Installers
2. Your OnPrem Sophos Firewall and the following information:
- The public IP address of Sophos Firewall.
- The IP address space behind your Sophos Firewall.
3. Your Microsoft Azure vNet and the following information:
- IP address space of the vNet
Step 1: Create Azure Local Network Gateway (with Sophos Firewall public IP address)
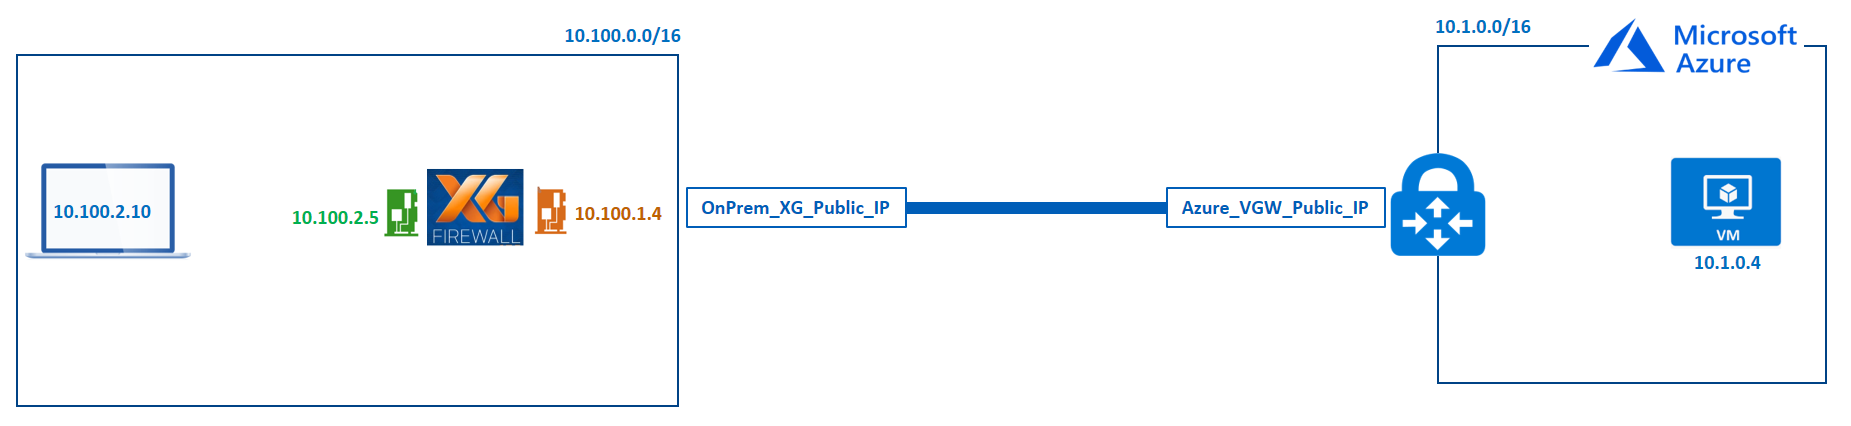
The local network gateway typically refers to your on-premises location. You'll need the public IP address of your On-Prem Sophos Firewall and your On-Prem Private IP address spaces.
Please note that this configuration assumes that the public IP address is directly configured on the On-Prem Sophos Firewall. Your configuration will be slightly different if your On-Prem Sophos Firewall sits behind a NAT device.
- Go to the Azure Portal: https://portal.azure.com and sign in with your credentials.
- Click "Create a resource".
- In the search box, type "Local Network Gateway".
- Select "Local Network Gateway" and click "Create".
-
In the "Create local network gateway" blade, configure the following and then click "Create":
- Name: On_Premises_Sophos_Sophos_Firewall (You can give this any preferred name).
- Endpoint: IP address
- IP address: Specify the public IP address of your Sophos Firewall.
- Address space: Specify the address ranges for the network that your On-Prem local network represents. In our scenario, this is 10.100.0.0/16.
- Subscription: Verify that the correct subscription has been selected for deployment.
- Resource Group: Select the resource group you want to use. You can either create a new one or select an existing one.
- Location: Select the location where this object will be created.
Step 2: Create a Gateway Subnet
The VPN gateway will be deployed into a specific subnet of your network called the 'GatewaySubnet'.The size of the GatewaySubnet that you specify depends on the VPN gateway configuration that you want to create. While it is possible to create a GatewaySubnet as small as /29, it is recommend to create a larger subnet that includes more addresses by selecting /27 or /28 to be able to accommodate future configurations.
- In the Azure Portal: https://portal.azure.com, click on "More Services".
- Type "Virtual Networks" in the search box and select the "Virtual Networks" option.
- Click on the virtual network for which you want to create a virtual network gateway.
- In the "Virtual networks" blade, under "Settings", click "Subnets".
- In the "Subnets" blade, click "+ Gateway subnet" to add a new Gateway subnet.
- In the "Add Subnet" blade, configure the CIDR range of the new Gateway subnet and click "Save". In our scenario, this is 10.1.1.0/24.
Step 3: Create the VPN Gateway
- In the Azure Portal: https://portal.azure.com, click "Create a resource".
- In the search box, type "Virtual network gateway".
- Select "Virtual network gateway" and click "Create".
-
In the "Create virtual network gateway" blade, configure the following:
- Subscription: Verify that the correct subscription has been selected for deployment.
- Instance details
- Name: This will be the name of the gateway object you’re creating.
- Region: Select the same location as your virtual network (Otherwise, the virtual network won’t be displayed on the list).
- Gateway type: VPN
- VPN type: Route-based (this is a MUST for IKEv2).
- SKU: Select the gateway SKU from the drop-down. For more information about gateway SKUs, see Gateway SKUs.
- Generation: Generation 1
- Virtual network: Choose the virtual network to which you want to add this gateway (if the virtual network you want isn’t displayed on the list, verify that you have selected the right location in the "Region" parameter above).
- Public IP address:
- Public IP address: Create a New
- Public IP address Name: Enter a Name for the public IP address resource.
- Leave other settings as default.
- Click "Review + Create"
- Click "Create."
- Creating a gateway can take up to 45 minutes!
- After the VPN gateway creation has completed successfully, obtain it's public IP address (this will be needed in step 5).
- In the Azure Portal, click on "More services" and search for "Virtual network gateways". Then click on "Virtual network gateways".
- Click on the VPN Gateway that you just created.
- In the "VPN Gateway" blade, in the "Overview" section, make a note of the public IP address of the gateway.
- This will be used in step 5.
Step 4: Create the VPN connection (Azure)
- In the Azure Portal: https://portal.azure.com, click on "More Services" and search for "Virtual network gateways". Then click "Virtual network gateways".
- Select the VPN gateway that you created earlier.
- In the "VPN Gateway" blade, in the "Settings" section, click on "Connections" and then click on "+ Add."
- In the "Add connection" blade, configure the following:
- Name: Sophos_Sophos_OnPrem_To_Azure (Input your preferred name)
- Connection type: Site-to-site (IPSec)
- Virtual network gateway: The value is fixed because you’re connecting from this gateway
- Local network gateway:
- Click "Choose a local network gateway."
- In the "Choose a local network gateway" blade, select the local network gateway that you created earlier.
- Shared key (PSK): Input a complex shared key. The value here must match the value we will use on our on-premises Sophos Firewall.
- IKE Protocol: IKEv2
- The remaining values for Subscription, Resource Group, and Location are fixed.
- Click OK to create your connection. You'll see Creating Connection flash on the screen.
Step 5: Download and extract the needed information from the configuration file (Azure)
- In the Azure Portal: https://portal.azure.com, click "More services" and search for "Virtual network gateways". Then click "Virtual network gateways".
- Select the VPN gateway that you created earlier.
- In the "VPN Gateway" blade, in the "Settings" section, click "Connections" and select the connection you created earlier.
- Click the "Download Configuration" button. This configuration file contains the information needed to configure the Sophos Firewall's VPN connection.
- In the "Download configuration" blade, select the following:
- Device vendor: Generic Samples
- Device family: Device Parameters
- Firmware version: 1.0
- Click "Download configuration".
- Open the downloaded file and make a note of the following:
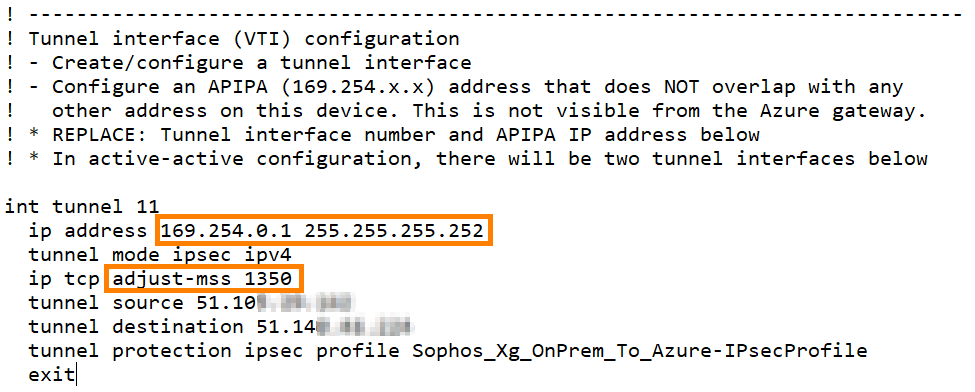
- Scroll down to the "Tunnel interface (VTI) configuration" section.
- Make a note of the interface tunnel IP address and subnet mask
- Also, make a note of the MSS value.
- Both values will be needed to configure the "XFRM tunnel interface" on the Sophos Firewall.
Step 6: Create the VPN connection (Sophos Firewall)
- Log into the WebAdmin of your On-Premises Sophos Firewall.
- Under "Configure", click "VPN" → "IPSEC Connections," → "Add".
- Configure the following settings:
- General Settings
- Name: Input any preferred name.
- Connection type: Tunnel interface
- IP version: Dual
- Gateway type: Initiate
- Activate on save: Selected
- Description: Add a description for the connection.
- Encryption
- Policy: Microsoft Azure
- Authentication Type: Preshared key
- Preshared key: Enter the same preshared key you entered when creating the VPN connection on Azure.
- Repeat preshared key: Confirm the above preshared key.
- Gateway settings
- Listening interface: Select the WAN interface of Sophos Firewall.
- Gateway address: Input the public IP of the Azure VPN gateway that you noted in Step 3 (5).
- Local ID: IP Address
- Remote ID: IP Address
- Local ID: Enter the public IP of the OnPrem Sophos Firewall.
- Remote ID: Input the public IP of the Azure VPN gateway that you noted in Step 3 (5).
- Configuring the "Local Subnet" and "Remote Subnet" isn’t an option. They’ll both be set to "0.0.0.0/0".
- Advanced
- Leave default settings.
- Click "Save".
- Click "OK" when prompted about the "Preshared key".
- The connection must now be active. Click the "red" button under Connection to turn on the connection.
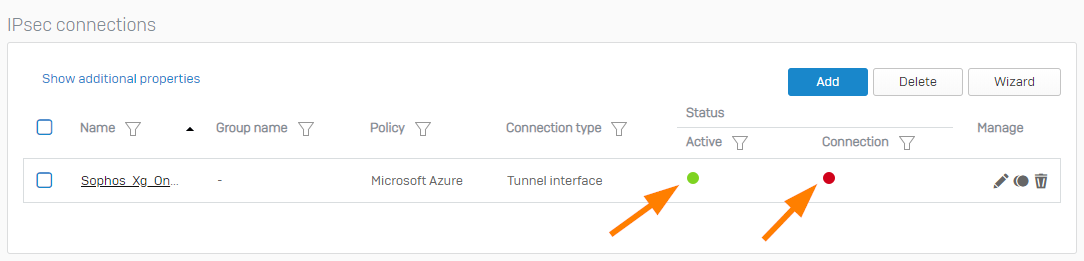
- When prompted, if you're sure that you want to connect, click "OK".
- General Settings
Step 7: Create firewall rules to allow inbound and outbound traffic through the VPN (Sophos Firewall)
- Sign in to the WebAdmin of your On-Premises Sophos Firewall.
- Under "Protect", click "Rules and Policies," → "Add firewall rule," → "New firewall rule".
- In the "Add Firewall Rule" window, configure the incoming firewall rule as follows:
- Rule status: None
- Rule name: azure_to_onprem
- Action: Accept
- Rule position: Top
- Rule group: None
- Log firewall traffic: Selected
- Source
- Source zones: LAN and VPN
- Source networks and devices: Any
- During scheduled time: Leave the default setting
- Destination & services
- Destination zones: LAN and VPN
- Destination networks: Any
- Services: Any
- Leave other settings as default.
- You can configure the security checks of Sophos Firewall for the traffic if you want to.
- Click "Save".
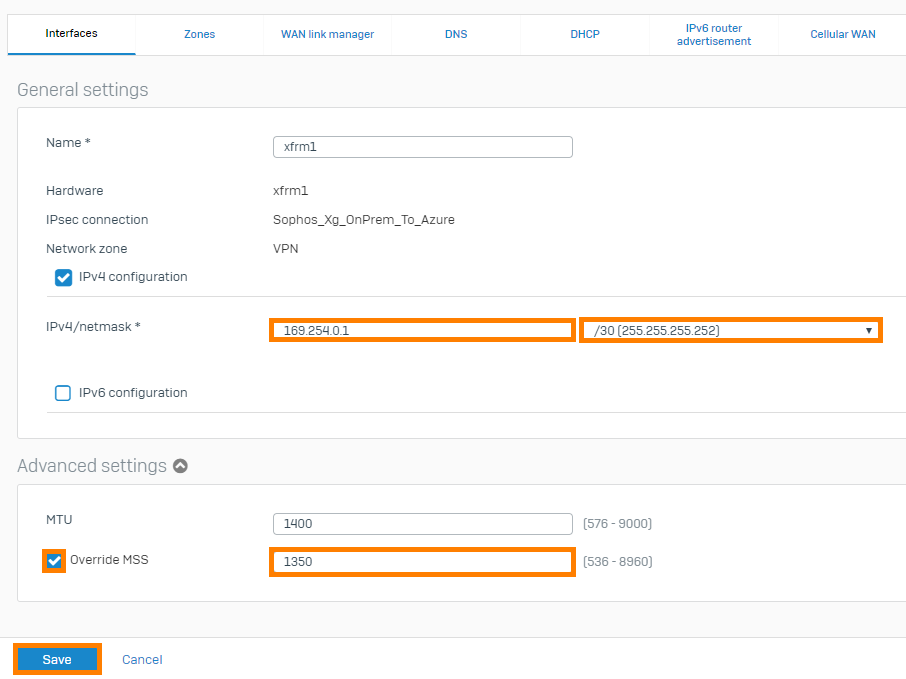
Step 8: Configure the XFRM tunnel interface (Sophos Firewall)
- Sign in to the WebAdmin of your On-Premises Sophos Firewall.
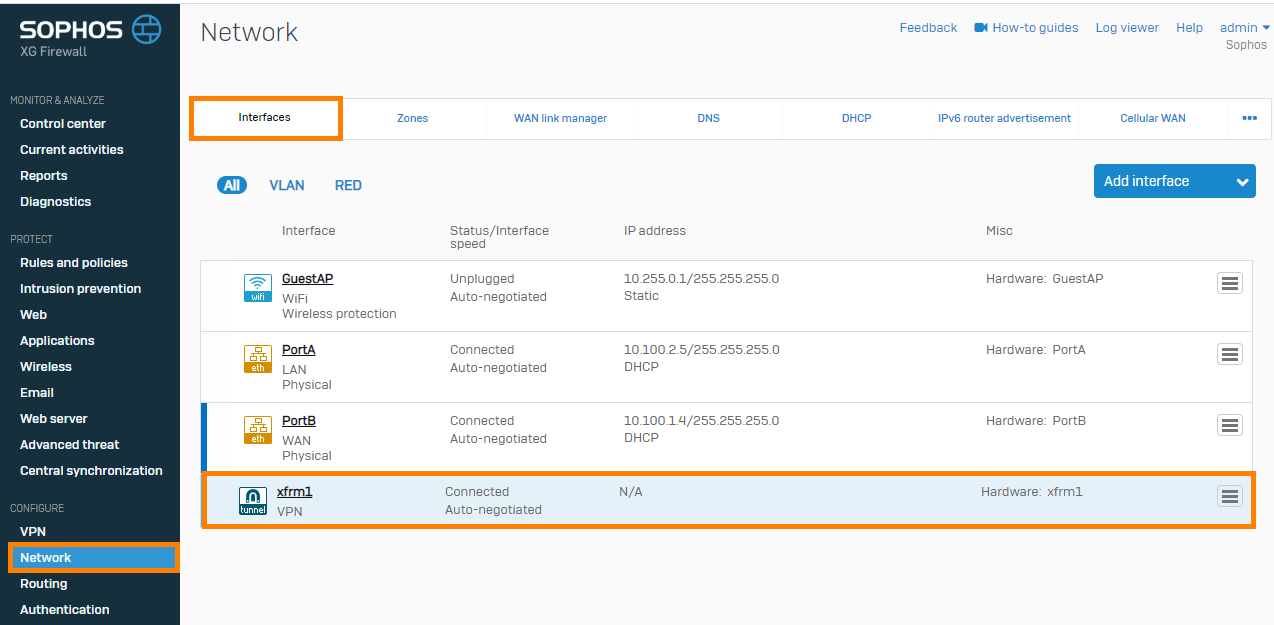
- Under "Configure", click "Network" → under "Interfaces", click the XFRM interface.
- In the "Network" configuration window, configure the following:
- IPv4/netmask: Enter the IP address and select the subnet mask you noted in Step 5 (6).
- Expand "Advanced settings".
- Select "Override MSS" and enter the MSS value you noted in Step 5 (6).
- Click "Save."
- In the "Update interface" prompt, click "Update interface".
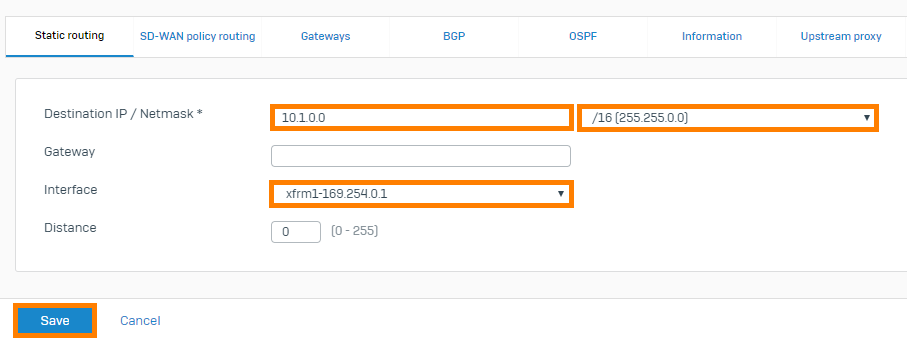
Step 9: Configure static routing to the Azure network (Sophos Firewall)
- Sign in to the WebAdmin of your On-Premises Sophos Firewall.
- Under "Configure," click "Routing." → Under "Static Routing," click "Add."
- In the "Add unicast route" window, configure the following:
- Destination IP/Netmask: Enter your Azure virtual network's network IP and subnet mask.
- Gateway: You can either leave this empty
- OR enter the second IP address in the network you noted in Step 5 (6). For example, the Sophos Firewall tunnel interface in my case is "169.254.0.1" in a "/30" network, so the only other IP in that network is "169.254.0.2". I can enter this if I choose.
- Interface: Select the Sophos's XFRM tunnel interface.
- Distance: Leave default setting.
- Click "Save."
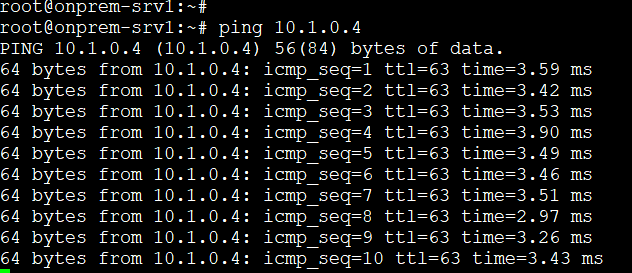
Step 10: Verify the VPN connection
- Do a connectivity test from an on-premise instance to an Azure VM.
- Do a connectivity test from an Azure VM to an on-premise instance.

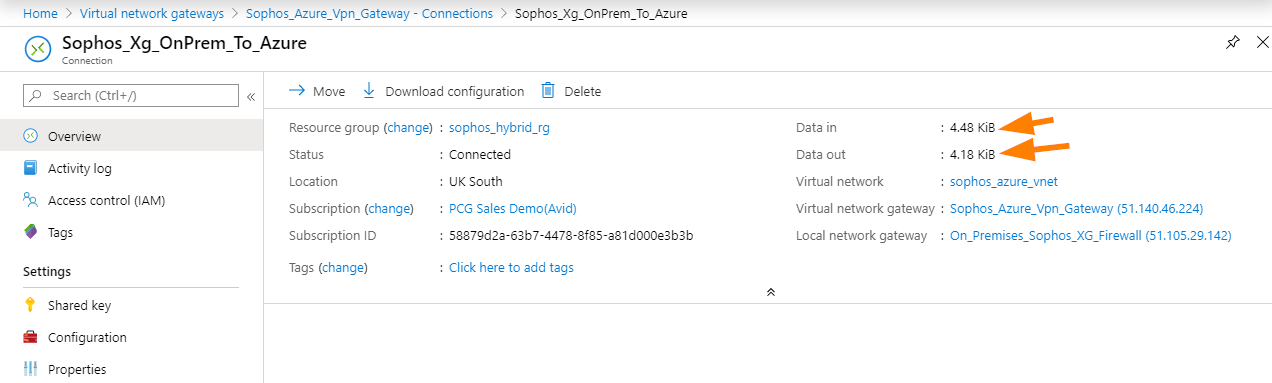
- In the Azure Portal, go to "Virtual network gateways" at https://portal.azure.com and select the virtual network you are connected to.
- In the "VPN Gateway" blade, in the "Settings" section, click "Connections".
- In the "VPN Gateway - Connections" blade, ensure the connection status is "Connected."

- Click the connection and ensure that you're seeing data flow.
- If you see 0B, it doesn't mean that the connection isn’t working. It just means that no data flow has been detected on the Azure side.
- If you see 0B, it doesn't mean that the connection isn’t working. It just means that no data flow has been detected on the Azure side.
Things to watch out for
- Network Security Groups in Azure
- If a network security group is configured to block ports you're attempting to connect on, this will cause issues.
- Route Table configuration in Azure
- By default, the VPN Gateway automatically advertises the VPN subnets to the vNet route tables, but watch out if you have user-defined routes that could override this.
- A public routable IP address interface is required on the on-premises Sophos Firewall since Azure doesn’t support NAT. For more information, see Azure VPN Gateway FAQ.
- If the on-premises Sophos Firewall is behind a NAT device, it is recommended that the VPN connection be deployed using Sophos Firewall in Azure. For instructions on how to deploy Sophos Firewall on Azure, see Sophos Firewall on Azure: How to Deploy.
- To avoid triggering false alerts in Sophos Central, change the re-key timers on Sophos Firewall (initiator) to lesser values than what is used in Azure.
- Azure must re-key the IKE_SA by deleting the expired IKE_SA and creating a new connection, which leads to some seconds of downtime.
- Azure tends to use SHA1 if not forced by the on-premises Sophos Firewall to use SHA2.
Edited Pre-Requisites
[edited by: emmosophos at 4:43 PM (GMT -8) on 17 Dec 2024]
