Disclaimer: This information is provided as-is for the benefit of the Community. Please contact Sophos Professional Services if you require assistance with your specific environment.
Overview
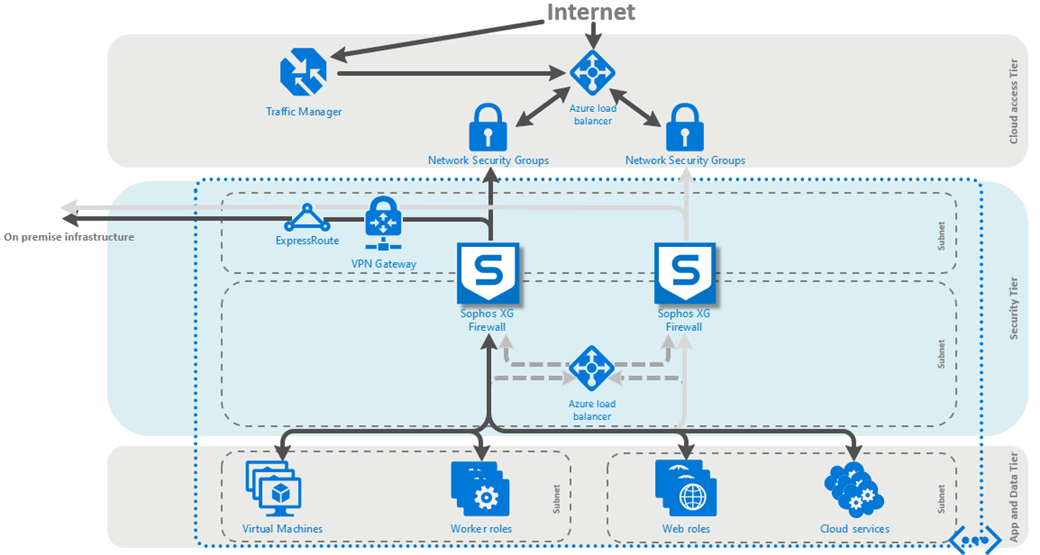
This article describes how to implement a full Active/Active HA for Sophos Firewall on Azure. The deployment makes use of the new Azure standard load balancer with its HA ports feature for outbound load distribution.
Note:
- A separate license will be needed for each instance of the Sophos Firewall appliance (for BYOL).
- Only an active/active solution is supported (no active/passive solution).
- The deployment automates the addition of the needed routes to the load balancers by using Azure automation runbooks.
- This deployment assumes the use of a /16 subnet space for the vNet, and a /24 subnet space for the LAN and WAN subnets. If you wish to use different subnet sizes, contact your Sophos account representative before modifying the provided template.
- The load balancers will use TCP ports 4444 and 3128 for the respective external and internal health checks. Make sure that your Sophos Firewall and security group configurations allow access to these ports, or modify the load balancer health check(s) after deployment to match your desired port(s). When modifying the health check, please make sure the internal and external checks use different ports.
Table of Contents
- Overview
- Product and Environment
- Deploy the full HA solution template
- Connecting to the Sophos Firewall instances after deployment
- Verify the needed routes were added by the Azure automation runbook
- Verify that the Sophos Firewall instances are responding to health probes
- Firmware upgrade behaviour
- Related information
Product and Environment
Sophos Firewall
Deploy the full HA solution template
Log into the Azure Portal and open another browser tab to browse to the following URL: https://github.com/sophos-iaas/Sophos-azure-aa.
Scroll down the page and click on the Deploy to Azure button. This will open up the template in the Azure portal.
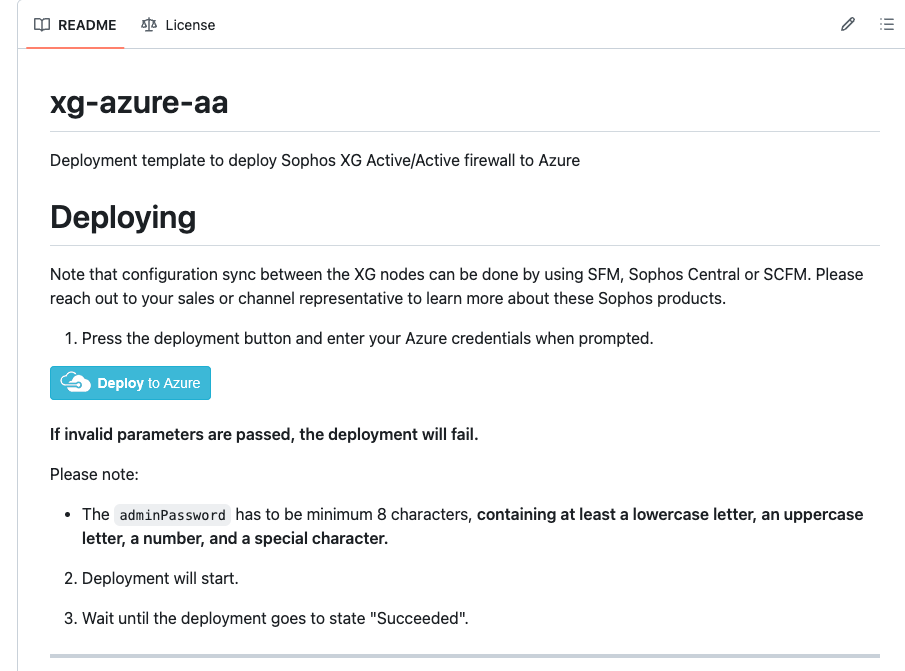
In the Custom deployment window, configure the following:
- Subscription: Select the subscription that you want this resource to be associated with
- Resource group: Select Create new and enter the following: sophosSophos-ha-poc-rg (feel free to follow your preferred naming convention)
- Location: Select the Azure region that you want to deploy the resource to
- Base URL: Leave the current configuration
- VM Name: Configure a VM name according to your naming convention E.g do-sophosSophos.
- Admin Password: Enter a complex password (make a note of this password as it will be needed for the initial logon)
- Image Sku: Select BYOL if you're using a license that you bought from a Sophos partner or from Sophos. Select PAYG if you'll be paying for the license as part of your Azure charges
- Vm Size: Enter the Azure VM size that you want - docs.microsoft.com/.../sizes-general (The size must support a minimum of 2 NICs) E.g. Standard_F2s
- Net New Or Existing: Select new if you'll like to deploy into a new vNet or existing if you have an existing vNet
- Net RG: The resource group of the new or existing network
- Net Name: The name of the new or existing virtual network
- Net Prefix: The network portion of the CIDR address space of the new or existing virtual network (will be appended by /16)
- Wan Name: The name of the new or existing front end (WAN) subnet
- Wan Prefix: The subnet portion of the CIDR address space of the new or existing front end (WAN) subnet (will be appended by /24)
- Lan Name: The name of the new or existing back end (LAN) subnet
- Lan Prefix: The subnet portion of the CIDR address space of the new or existing back end (LAN) subnet (will be appended by /24)
- Loadbalancer Int IP: The IP address of the internal (outbound) load balancer. The IP must be in the range of the LAN prefix
- Public Ip New Or Existing: Select new if you'll like to create a new public IP or existing if you have an existing public IP
- Public Ip RG: The resource group of the new public IP resource (typically the same resource group as above)
- Public Ip Name: The name of the new or existing public IP resource
- Public Ip DNS: The DNS name record that will be created in a Microsoft owned DNS zone. This must be something unique across the entire DNS zone (recommended to add random numbers to guarantee uniqueness). Specify the existing DNS name if it is for an existing public IP address.
- Storage New or Existing: Select new if you'll like to create a new storage account or existing if you have an existing storage account
- Storage RG: The resource group that contains the new or existing storage account
- Storage Name: The name of the new or existing storage account where the virtual machine disk will be stored
- Storage Type: Standard or Premium; LRS, ZRS, GRS, RA-GRS E.g. "Standard_LRS"
- Location: Specify a custom location or leave as it is to deploy to the same location as the resource group
- Nic Wan: The name of the front end (WAN) NIC of the Sophos Firewall
- Nic Lan: The name of the back end (WAN) NIC of the Sophos Firewall
- Network Security Group New Or Existing: Select "new" if you'll like a new network security group to be created or "existing" if you have an existing network security group that you'll like to use
- Network Security Group Name: The name of the network security group that will be associated with the front end (WAN) NIC of the Sophos Firewall
- Trusted Network: The host (IP) or CIDR network range that should have administrative access to the Sophos Firewall (use * for any). Note: Please leave this set to * for any. The Azure Automation account uses Azure public IP addresses for the connection. Restricting this will cause the runbook connection to fail. You can tighten the NSG after successful deployment.
- Availability Set New Or Existing: Select "new" if you'll like a new availability set to be created or "existing" if you have an existing availability set
- Availability Set Name: The name of the new or existing availability set that the Sophos Firewalls will be deployed in
- Number Of Instances: The number of Sophos Firewalls that you'll like to deploy in the availability set. The template limits this to a maximum of five (5) but the value can be modified in the template as needed
- Automation Account New Or Existing: Select new if you'll like a new automation account to be created or existing if you have an existing automation account
- Automation Account Name: The name of the new or existing automation account that will be used to execute post deployment configuration runbook
- Azure automation accounts are currently supported in selected regions - Visit for more information Products available by region
- Ensure that a supported location is selected
In the Terms and Conditions section, tick the checkbox to agree to the terms and click on Purchase

Connecting to the Sophos Firewall instances after deployment
WebAdmin access to the Sophos Firewall instances
If the deployment is successful, you will be able to connect directly to the WebAdmin of each Sophos Firewall instance using TCP ports 4444, 4445, 4446 respectively.
For example:
- WebAdmin of the first Sophos Firewall instance can be reached on https://<public IP>:4444
- WebAdmin of the second Sophos Firewall instance can be reached on https://<public IP>:4445
- WebAdmin of the third Sophos Firewall instance can be reached on https://<public IP>:4446
SSH access to the Sophos Firewall instances
If the deployment is successful, you will be able to connect directly to the SSH of each Sophos Firewall instance using TCP ports 2222, 2223, 2224 respectively.
For example:
- SSH of the first Sophos Firewall instance can be reached on TCP port 2222
- SSH of the second Sophos Firewall instance can be reached on TCP port 2223
- SSH of the third Sophos Firewall instance can be reached on TCP port 2224
Verify the needed routes were added by the Azure automation runbook
Connect to the Sophos Firewall appliance via SSH
Run the following command:
ssh admin@<public IP> -p 2222
Enter yes when prompted regarding the authenticity of the host
Enter the admin password when prompted

Navigate to the advanced shell of the firewall
In the console window, type 5 and press Enter to select Device Management

Type 3 and press Enter to select Advanced Shell

Verify routing for the Azure Magic IP 168.63.129.16
Type the following command:
ip rule show
Verify that an ip rule exists that maps traffic between the Sophos Firewall’s LAN IP (10.42.2.5 in this example) and the Azure Magic IP (168.63.129.16) to route table (“lookup”) 200.

Next, type the following command to display the contents of table 200:
ip route show table 200
Verify that the default route matches the Sophos Firewall’s LAN adapter subnet gateway (by default this is the first IP address of the subnet in Azure, in our example this is 10.42.2.1).

Repeat the above steps for the remaining Sophos Firewall appliances. Remember to use the right SSH ports to connect to each of them.
Verify that the Sophos Firewall instances are responding to health probes
The health probe status metric describes the health of the Sophos Firewall instances according to the load balancer health probe configuration. The Azure load balancer uses the status of the health probe to determine where to send new flows. Health probes originate from an Azure infrastructure address and are visible within the OS of the VM.
Some reasons why health probes may fail include:
- You configure a health probe to a port that is not listening or not responding or is using the wrong protocol. If your service is using direct server return (DSR, or floating IP) rules, make sure that the service is listening on the IP address of the NIC's IP configuration and not just on the loopback that's configured with the front-end IP address.
- Your probe is not permitted by the Network Security Group, the VM's guest OS firewall, or the application layer filters.
- The special routes injected by the automation runbook are not firmware-upgrade persistent. So, after the firewall firmware upgrade activity, ensure to rerun the runbook automation, in order to inject the special routes for internal load balancer again.
In the Azure Portal, go to Load balancers to select any of the load balancers that you want to verify.
In the monitoring section, click on Metrics.

In the Loadbalancer - Metrics window, select the Health Probe Status metric with Avg aggregation type.

We can apply a filter on the required Backend IP address of the Sophos Firewall instances or port (or both).

Note: The graph may fluctuate but this does not matter as long as the probe status does not get to 0 which is when it is removed from the pool of healthy instances.
Firmware upgrade behaviour
The routes related to magic IP 168.63.129.16 are specially injected to the kernel routes for successful health probes of Internal Load balancer and these routes are not firmware-upgrade persistent.
So once the firmware version of the firewall VMs is upgraded, it loses these routes from its routing table and hence the health status of Internal Load Balancer shows unhealthy or 100% loss for both the firewall VMs. This will lead to users losing their access internet.
To make the Internal Load Balancer’s probe healthy again, you need to perform following steps:
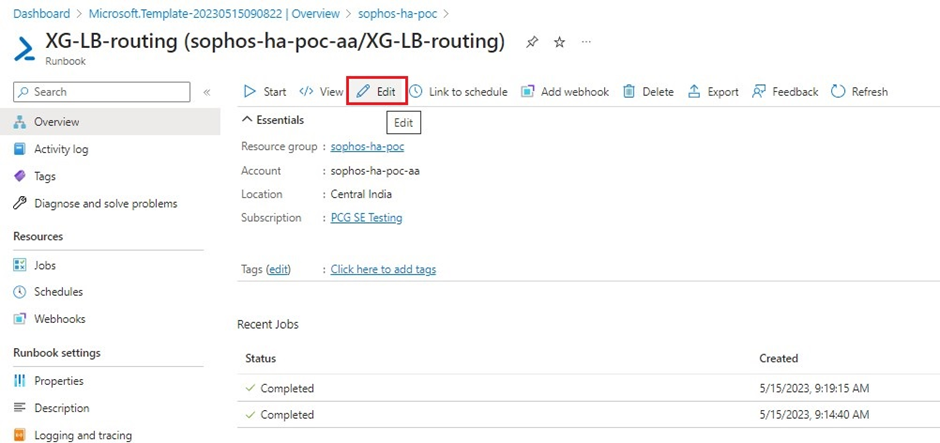
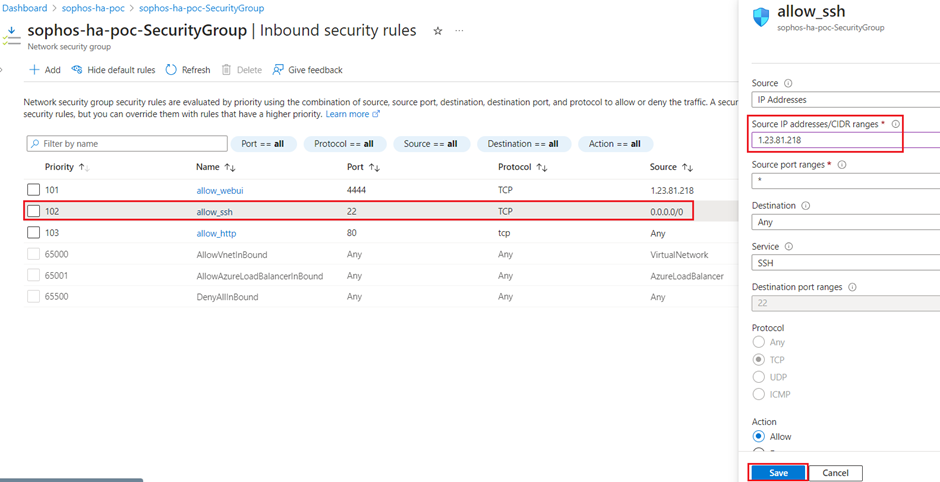
- Open the Network Security Group associated with the firewall VMs and for the Inbound security rules, allow 0.0.0.0/0 IP for port 22(temporarily).
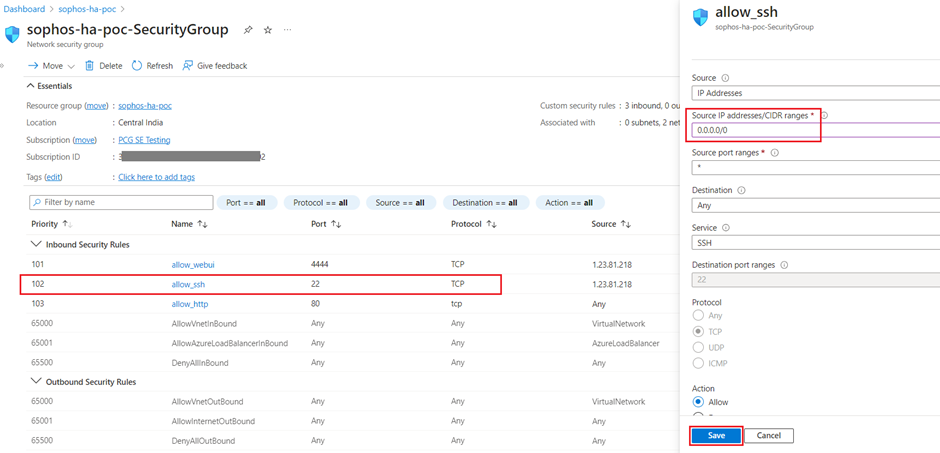
- Find the Runbook in the resource group and click on it.

- Click on Edit option at the top.
- Add # letter in front of each command starting from line number 20 till line number 24, so that these commands would be considered as comments.
After making these changes, click on Save button and then click on Publish button, so that the updated script comes into action during next runbook execution cycle.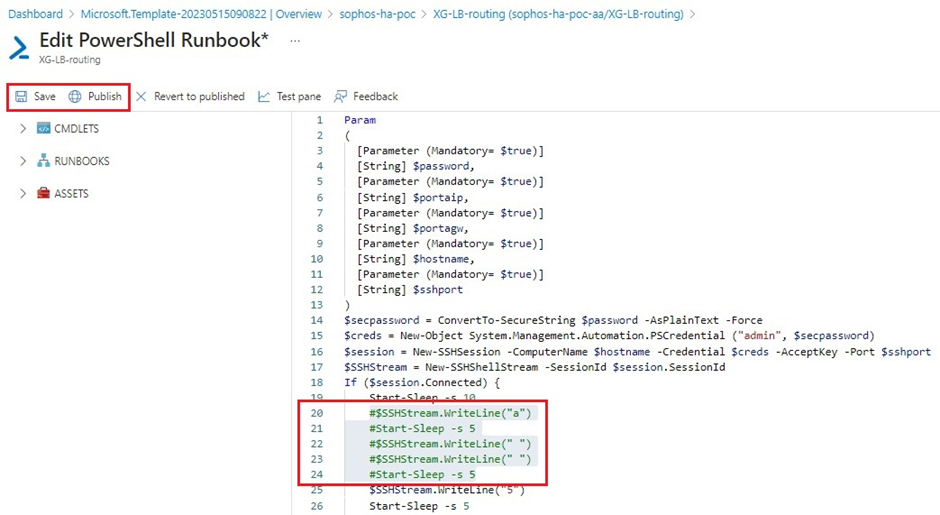
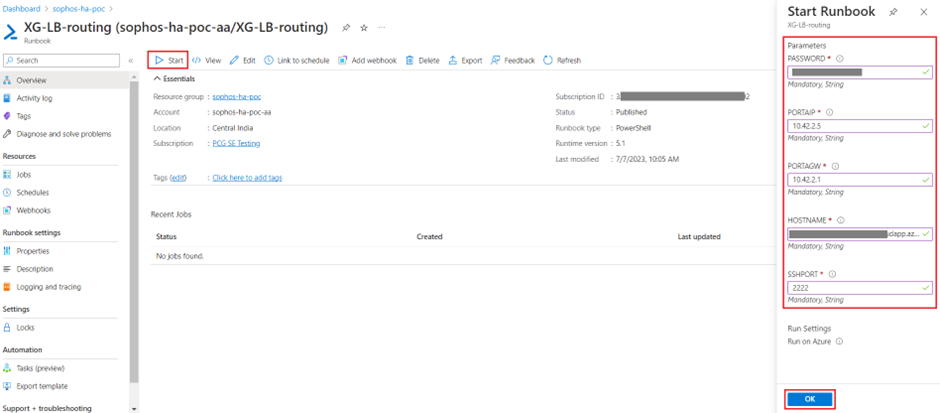
- Click on Start button, enter the details associated with the first firewall VM for each parameter and then click on OK.
PASSWORD: The password of username admin.
PORTAIP: The private IP address of PortA (LAN interface).
PORTAGW: Usually this is the first IP (x.x.x.1) of the subnet associated with LAN interface.
HOSTNAME: The DNS name or the public IP address of Firewall VM.
SSHPORT: This is the external-facing port number to access SSH of Firewall VM.
SSHPORT: This is the external-facing port number to access SSH of Firewall VM.
If the script is executed successfully, it will show the status as Completed and reboot the firewall VM.
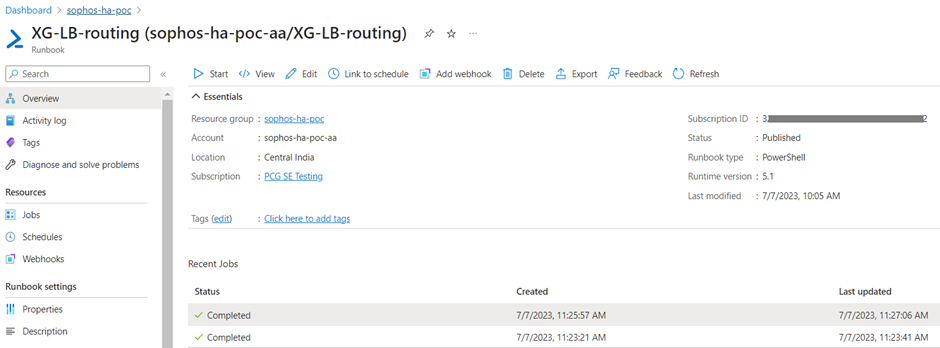
This will re-inject the routes associated with magic IP168.63.129.16 for a successful health probing of Internal Load Balancer.
- Repeat the same script-execution activity for secondary firewall VM (after upgrading the firmware) by clicking on Start and entering the details associated with secondary firewall VM.
- After this activity, the health probe of Internal Load Balancer for both the firewall VMs will be restored to 100% and it can be verified by clicking on Internal Load Balancer.

- Click on Insights section and it will show you 100% healthy with green tick mark on both the firewall VMs.
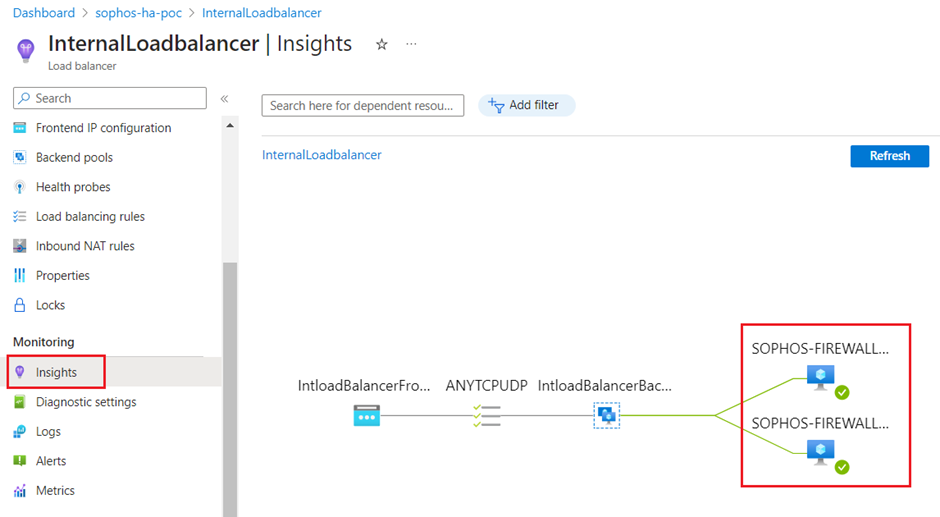
Moreover from traffic flow perspective, the internet connectivity will be restored for the users.
- Revert the access of port 22 to the whitelisted or allowed IP address for the Network Security Group.
Related information
Previous article ID: 133755
Added TAGs
[edited by: Raphael Alganes at 5:16 AM (GMT -7) on 18 Sep 2024]


