

Disclaimer: This information is provided as-is for the benefit of the Community. Please contact Sophos Professional Services if you require assistance with your specific environment.
Table of Contents
Overview
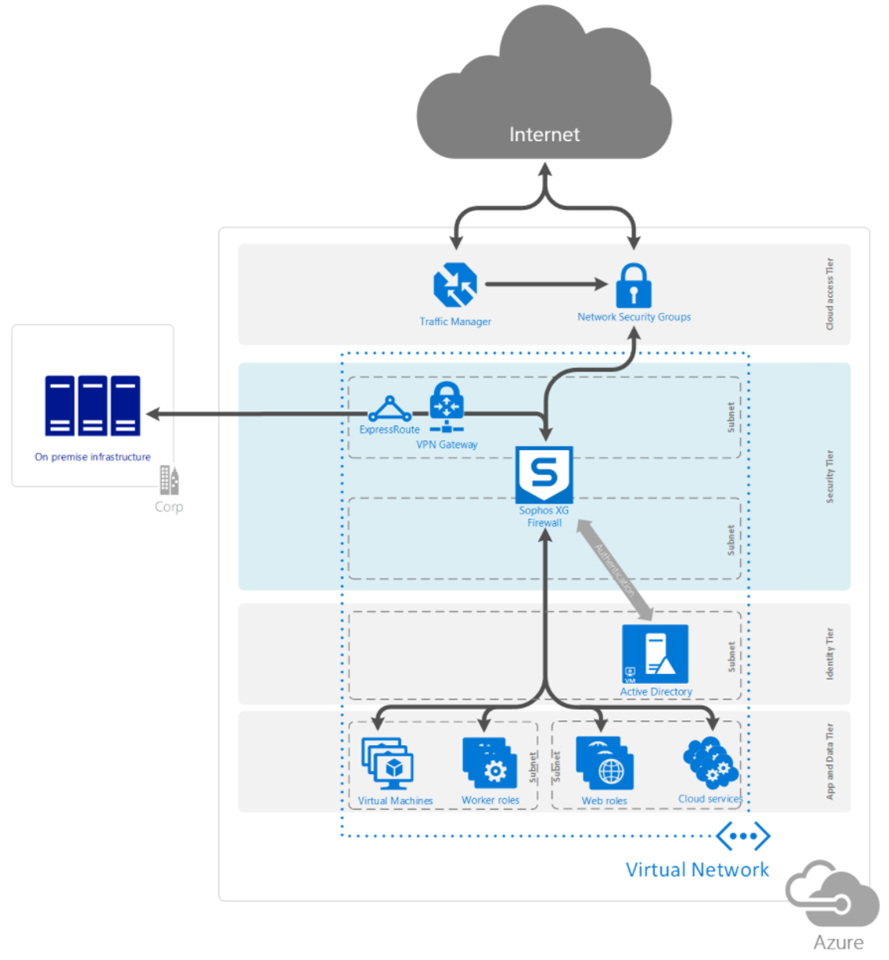
This recommended read details how to set up the Sophos Sophos Firewall DMZ in Microsoft Azure using a dual NIC architecture. This architecture has the benefit of being able to use Sophos Synchronized Security.
The DMZ can be deployed as a private DMZ or a public DMZ:
- A private DMZ is the security tier that handles connectivity to the outer world i.e. the Internet.
- A public DMZ is the security tier that handles hybrid connectivity.
Microsoft recommends that private and public DMZs be separated.
This applies to the following Sophos products and versions
Sophos on Azure Marketplace
Prerequisites
- Microsoft Azure subscription.
- Sophos Sophos Firewall serial number obtained from a Sophos Partner or Sophos Sales for BYOL (Bring Your Own License). PAYG doesn’t need This serial number (Pay As You Go). You can also register for a free evaluation serial number.
- An existing Sophos ID account.
- A Sophos Central account with Sophos Central Server Advanced Licensing. You can sign up for a free trial.
Deployment of Sophos Firewall on Azure
The Sophos Sophos Firewall can be deployed to Azure using different methods: via the Azure marketplace, from the Sophos Iaas GitHub page, using Powershell, using the Azure CLI, and using an ARM template. The Azure marketplace is used for this deployment, but a different deployment scenario may be more suitable for your environment. For example, if you're looking to automate your deployment process, using an ARM template, Powershell or Azure CLI may be more suitable for your scenario.
Two licensing options are available for the Sophos Firewall on Azure: BYOL and PAYG. More information about licensing is available on the FAQ page.
We used the BYOL option in this task, but you can also select the PAYG option. As part of this process, we created a new resource group to use as a container for all resources that will be created, and this is so that we can remove the resources easily afterward.
- Go to the Azure Portal and click Create a resource in the upper left corner. In the search bar, type Sophos, press enter, and select Sophos Sophos Firewall.
- In the Sophos Sophos Firewall blade, click Create.
- In the Create Sophos Sophos Firewall blade, Basics section, configure the following:
- Subscription: Select the subscription you want this resource to be associated with.
- Resource group: Select Create New and choose a name like sophosSophos-poc-azure-rg (feel free to follow your preferred naming convention).
- Region: Select the Azure region that you want to install the resource to.
- VM Name: sophosSophosAzureFw01.
- Password: Enter a complex password (make a note of this password).
- Confirm password: Confirm the complex password that was previously entered.
- Click Next: Instance Details.
- In the Create Sophos Sophos Firewall blade, under the Instance Details section, set the following:
- License Type: BYOL or PAYG (You must have an existing serial number to activate a BYOL deployment).
- Virtual machine size: Click Choose a size. Search for D2_v2, select D2_v2, and click Select to proceed. Refer to Purchasing Sophos on Azure to select any supported VM sizes.
- Virtual Network: Click on Create new and configure the following:
- Name: sophosSophos-azure-vnet.
- ADDRESS SPACE:
- Address range: 10.10.0.0/16 (feel free to use your preferred IP address scheme).
- SUBNETS:
- Subnet name: sophosSophos-public-dmz-frontend.
- Address range: 10.10.254.0/24.
- Subnet name: sophosSophos-public-dmz-backend.
- Address range: 10.10.1.0/24.
- Click OK.
- Public IP name: Click on Create new and configure the following:
- Name: sophosSophosAzureFw01-pip.
- SKU: Basic
- Assignment: Static.
- Click OK.
- Domain name: Enter a unique domain name (this name must be unique across the entire <azure region>.cloudapp.azure.com domain namespace).
- Storage Account: Click on Create new and configure the following:
- Name: sophosSophospocstoreXXXX (add a random number that says XXXX to have a unique name across the entire core.windows.net domain namespace).
- Account kind: Storage (general purpose v1)
- Performance: Standard.
- Replication: Locally-redundant storage(LRS).
- Click OK.
- Click Next: Review + create >.
- Ensure that the validation passes and click Create. If there’s a failure, review the failure message and return it to the necessary node to fix the issue.
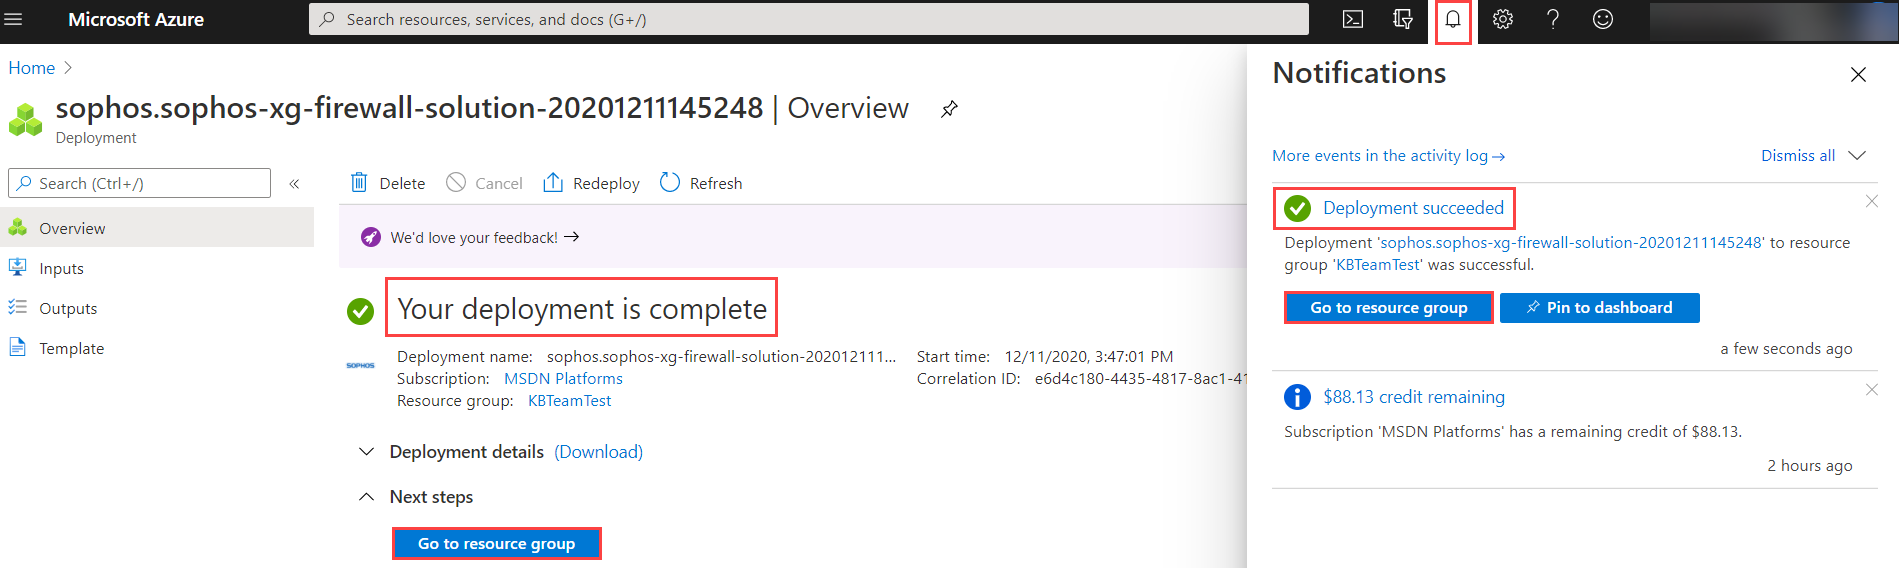
- The deployment will now be in progress. Optionally, click the top right corner on the notification button, then click Deployment in progress to view and monitor the deployment.
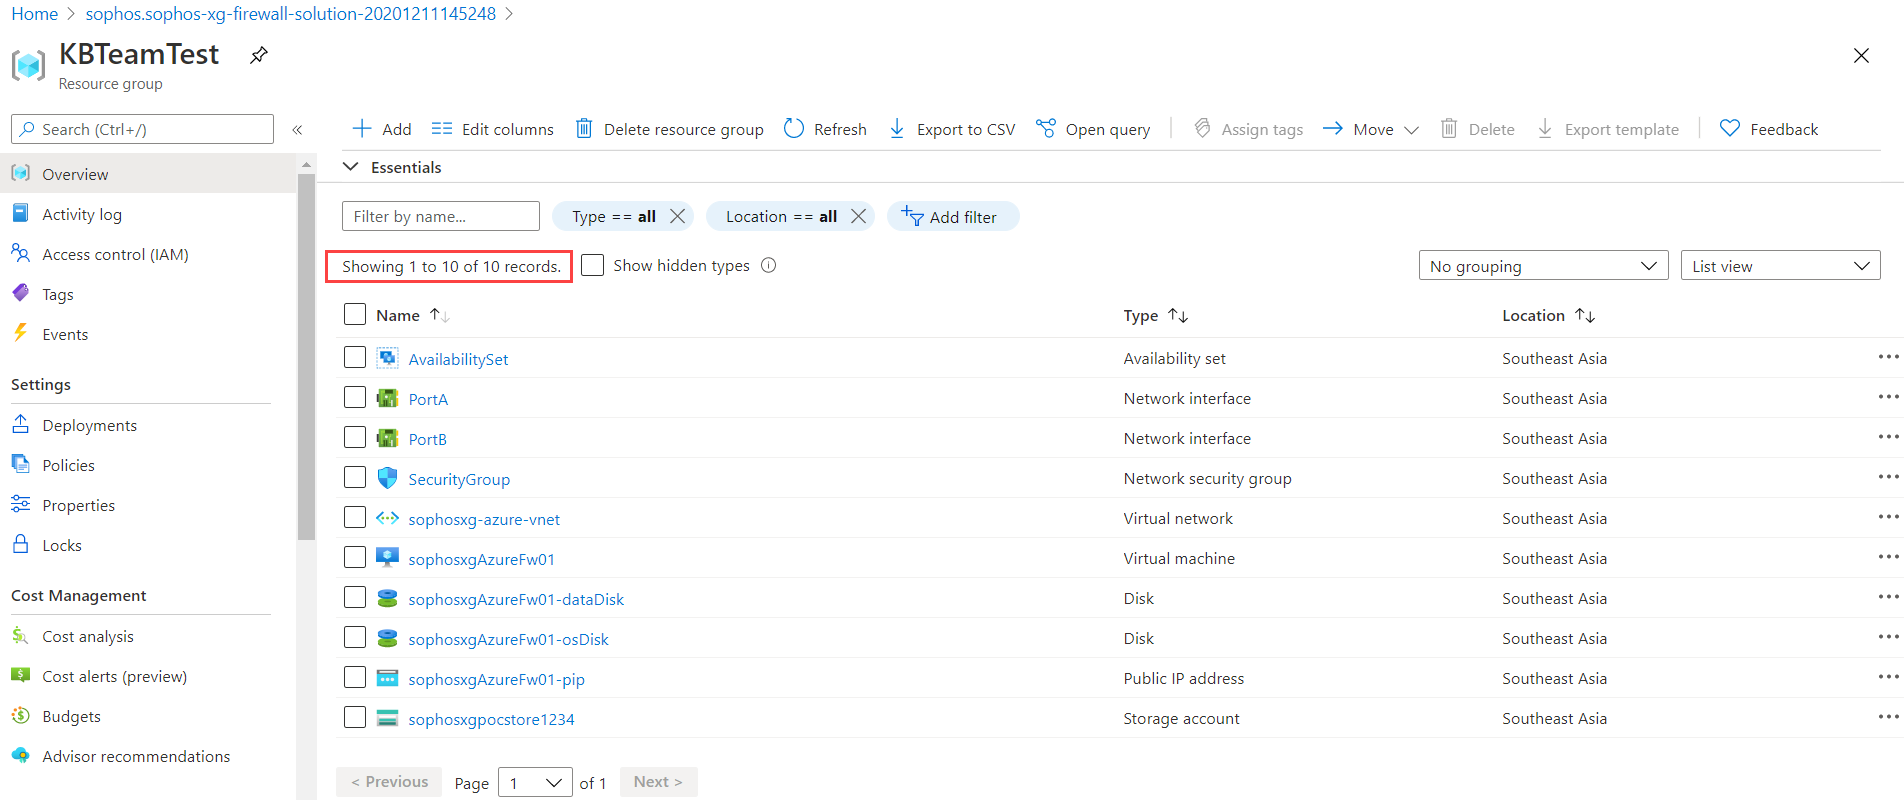
- Wait until the deployment succeeds before proceeding, then click Go to resource group.
- Verify that you have ten items in the resource group.
Configure the Sophos Sophos Firewall
After deploying the Sophos Firewall, it must be activated and synchronized (for BYOL deployment) before we can configure its security and networking features.
Activate the Sophos Firewall
The following steps will be done only if you select the BYOL deployment model. It’sn’t needed for the PAYG deployment model.
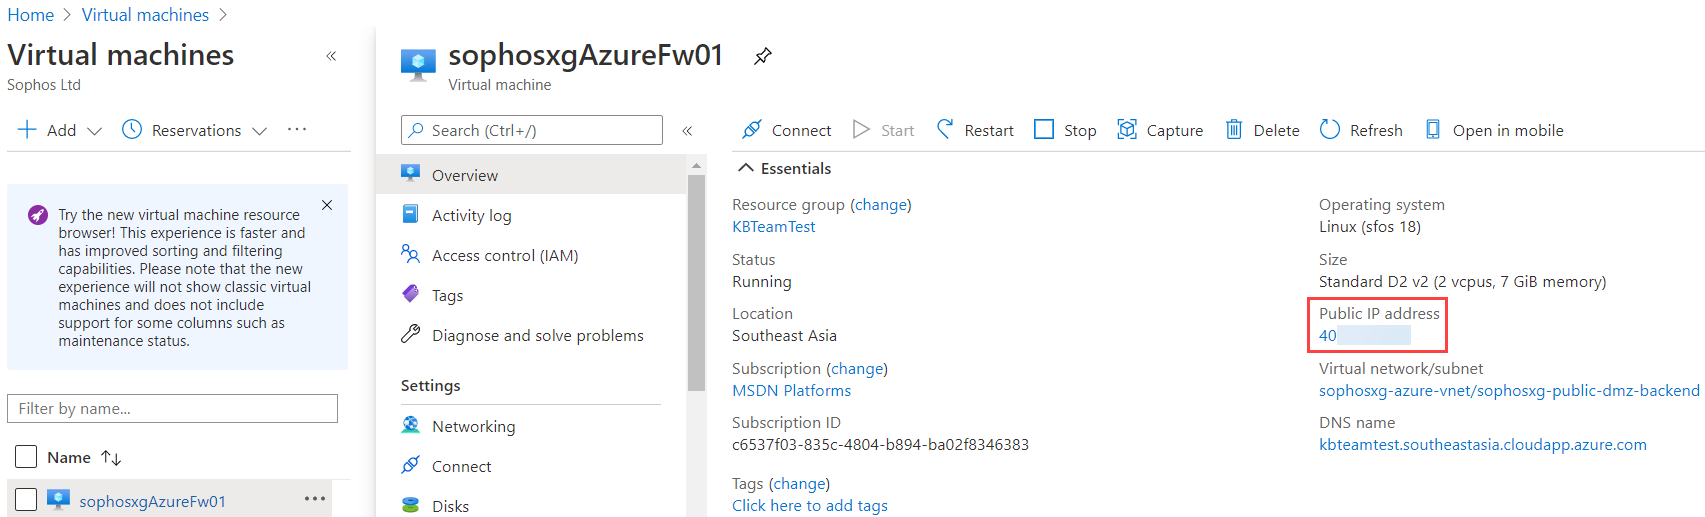
- In the Azure Portal, click Virtual machines, select sophosSophosAzureFw01, and click Overview to make a note of the public IP address of the Sophos Firewall.
- Open a new browser tab and type https://<public ip address>:4444. This opens the WebAdmin page of the Sophos Sophos Firewall deployed earlier (sophosSophosAzureFw01). Since you're accessing the Device Management user interface for the first time, you’ll see a security alert. This indicates that the software requires a certificate; click the Advanced or Proceed link (the display alert varies based on your browser).
Note: Ensure you’re accessing this from a network allowing TCP port 4444 outbound to the internet.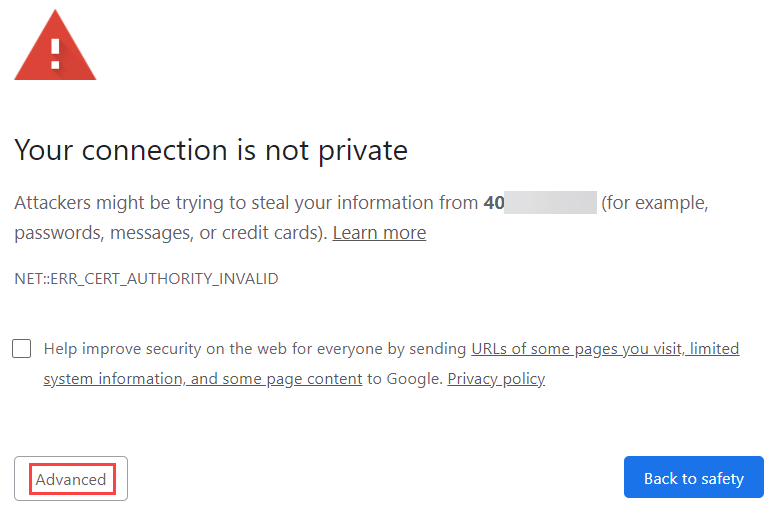
- Enter the username admin and the password set earlier in the deployment.
- Accept the Sophos End-User License Agreement.
- Once logged in successfully, follow Sophos Firewall: How to register and activate your Sophos Firewall after a fresh installation to complete the activation process.
Perform basic configuration on the Sophos Firewall
Traditional networking vs software-defined networking
Most of the Network/System Engineers and Architects are familiar with traditional network architectures that require the different networks that will be protected to terminate at a physical or logical network interface behind the Sophos Sophos Firewall. While this architecture is possible with the Sophos Sophos appliance in the Azure public cloud (please refer to Sophos documentation and videos on how to configure this), this architecture isn’t scalable, and it limits the ability of organizations to take advantage of the benefits of adopting a public cloud strategy like agility and automation. In this task, we’ll complete the following:
- Update the firmware of the appliance.
- Turn on Logging on the Sophos firewall.
- Change the gateway failover rule on the Sophos Firewall to avoid getting the interface error message on the dashboard.
- Change the default network security group of the WAN NIC to allow all traffic from the CIDR range that will be used in this example.
Update the firmware of the Sophos Sophos Firewall by following the instructions on How to upgrade the firmware automatically.
Turn on logging on the Sophos Firewall (we need this for later verification of different features. It's also advisable to configure syslog on the Sophos to ensure that the logs are centrally stored).
- Log into the graphical user interface (GUI) of the sophosSophosAzureFw01 firewall at https://<public ip address>:4444.
- Go to System Services> Log settings to select all and click Apply.
- Click OK when prompted.
- Change the gateway failover rule on the Sophos Firewall. If this isn’t completed, you may get a similar alert on the Sophos dashboard as shown in the picture below. This step will disable ICMP monitoring of the default gateway, as Azure default routers can't be pinged. For more information about Azure routers, refer to Azure Virtual Network's frequently asked questions (FAQ).
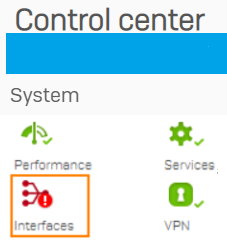
- Go to Routing > Gateways and edit the IPv4 gateway.
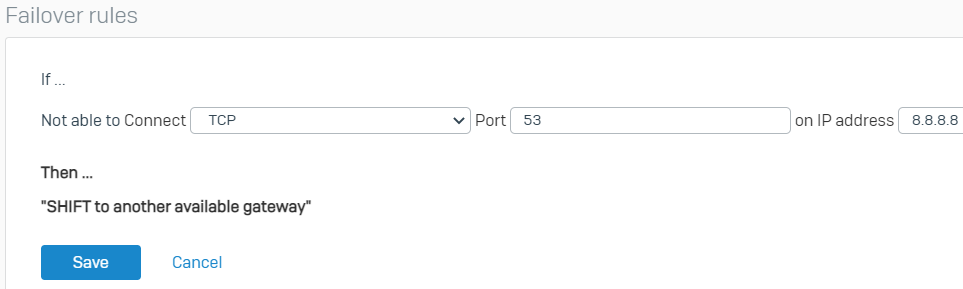
- Click Edit under the Failover rules section.
- Change the protocol from PING to TCP, the port from * to 53, and the IP Address to 8.8.8.8 (you can use any host or port you want for monitoring as long as it's reachable). Click Save and click OK at the prompt to save the new failover rule.
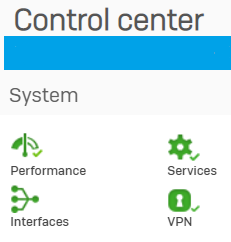
- Go back to the Webadmin dashboard to verify the status of the interface which should now be green.
- Change the default network security group of the WAN NIC of the Sophos Firewall to allow management traffic only from trusted IP addresses. This is to further lock down and ensure that traffic is forced to be routed through the Sophos Firewall for inspection.
- From the Azure Portal, go to All resources > SecurityGroup > Inbound security rules and click allow_webui rule to edit it.
- In the allow_webui blade, make the following modifications:
- Source: Change from Any to IP Addresses.
- Source IP addresses/CIDR ranges: Input your trusted public IP range in CIDR format (e.g. 1.1.1.1/32).
- Leave the other settings as they’re.
- Click Save.
- Click allow_ssh to edit the rule and make the following modifications:
- Source: Change from Any to IP Addresses.
- Source IP address range: Input your trusted public IP range in CIDR format (e.g. 1.1.1.1/32).
- Leave the other settings as they’re.
- Click Save.
- Change the default network security group of the WAN NIC of the Sophos Firewall to allow RDP traffic only from trusted IP addresses. Port forwarding will be turned on to a backend jump host using RDP later in this documentation.
- From the Azure Portal, go to All resources > SecurityGroup > Inbound security rules and click Add.
- In the Add inbound security rule blade, configure the following:
- Source: Change from Any to IP Addresses.
- Source IP address range: Input your trusted public IP range in CIDR format (e.g. 1.1.1.1/32).
- Source port ranges: *.
- Destination: Any.
- Destination port ranges: 3389.
- Protocol: TCP.
- Action: Allow.
- Priority: Leave the default setting.
- Name: allow_rdp.
- Leave the other settings as they are..
- Click Add.
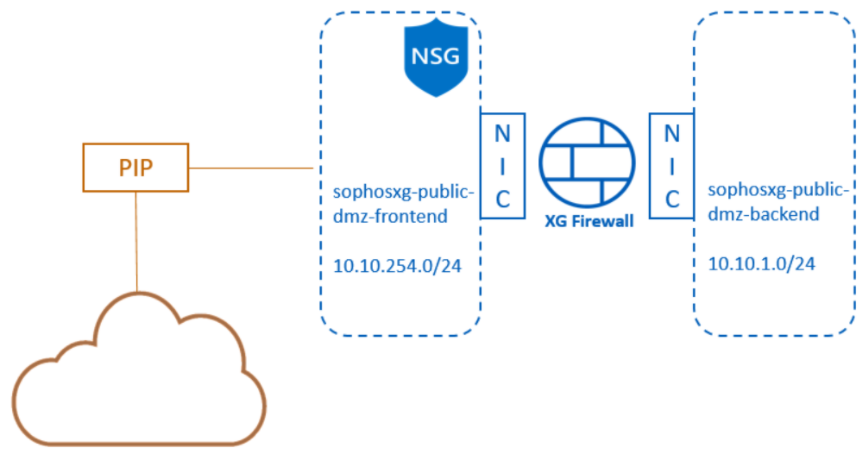
What we have so far
After completing all the steps above, we have the architecture below:
- A single Sophos firewall with two NICs.
- The WAN NIC is connected to the sophosSophos-public-dmz-frontend subnet.
- The LAN NIC is connected to the sophosSophos-public-dmz-backend subnet.
- The sophosSophos-public-dmz-frontend subnet has the SecurityGroup NSG associated with it.
- The WAN NIC is associated with a public IP address resource.
Create a management subnet and configure traffic to flow through the Sophos Firewall DMZ.
This subnet can be used for VM implementation that hosts management and monitoring capabilities for the components running in the VNet. In this scenario, we will deploy a Windows server as a Jumphost into this subnet.
Create a new web applications subnet.
- From the Azure Portal, go to All resources > sophosSophos-azure-vnet > Subnets. In the sophosSophos-azure-vnet | Subnets blade, click + Subnet to add a new subnet to the virtual network.
- In the Add subnet blade, configure the following:
- Name: management-subnet.
- Subnet address range: 10.10.253.0/24.
- NAT gateway: None
- Network security group: None.
- Route table: None.
- Leave the other settings as they are.
- Click Save.
Deploy a Windows server into the new subnet (as a jump host)
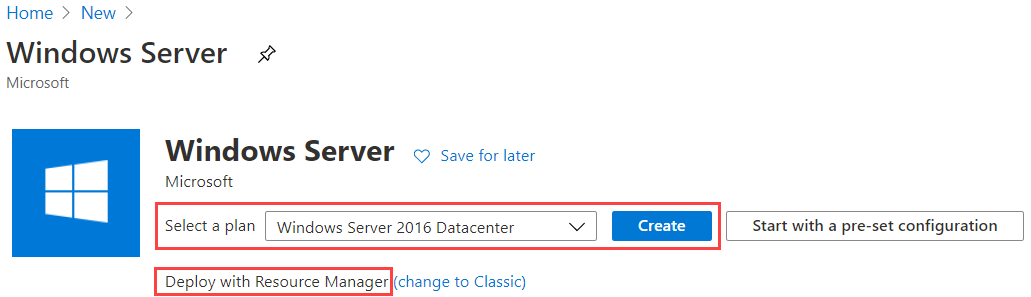
- From the Azure Portal, click Create a resource, type Windows Server into the search box, and press enter.
- In the Select a Plan field, select Windows Server 2016 Datacenter.
- Ensure that the deployment is Deploy with Resource Manager, then click Create.
- In the Create a virtual machine blade, in the Basics section, configure the following:
- Subscription: Select your subscription.
- Resource group: Use existing and select the sophosSophos-poc-azure-rg.
- Virtual machine name: mgmt-srv-1
- Region: Automatically populated (make sure it is in the same location as other resources).
- Availability options: Availability zone.
- Availability zone: 1
- Image: Windows Server 2016 Datacenter - Gen1
- Azure Spot instance: Disabled
- Size: Click Select Size and select the Standard_D2s_v3 size (or any other size you prefer).
- Username: azureadmin
- Password: Type a complex password (Note the password you use as you’ll need it later).
- Confirm password: Confirm the complex password.
-
Public inbound ports: None
- Would you like to use an existing Windows Server license?: If you already have a valid license agreement with Microsoft, click Yes to save on licensing costs. Select No and confirm with your Microsoft reseller if you’re not sure.
- Click Next: Disks >.
- In the Disks section, configure the following:
- OS disk type: Premium SSD
- Encryption type: Default
- Enable Ultra Disk compatibility: No
- Advanced > Use managed disks: Yes
- Click Next: Networking >.
- In the Networking section, configure the following:
- Virtual network: Ensure that sophosSophos-azure-vnet is selected.
- Subnet: management-subnet (10.10.253.0/24)
- Public IP: None
-
NIC network security group: None
- Leave other settings as default.
- Click Next: Management >.
- In the Management section, leave the settings as default and click Next: Advanced >.
- In the Advanced section, leave the settings as default and click Next: Tags>.
- In the Tags section, leave the settings as default and click Next: Review + create >.
- Ensure that the validation passes and then click Create.
- Wait for the deployment to complete.
Create a custom route table (with user-defined routes)
Internet-bound traffic from a subnet is routed via an Azure-provided internet gateway. This is an Azure-managed, automatically provisioned gateway that does not have the advanced security features of the Sophos Sophos Firewall. To inspect outbound traffic from a subnet, we’ll need to create a route table that routes internet-bound traffic to the Sophos Sophos Firewall and then attach the route table to the subnet we want.
- From the Azure Portal, click Create a resource, type Route table into the search box, press enter, and select Route table.
- Click Create.
- In the Create Route table blade, configure the following:
- Subscription: Select your subscription.
- Resource group: Use existing → select the "sophosSophos-poc-azure-rg" resource group.
- Region: Select the same location as the resources that have been deployed.
- Name: management-subnet-routetable
-
Propagate gateway routes: Yes
- Click Next: Tags >.
- Click Next: Review + create >.
- Ensure that the validation passes and then click Create.
- Wait for the deployment to complete.
- From the Azure Portal, type Route tables in the search box, press enter, and select Route tables.
- In the Route tables blade, go to management-subnet-routetable > Routes and click Add.
- In the Add route blade, configure the following:
- Route name: subnet-route
- Address prefix: 10.10.253.0/24
- Next hop type: Virtual network
- Next hop address: Empty
- Click OK.
- Repeat the step above to add two other routes with the following settings:
- Route name: vnet-route
- Address prefix: 10.10.0.0/16
- Next hop type: Virtual appliance
- Next hop address: Private IP of the Sophos backend NIC.
And
- Route name: internet-route
- Address prefix: 0.0.0.0/0
- Next hop type: Virtual appliance
- Next hop address: Private IP of the Sophos backend NIC.
- Note: You can obtain the private IP of the Sophos Firewall WAN NIC by going to All resources > sophosSophosAzureFw01 > Networking > PortA (Use the IP of the internal NIC).
You should now have the following three routes in the routing table:
Attach the route table to the appropriate subnet
- From the Azure Portal, type Route tables in the search box, press enter, and select Route tables.
- In the Route tables blade, go to management-subnet-routetable > Subnets and click Associate.
- In the Associate subnet blade, click the drop-down under Virtual network and select the sophosSophos-azure-vnet virtual network.
- In the Subnet field, select the management-subnet subnet and click OK.
Additional configuration on Sophos Firewall
Configure routing
We need to configure the Sophos Sophos Firewall to route traffic to our internal subnets out of its LAN interface instead of out of its WAN interface.
- From the WebAdmin of the sophosSophosAzureFw01 firewall, go to Routing > Static Routing. Under the IPv4 unicast route section, click Add and configure the following:
- Destination IP: 10.10.0.0 (Input the address space of your vNet)
- Netmask: /16 (255.255.0.0).
- Gateway: The first IP address in the "sophosSophos-public-dmz-backend" subnet. In our scenario, this is "10.10.1.1".
- Interface: PortA.
- Distance: Leave default setting (0).
- Click Save.
Configure RDP port forwarding to the management server
- Go to Host and Services> IP host > Add.
- Configure the following:
- Name: management-srv-10.10.253.4
- IP version: IPv4
- Type: IP
- IP address: 10.10.253.4
- Click Save.
- Go to Host and Services> Services > Add.
- Configure the following:
- Name: RDP
- Type: TCP/UDP
- Protocol: TCP
- Source port: 1:65535
- Destination port: 3389
- Click Save.
- Go to Rules and Policies> NAT rules > Add NAT rule > Server access assistant (DNAT).
- Configure the following:
- Select IP host: management-srv-10.10.253.4
- Click Next.
- Select public IP address or WAN interface: #PortB-10.10.254.4 (Private IP of Sophos's WAN interface).
- Click Next.
- Services: RDP
- Click Next.
- External source networks and devices: Any
- Click Next.
- Review the configuration and then click Save and finish.
- Go to Rules and Policies> Firewall rules and disable the Auto added firewall policy for MTA firewall rule. Click OK when prompted.

Add a firewall rule allowing outbound internet traffic from internal subnets.
- Go to Rules and Policies> Firewall rules > Add firewall rule > New firewall rule.
- Configure the following:
- Rule name: vnet_to_internet.
- Action: Accept.
- Tick Log firewall traffic.
- Rule position: Top
- Rule group: None
- Source zones: LAN
- Source networks and devices: "sophosSophos-azure-vnet-10.10.0.0/16" (create network object if it does not exist).
- During scheduled time: Leave default setting.
- Destination zones: WAN.
- Destination networks: internet IPv4 (Follow the instructions here on creating this object - Auto-Create an "internet IPv4" Object On The Sophos Firewall).
- Services: Any
- Set web policy to Allow All.
- Tick Scan HTTP and decrypted HTTPS and leave other settings as default.
- Click Save.
Verify that you can access the management server
-
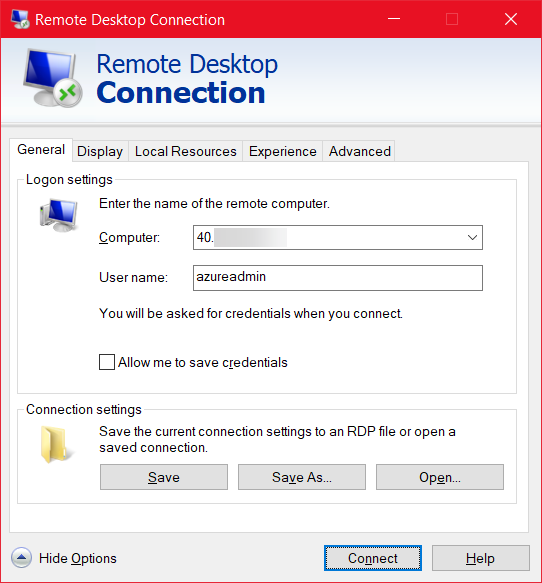
Open an RDP client and enter the following:
- Computer: The public IP of the Sophos firewall.
- Username: The username you configured for the Windows management server (in our case azureadmin).
- Click Connect.
- Enter the password that you configured for the Windows server and click OK.
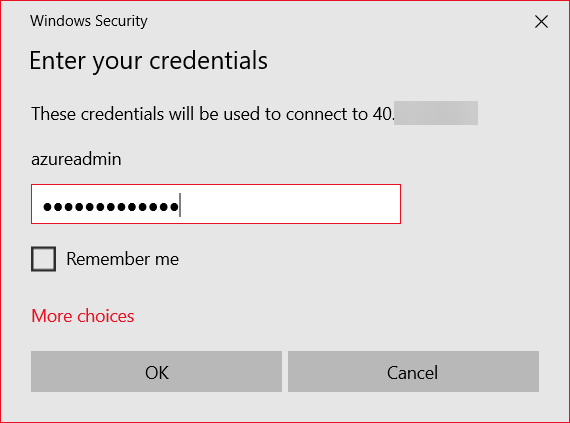
- Click Yes to the certificate warning.
- You will now be connected to the management server through the Sophos Sophos Firewall.
Verify that the traffic is going through the Sophos Firewall
- From the RDP session of the management server, open a browser and surf the internet to trigger some outbound traffic.
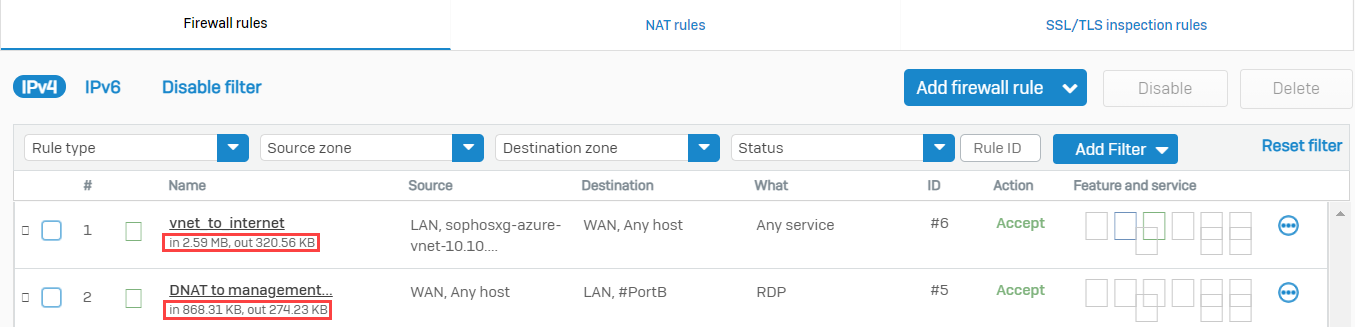
- From the WebAdmin of the Sophos Firewall, go to Rule and Policies> Firewall rules and verify that the traffic is allowed by the two recently created firewall rules.
- Click Log Viewer on the upper right corner of the WebAdmin.
- Type 3389 in the search box and press enter. You'll be able to see the RDP traffic in the logs containing the information specified below:
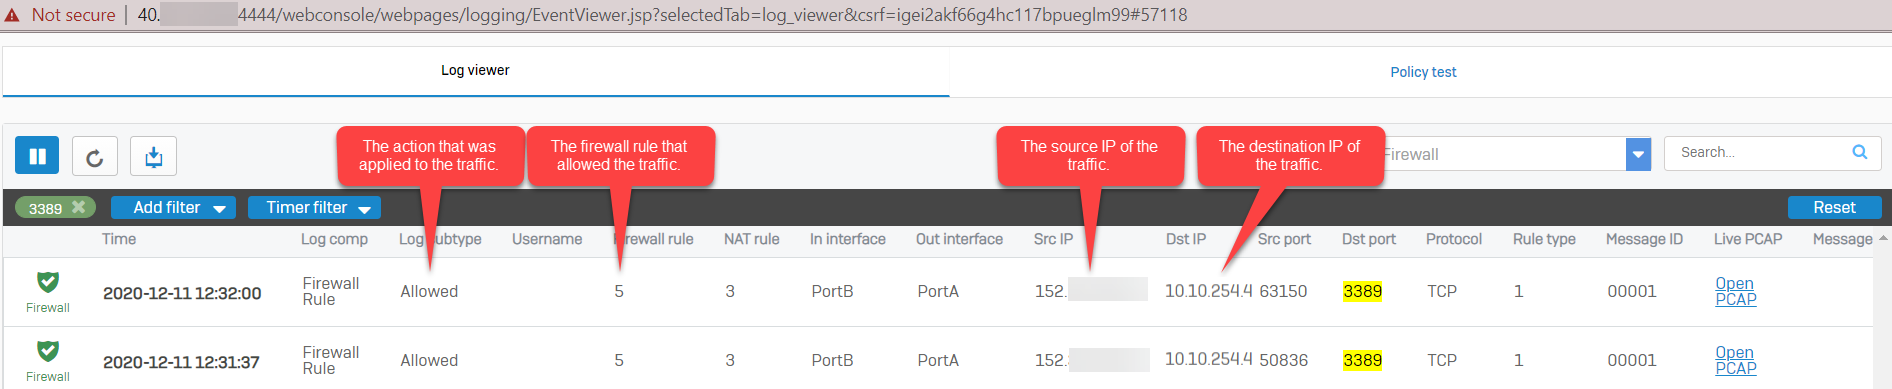
Note: If there are no results in the log viewer, make sure that the Log firewall traffic is enabled in the firewall rule and DNAT rule.
What we have done
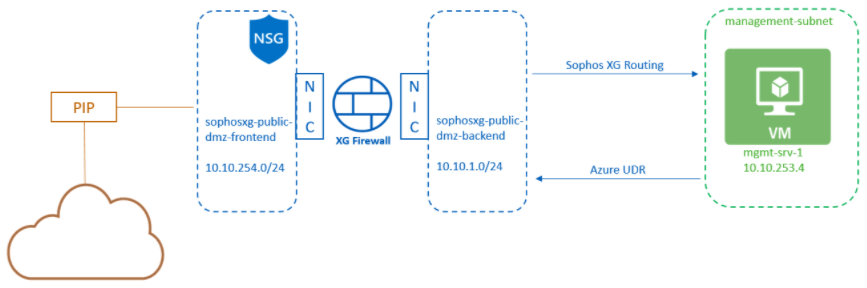
After completing the above sections, we have the architecture below:
- A single Sophos Firewall with two NICs.
- The WAN NIC is connected to the sophosSophos-public-dmz-frontend subnet.
- The LAN NIC is connected to the sophosSophos-public-dmz-backend subnet.
- The sophosSophos-public-dmz-frontend subnet has the SecurityGroup NSG associated with it.
- The WAN NIC is associated with a public IP address resource.
- A backend subnet is called a management subnet.
- A Windows server deployed into the management subnet.
- An Azure route table is configured to send all outgoing subnet traffic to the Sophos firewall.
- The Azure route table is attached to the management subnet.
- The Sophos firewall is configured to route traffic going to the vnet out of its backend interface.
Sign up for the Sophos Support SMS Notification Service for the latest product release information and critical issues.
Previous article ID: 128102
Revamped - Updated links to latest
[edited by: Raphael Alganes at 11:43 AM (GMT -8) on 18 Nov 2024]

