Disclaimer: This information is provided as-is for the benefit of the Community. Please contact Sophos Professional Services if you require assistance with your specific environment.
______________________________________________________________________________________________________________________________________
Table Of Contents
Overview:
This recommended Read aims to provide a complete guide on configuring VLANs on a Sophos switch, including tagged and untagged ports. Further, this Recommended Read will also show how to configure Inter-VLAN routing using Sophos Firewall; this method is also known as “Router-on-a-stick”.
Moreover, In the context of Sophos switches, please take note that we refer to 'tagged ports' as trunk ports, which are typically used to carry traffic for multiple VLANs, and 'untagged ports' or access ports, which are used for end devices within a single VLAN.
On the other hand, if you have a Layer 3 switch on the network that handles VLAN routing, this configuration guide isn’t suitable for your setup.
Scenario:
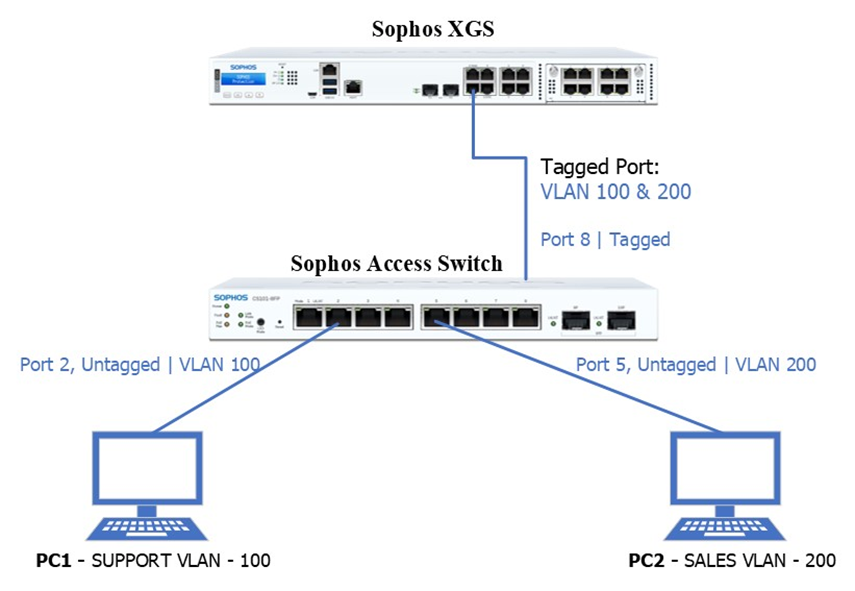
Access Switch
Ports: 2–4 Untagged Port VLAN 100
Ports: 5–7 Untagged Port VLAN 200
Port 8:
- Tagged Port VLANs 100 and 200
- Connected to XGS firewall to carry traffic for VLANs 100 & 200.
PC 1 – SUPPORT VLAN
Member of VLAN SUPPORT-100, which resides in VLAN 100.
Connected to port 2 on the Sophos Access Switch
PC 2 – SALES VLAN
Member of VLAN SALES-200, which resides in VLAN 200.
Connected to port 5 on the Sophos Access Switch
Sophos Switch VLAN Configuration:
Log in to Sophos Switch
Add VLAN
To add VLAN navigate to Configure > VLAN settings > 802.1Q then click “+Add”
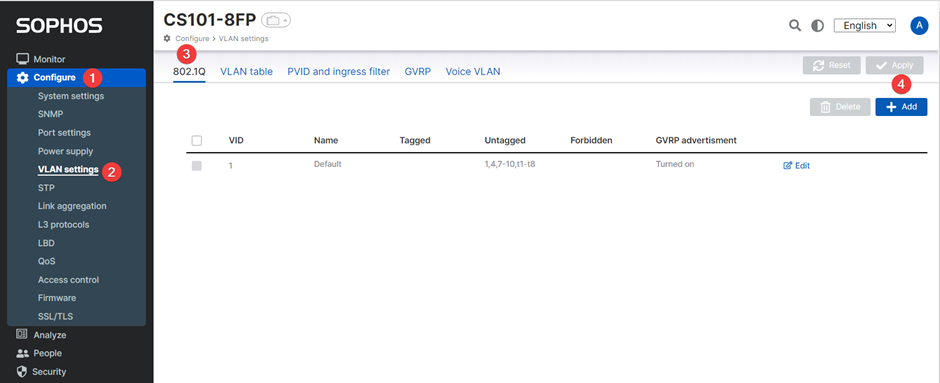
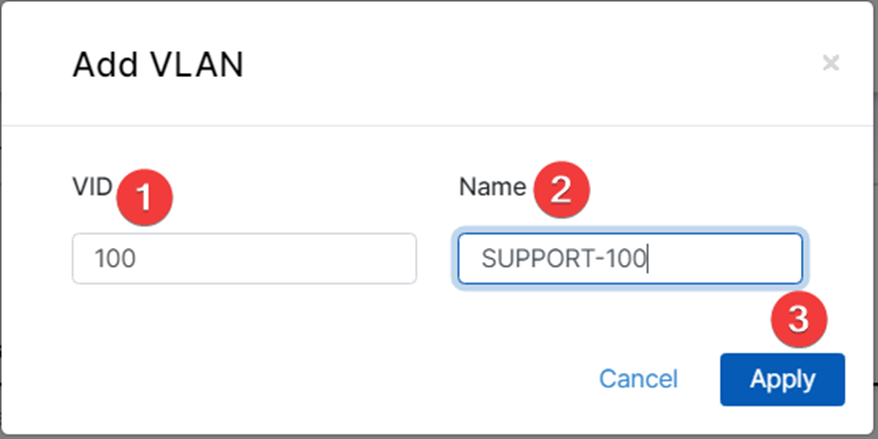
In the Add VLAN window, enter the details of your desired VLAN
- Enter your desired VLAN ID. This must be a number from 2 to 4094.
- Enter the desired VLAN name.
- Then click ‘Apply.’
Tagged Ports (Trunk Port)
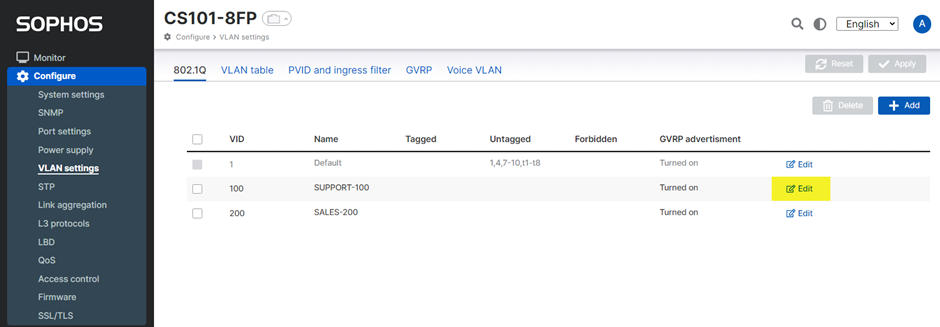
- To configure a tagged port, navigate to Configure > VLAN settings > 802.1Q, then click ‘Edit’ on the VLAN(s) created.
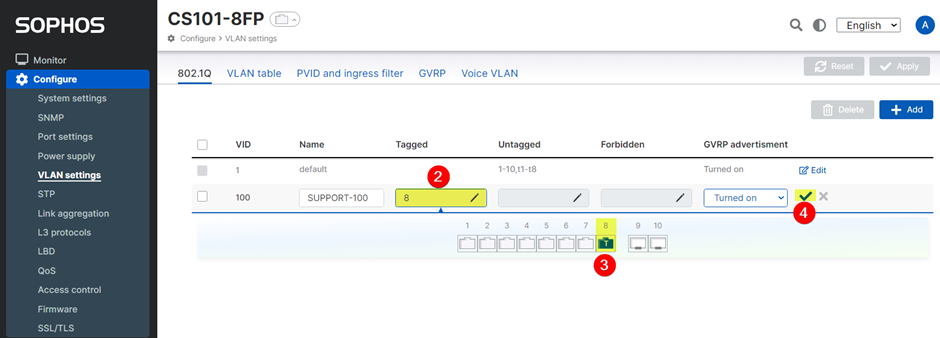
- Click the 'Tagged' box.
- Select your desired tagged port. In this example, choose Port 8.
- Click the 'checkmark' icon.
5. Then click 'Apply'.

We have successfully created a Tagged Port (Trunk Port) for VLANs 100 and 200.
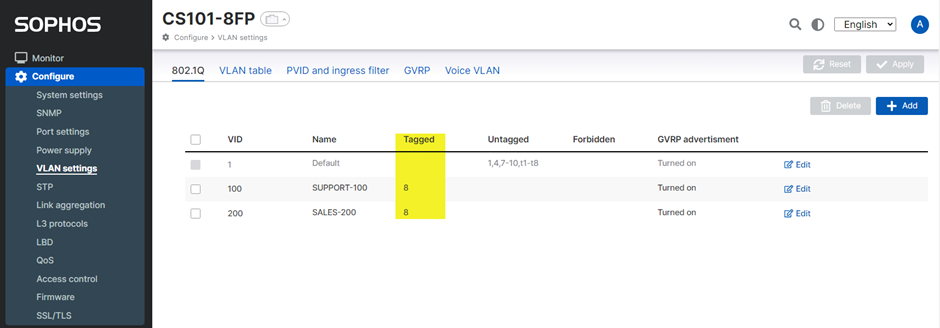
Untagged Port (Access Port)
- Click ‘Edit’ your desired VLAN to create untagged ports. In this example, we choose SUPPORT-100.
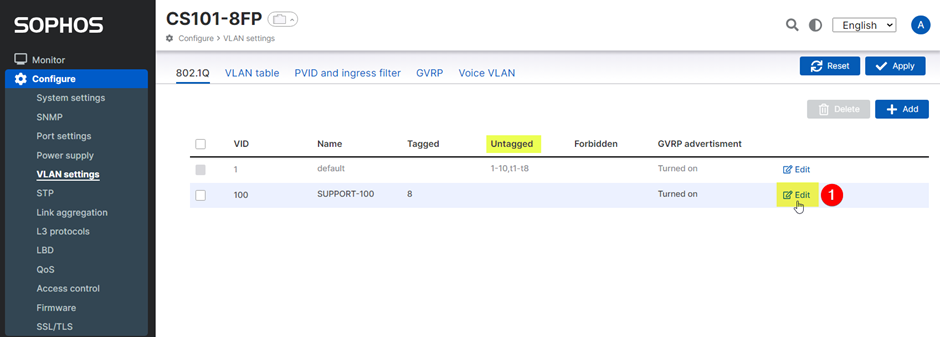
- Click the ‘Untagged’ Box
- Click your desired port(s). In this example, ports 2, 3, and 4.
- Click the 'checkmark' icon.
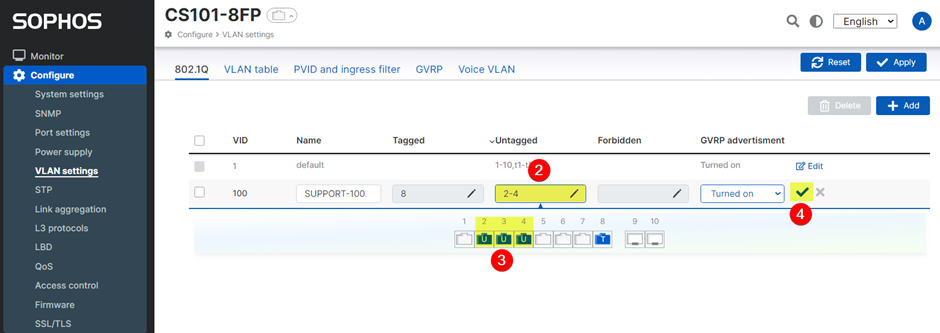
5. Then click ‘Apply’.

Port VLAN ID (PDVID)
The PVID is a setting assigned to an individual switch port, specifying the VLAN ID to be assigned to incoming untagged traffic on that port.
In simpler terms, when an untagged frame arrives at a port, the switch assigns it the VLAN specified by the PVID for that particular port. In the context of Sophos switches, incoming traffic is initially set to PVID 1.
To ensure traffic is placed in the correct VLAN, changing or setting the PVID to the appropriate VLAN ID on your desired port(s) is essential.
More details can be found here for reference: Sophos Cloud Switch: PVID
PVID Configuration
In our example, we will be configuring PVIDs as follows:
- PVID 100 on ports 2, 3, and 4.
- PVID 200 on ports 5, 6, and 7.
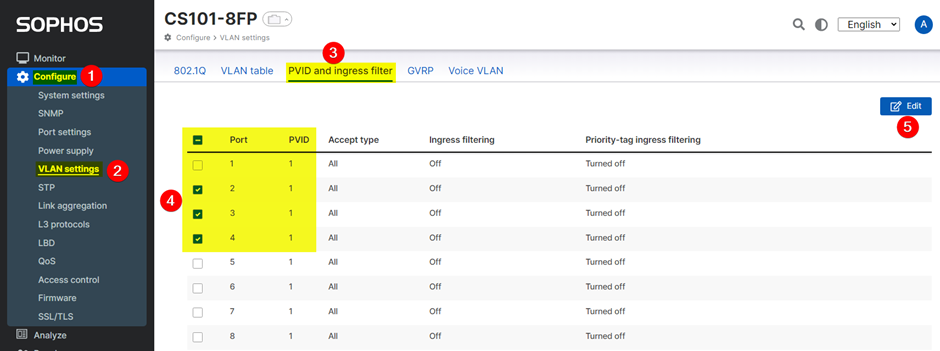
To configure PVID, navigate to:
- Configure
- VLAN settings
- PVID and Ingress filter
- Choose your required port(s). In this example, ports 2, 3 and 4
- Then click ‘Edit’
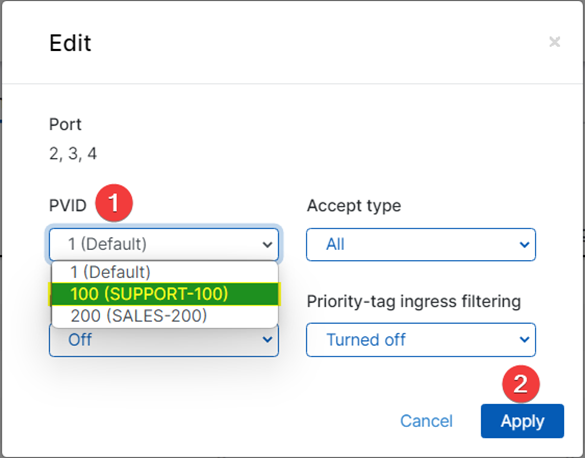
Once the PVID Window appears:
- Select your desired PVID, in this example, 100 (SUPPORT-100).
- Click Apply.
Sophos Firewall Configuration
Scenario:
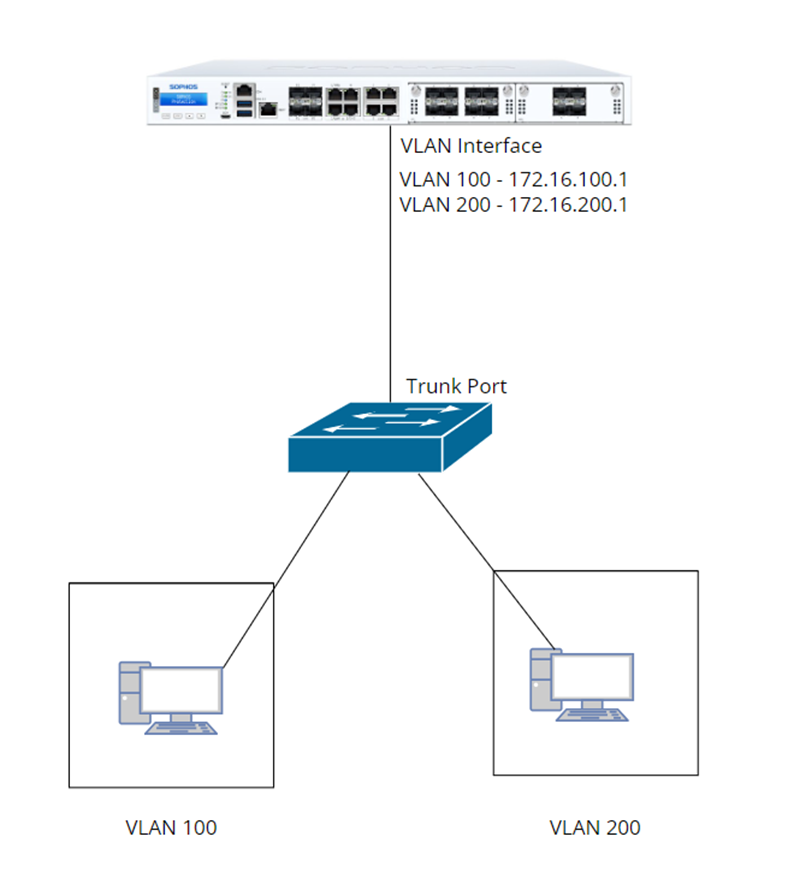
Requirements:
- You must have configuration access on the L2 switch connected to Sophos Firewall, where you can define VLANs, bound access ports to specific VLANs, and configure the trunk port.
- Switch Uplink going/connected to Sophos Firewall must be configured as “Trunk Port” which allows VLANs to pass through and reach it’s VLAN default gateway (which will be the VLAN interface that is to be configured on Sophos Firewall later on the guide)
VLAN Configuration on Sophos Firewall
VLAN Interface
Configure VLAN Interface under Network > Interfaces > Add interface > Add VLAN

Then, configure VLAN Interface Settings such as Port, VLAN ID, Zone, IP address, and Netmask accordingly.
VLAN 100 settings:
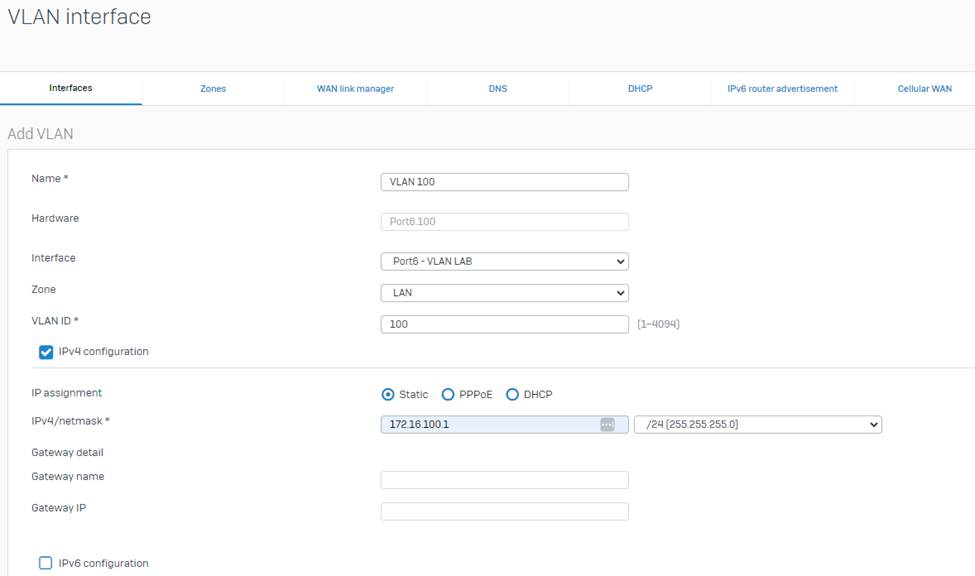
Click Save.
Then, verify if VLAN 100 interface is shown under Network > Interfaces > VLAN

VLAN 200 settings:
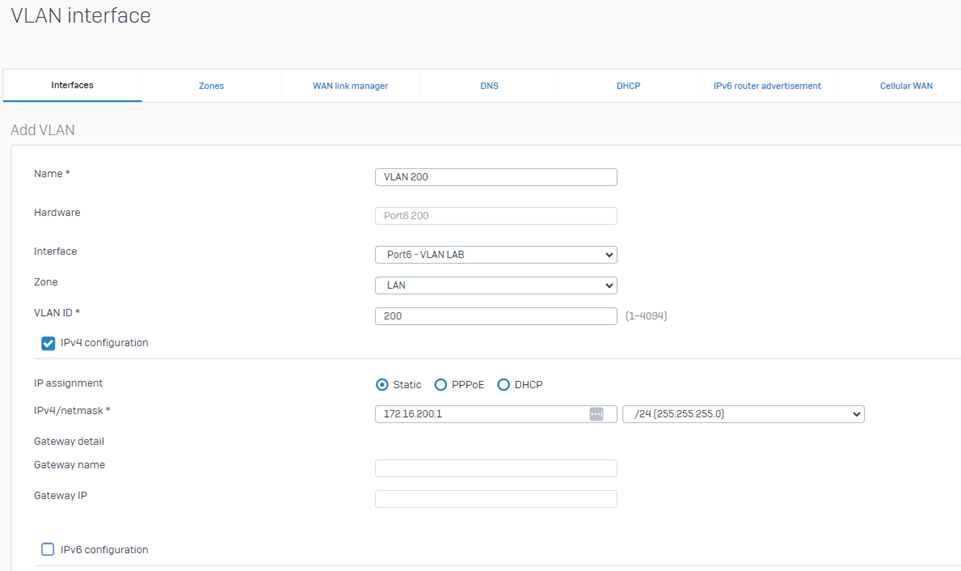
For more information on how to configure the VLAN interface on Sophos Firewall, you may refer to this document guide: https://doc.sophos.com/nsg/sophos-firewall/20.0/help/en-us/webhelp/onlinehelp/AdministratorHelp/Network/Interfaces/NetworkVLANInterfaceAdd/index.html
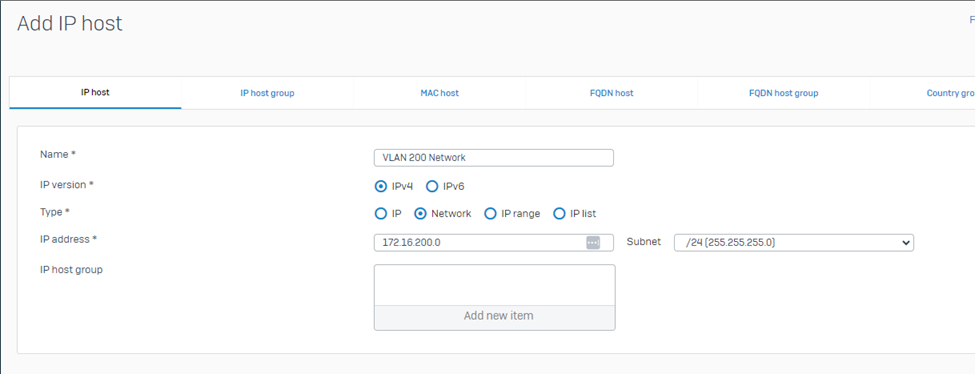
VLAN Network Object Definition:
This step would prepare the definition of VLAN networks that would be used in configuring the Firewall rule needed to allow communication on different VLANs.
Go to System > Host and services > Click Add > IP host > Then enter the VLAN 100 details then click Save.
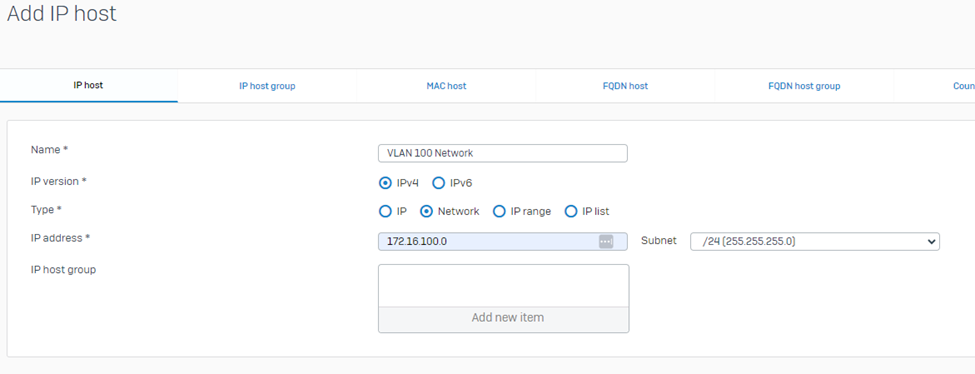
VLAN 200
Configuration of Firewall Rules
This step would allow communication of VLANs. Kindly take note that when putting the Source and Destination Network as you configure the firewall rule, you must NOT put the VLAN interface object but instead put on the VLAN Network object and always check “Log firewall traffic” should you need to troubleshoot issues.
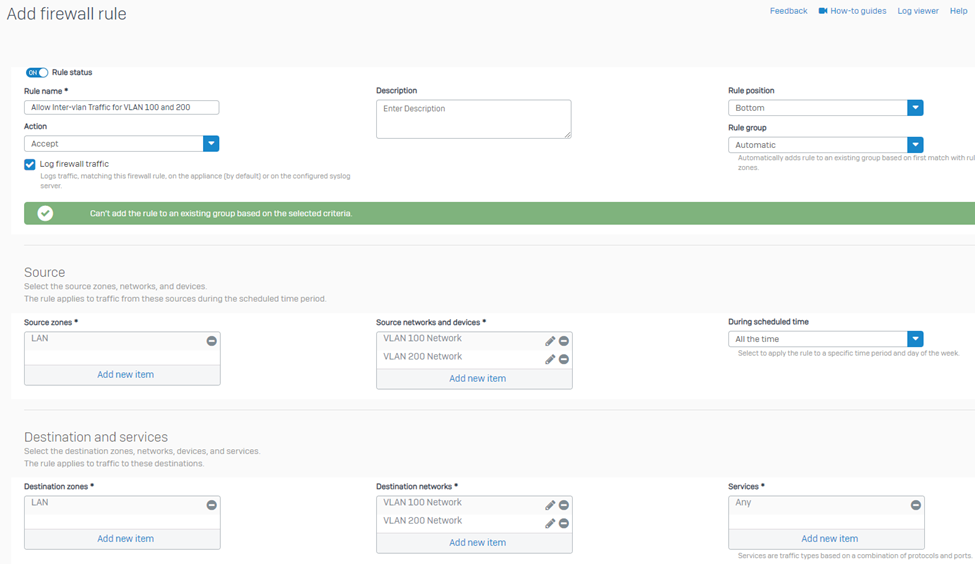
Upon completing the above configuration steps up to the configuration of Firewall Rules, your VLANs should be able to communicate with each other.
Additional Information:
- The example we used is only 2 VLANs, but the same principle applies if your network would require multiple inter-vlan traffic.
- The configuration isn’t limited to Inter-vlan communication. You may also control Web traffic, application, Traffic shaping, etc by VLAN using firewall rules, the same principle applies.
- You may also change the firewall rule disposition to “Deny” to control certain VLANs from accessing the internet, other networks etc.
- Sophos Switch Techvid: https://techvids.sophos.com/share/watch/fnLELAk4EchQoFRDepxJNA?
______________________________________________________________________________________________________________________________________
format, grammar
[edited by: Raphael Alganes at 3:02 PM (GMT -7) on 1 May 2024]


