For anyone who's joined the XDR & EDR Data Lake Early Access Program, we've been providing instructions on the different steps to join and enroll devices but I thought it would be useful to have one full blog post covering those steps and also detailing how to acquire and use the test tool to query the Data Lake APIs so here you go.
Step 1: Joining the EAP and enrolling devices
The presentation here will then walk you through joining the EAP, and enrolling devices into the EAP.
A few things to note:
- At this point in the EAP we are supporting just Windows Endpoints and Windows and Linux Servers in the early access program
- There will be an Early Access Program for both Endpoints and Servers and you must join one or both Early Access Programs to access the new features
- Customers don’t need an EDR license to enroll in the Data Lake EAPs, for customers who don’t have an EDR license we don’t provide an EDR license, but the Live Discover feature will become available and we will install the Live Discover components to devices that are enrolled in the EAPs.
- Devices can only be enrolled to one Endpoint or Server early access program at a time, so you might not see some devices available if they are already enrolled in the 'New Endpoint/Server Protection and EDR Features' early access program. Looking to move devices from the New Endpoint/Server EAP to the Data Lake EAP is pretty straight forward, a reboot will be requested when removing from the New Endpoint/Server EAP but for EDR customers no new components will be removed or installed. For customers who don't have an EDR entitlement the Live Query component will be installed to the devices that are enrolled in the Data Lake EAP.
Once devices are enrolled into the EAP they will start sending data to the Sophos Data Lake. If you plan on searching the Data Lake using Sophos Central only (eg. you do not intend to query the Data Lake via APIs) you only need to complete this first step. Check out this video that walks through the Central enhancements which allow you to query the Data Lake using our Live Discover functionality.
If you would like to query the Sophos Data Lake using our APIs then continue to follow the steps below.
Step 2: Get your credentials for connecting to the API:
This step is in preparation of getting the test tool up and running. To run the test tool (or if you use some other method to connect to the APIs), you will need to a client ID and Client Secret. To obtain those details:
- Log in to Sophos Central and browse to Global Settings. Select API credentials:

- Choose the option to 'Add Credential':

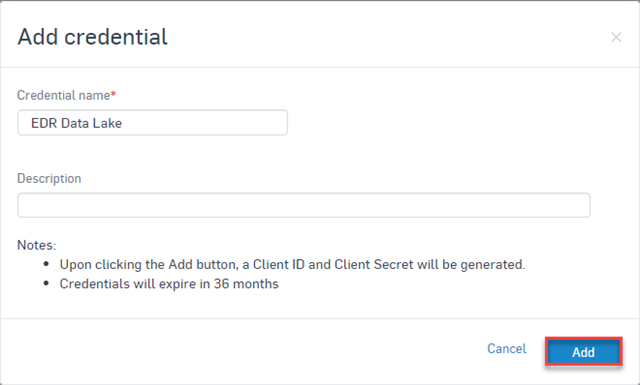
- Add a Credential name and optionally enter a description and then click the Add button:

- Take note of the Client ID and choose the option view and copy the Client Secret. Note you can only view the Client Secret once so ensure to take note and to keep the Client Secret secure:

Step 3: Downloading, setting up the test tool and running queries
Select a Windows system managed by the Central account being used for the EAP. You can use this system to run the test tool and query the Data Lake. On this system you will need to install python 3.8 or above. You can download from here:
https://www.python.org/downloads/
Important: During the Python install, choose the option to update the PATH value.
Note: At the end of the install there is also an option to override the initial PATH limit of 260 characters. It's been suggested that on a Window system that's been running for a while you may want to choose this option as well.
Once Python is installed the EDR Data Lake Test tool can be downloaded from GitHub here (click the Code dropdown and choose the option to 'Download ZIP':
https://github.com/sophos/Sophos-Data-Lake-Example-Tool
- Extract the Zip
- Open a cmd.exe terminal session and from the folder where the test tool files were extracted, run the command 'pip install -r requirements.txt'
- From within that same folder you should be able to run the command 'xdr_query_gui.py' to start running the tool.
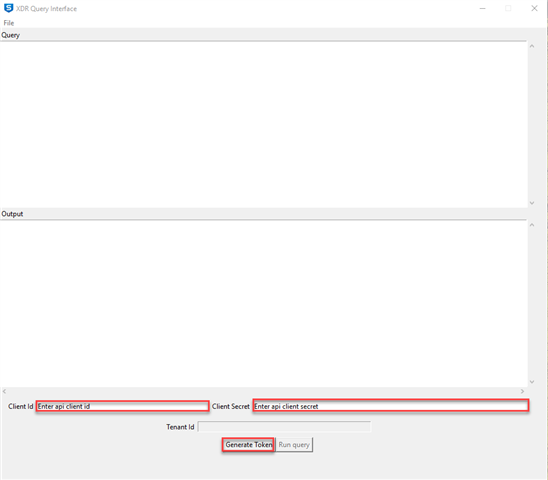
- Enter the Client ID and Client Secret (obtained in Step 2) into the test tool and click the Generate Token button:

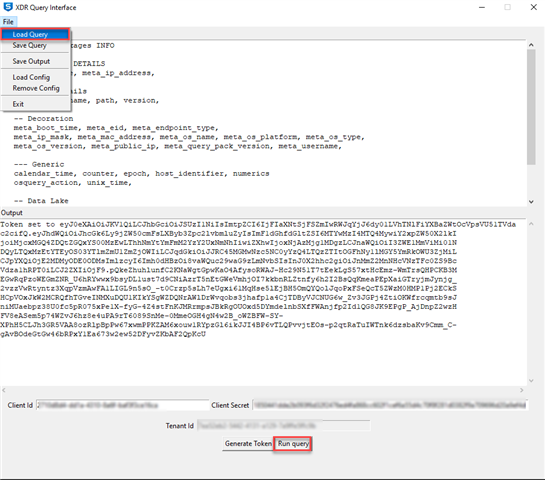
At this point you are now able to run queries. They can be directly entered into the query text box in the tool, or use the file menu to 'Load Query' and then click Run Query to execute the query. Results should be seen in the Output text box.

A collection of about 80 queries can be found here in the Files section of the community. Just Download and extract the zip file.
Note: The command shell used to start the tool will remain open and will provide debug details on what is happening with the tool.
If you have any questions on these instructions or anything else or want to provide any feedback please use the Discussion section of this community here and we'll get back to you ASAP.
Happy playing!
Kevin
