Disclaimer: This information is posted as-is and the content should be referenced at your own risk
Overview
Disclaimer: This information is posted as-is and the content should be referenced at your own risk
This article provides information on how to deploy Sophos UTM in Amazon Web Services VPCs with Cold Standby or Warm Standby High Availability (HA).
About AWS HA
HA allows admins to protect services hosted in AWS, with Sophos UTM, but still easily eliminate a single point of failure. Due to the structure of AWS, traditional HA features in Sophos UTM aren't useful in this environment. Because of this, we've constructed an HA solution specifically to work within AWS. As such, two flavors of AWS HA are available.
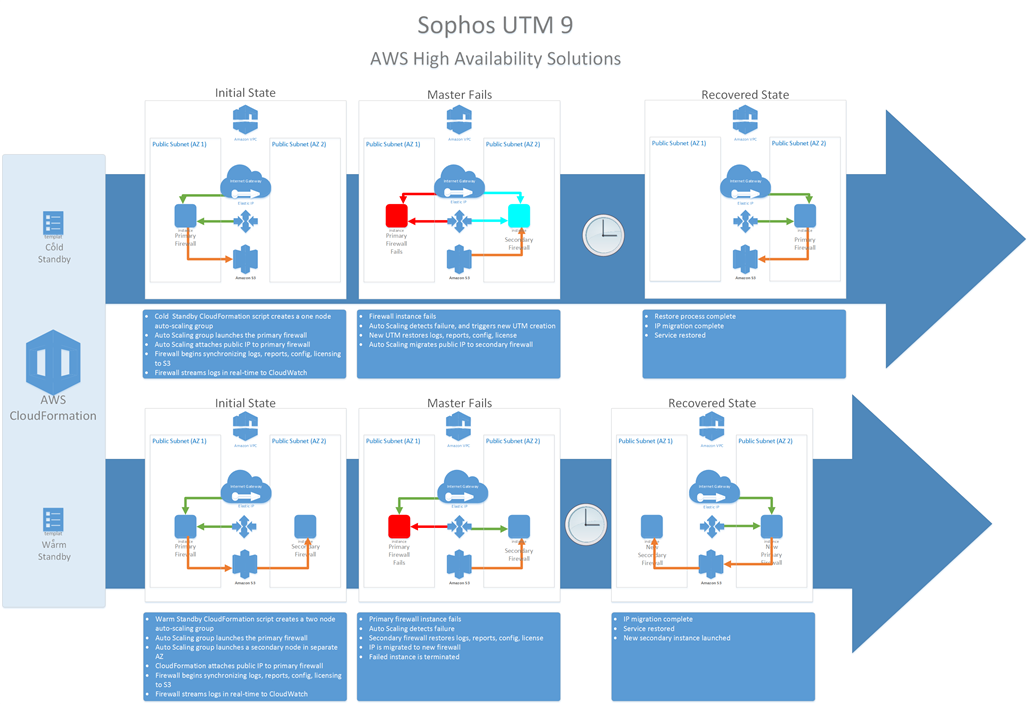
Cold Standby: Cold Standby runs only a single instance, and stores persistent information in Amazon's S3 storage. In the event of a failure, a new instance is created, persistent information is restored, and the attached public IP will be migrated to the new instance.
Warm Standby: Warm Standby works very much like Cold Standby, but a second instance is pre-created, to accelerate the recovery process.
The following diagram provides a more detailed description of the behavior of each:
What To Do
Sophos UTM in AWS now offers a high availability solution, for customers
1) Login to AWS Console
2) On the Services drop-down, choose CloudFormation 
4) Enter a name for your HA stack, then choose “Specify an Amazon S3 template URL”, then enter the template URL, for your preferred HA setup choice:
a. s3.amazonaws.com/.../utm-latest-ha_warm_standby.template
b. s3.amazonaws.com/.../utm-latest-ha_standalone.template
5) Click Next
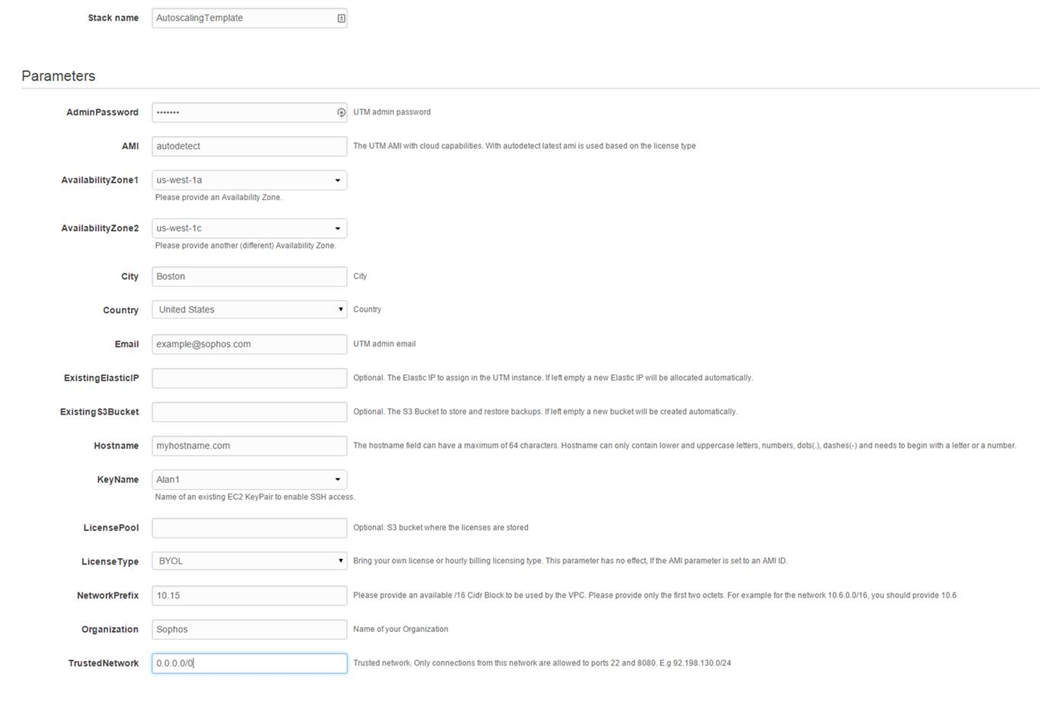
6) Fill in the template parameters, then click Next:
- AdminPassword: This will set the default password for the “admin” account, which is used to login to the firewall.
- AMI: Leave this set to autodetect, if this option is available.
- AvailabilityZone1&2: Availability zones have a default limit of 5 subnets. Choose two Availability zones with room for at least one subnet, or request a subnet limit increase from AWS, if necessary.
- City, Country, Organization, Hostname, and Email fields are only used by the firewall to generate its signing certificate. Email is also used as the target address that the firewall will attempt to send important notifications to.
- ExistingElasticIP: This is typically left blank; if you wish to assign an existing elastic IP to this firewall, enter it here.
- ExistingS3Bucket: This is typically left blank; if you wish to specify an existing bucket for storage of config and logs, enter it here.
- Keyname: The specified key name will be enabled for shell access to the firewall.
- LicensePool: This is typically left blank, but maybe specified if desired.
- LicenseType: Choose whether to deploy an hourly or BYOL licensed firewall
- NetworkPrefix: this /16 definition will be used as the prefix for two subnets that will be created by the firewall.
- TrustedNetwork: If remote shell access is necessary, it should contain the public IP range you will connect from.
7) You’ll be prompted to set additional options for your HA stack. None are necessary, so you can click Next
8) Review the summary of details, then click Create
9) The creation process will begin. It will take several minutes to complete, at which point, you should see something like this:
If the template fails to deploy, it will result in an error such as this:
In this event, please be sure to provide full details from the events log, to help troubleshoot the cause.
10) Once the stack is successfully deployed, you will see the UTM instance running:
11) You can then access it at https://<PublicIP>:4444/, once it has finished booting.


