Disclaimer: This information is provided as-is for the benefit of the Community. Please contact Sophos Professional Services if you require assistance with your specific environment.
Table of Contents
Overview
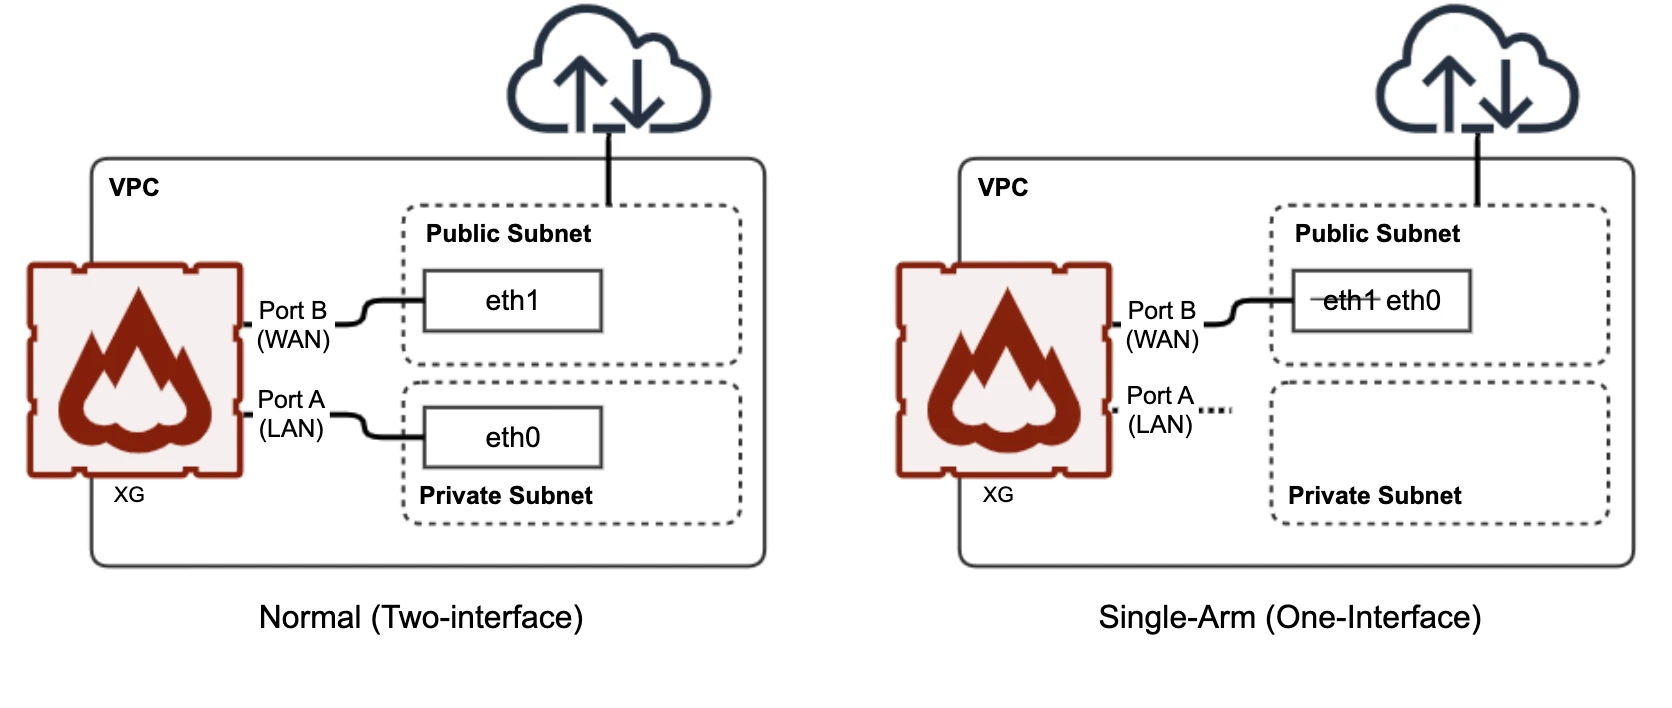
Sophos Firewall single-arm deployment only uses one interface, the WAN interface, and all traffic goes in and out of this interface.
While the Microsoft Azure virtual WAN zone feature allows using Sophos Firewall with one interface post-deployment, this doesn't fully cover some scenarios. In automated cloud environment load balancing deployments, Sophos Firewall is deployed automatically without user interaction and can only handle a single interface. To cover these scenarios, a single-arm deployment during boot-up is needed.
You can deploy Sophos Firewall in Azure with only one interface in standalone and high availability (HA) deployments:
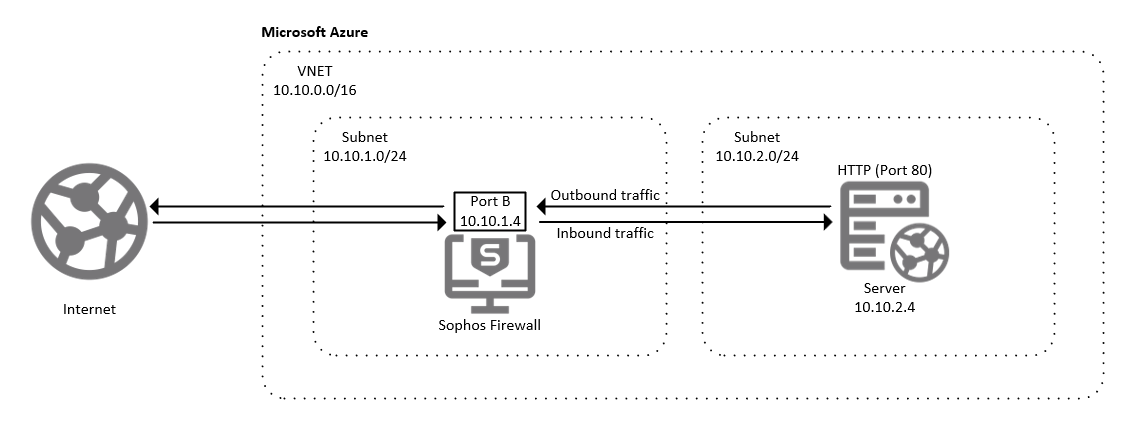
- Standalone: Deploy a single instance of Sophos Firewall.
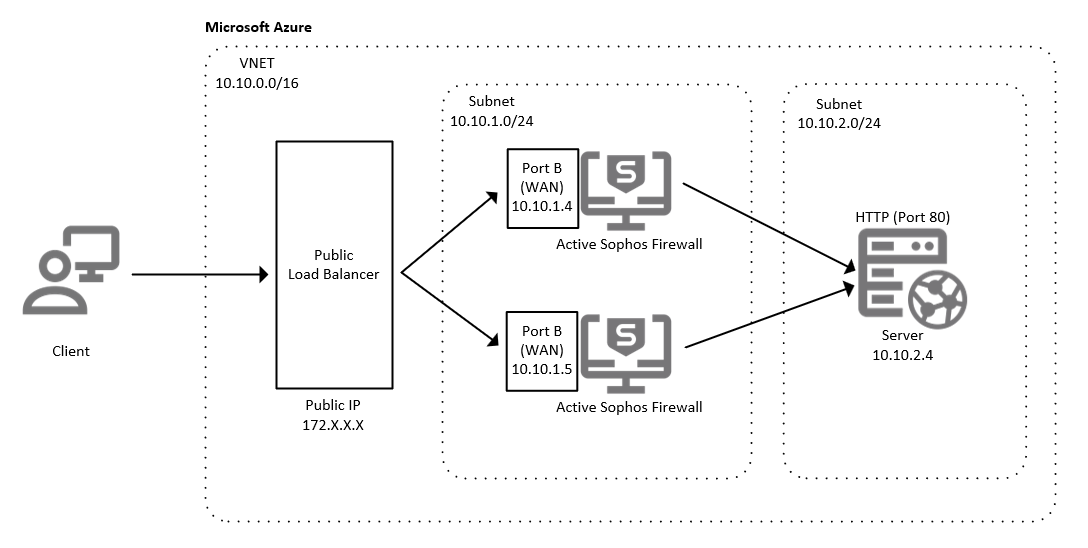
- HA: Deploy two instances of Sophos Firewall behind a public load balancer.
Note: Since there's no LAN interface in a single-arm deployment, legacy active-active HA deployment with the internal load balancer isn't supported.
Important: If you do a factory reset, skip the wizard by clicking Skip to finish. Don't configure the LAN interface for a single-arm deployment.
Example network diagram
Standalone deployment
HA deployment
Licensing
Sophos Firewall can be deployed in two licensing models:
- Pay-as-you-go (PAYG) - Consumption-based hourly billing through the Azure Marketplace.
- Bring-you-own-license (BYOL) - You acquire a license from a Sophos reseller. For more information, contact your Sophos account representative or send an email to publiccloud@sophos.com.
Note: For BYOL, you must have a separate license for each instance of Sophos Firewall in an HA deployment.
Deploy via template
You can deploy Sophos Firewall in single-arm mode in a standalone or HA deployment method. To do this using the template, do as follows:
- Select a deployment method:
Standalone
HA - The sample template is configured with default values. Configure the template as follows:
- Subscription: A subscription corresponds to a Sophos Firewall on Azure account and can be viewed in the Subscriptions dialog. If you have multiple accounts, you can change the default subscription.
- Resource group: Enter a name for the resource group or create a new one.
- Region: Select the data center where the VM instance should be deployed.
- _artifacts Location: Default
- _artifactsLocationSasToken: The sasToken required to access _artifacts Location. When the template is deployed using the accompanying scripts, a sasToken is automatically generated. Use the defaultValue if the staging location isn't secured.
- VM Name: Enter a name for the VM instance.
- Admin Password: Enter a password.
Note: The password has to consist of at least eight characters, containing at least one lowercase and one uppercase letter, a number, and a special character. If invalid parameters are passed, the deployment will fail. - Image SKU: Select whether to pay hourly (PAYG) or to buy a Sophos license (BYOL).
- VM Size: Select the size of the VM instance.
- Net New Or Existing: Create a new virtual network for the instance or select an existing one.
- Net RG: Resource group of the existing virtual network (optional).
- Net Name: Name of the virtual network.
- Net Prefix: Prefix of the virtual network.
- WAN Name: Name of the WAN subnet.
- Wan Prefix: Prefix of the WAN subnet.
- Public Ip New Or Existing: Create a new public IP or use an existing one.
- Public Ip RG: Resource group of the existing public IP (optional).
- Public Ip Name: Name of the public IP.
- Public Ip DNS: Unique DNS name prefix for the public IP.
- Public Ip Type: Allocation method of the public IP of the VM.
- Storage New or Existing: Create a new storage account or use an existing one.
- Storage RG: Resource group of the existing storage account (optional).
- Storage Name: Unique name for the storage account.
- Storage Type: Replication mode for the storage account.
- Nic Wan: Network interface name for the WAN zone.
- Network Security Group New Or Existing: Create a new network security group or use an existing one.
- Network Security Group Name: Name of the network security group.
- Trusted Network: Trusted network for administrator access. Using an asterisk (
*) allows all traffic. For example, using a CIDR notation such as203.0.113.0/24only allows traffic from that network range. - Availability Set New or Existing: Create a new availability set or use an existing one.
- Availability Set Name: Name of the availability set.
-
Number Of Instances: Number of Sophos Firewall instances to be deployed. The default and recommended value is 2.
Note: Number Of Instances only appears in HA deployment. - Location: Location to deploy. The default uses the same location as the resource group.
- Dev Fw Blob Url Prefix: Dev blob URL for testing only (Backward compatibility support).
Standalone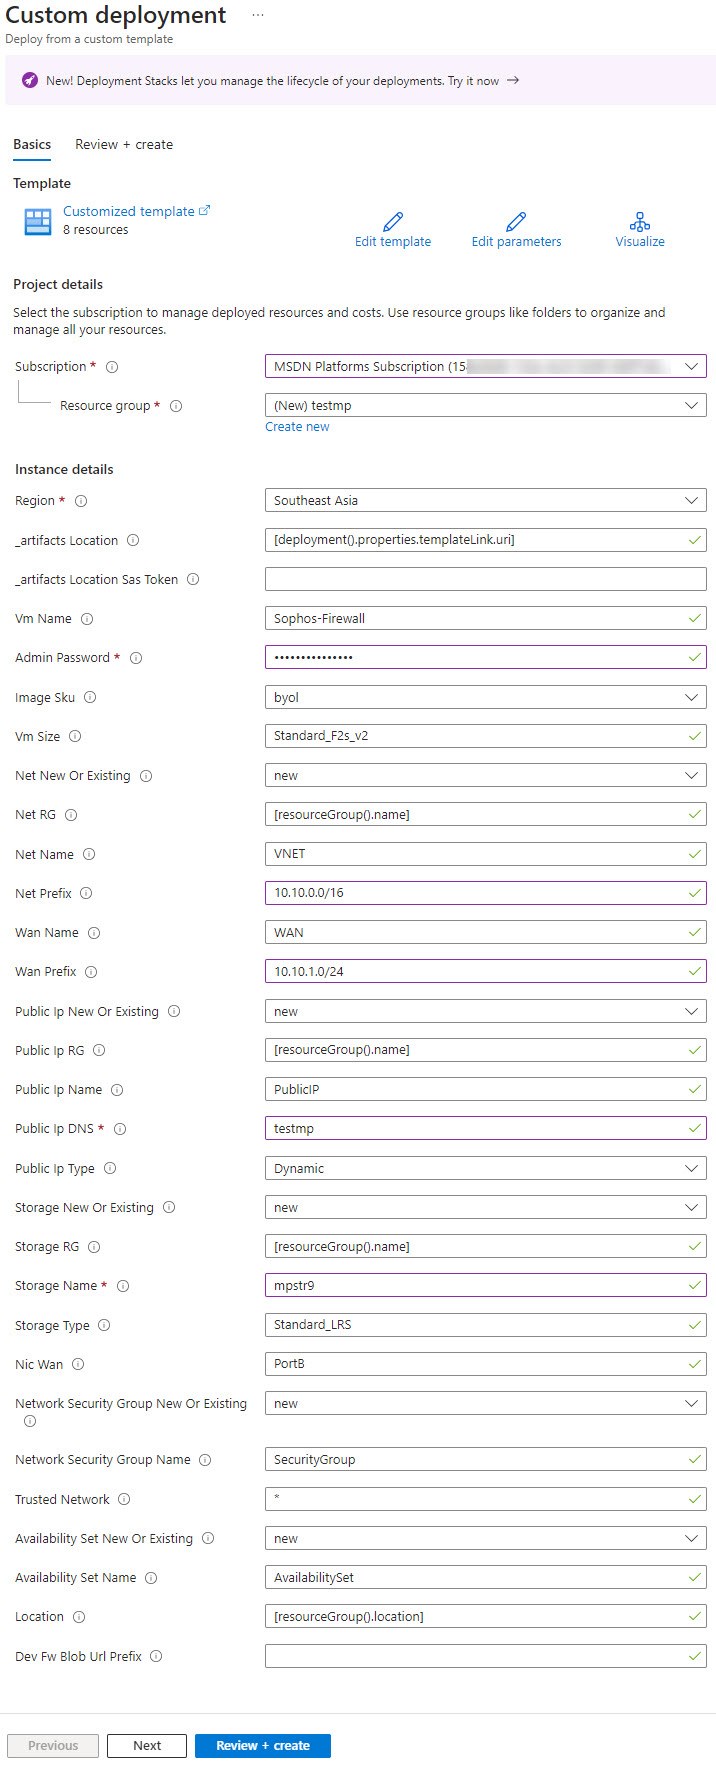
HA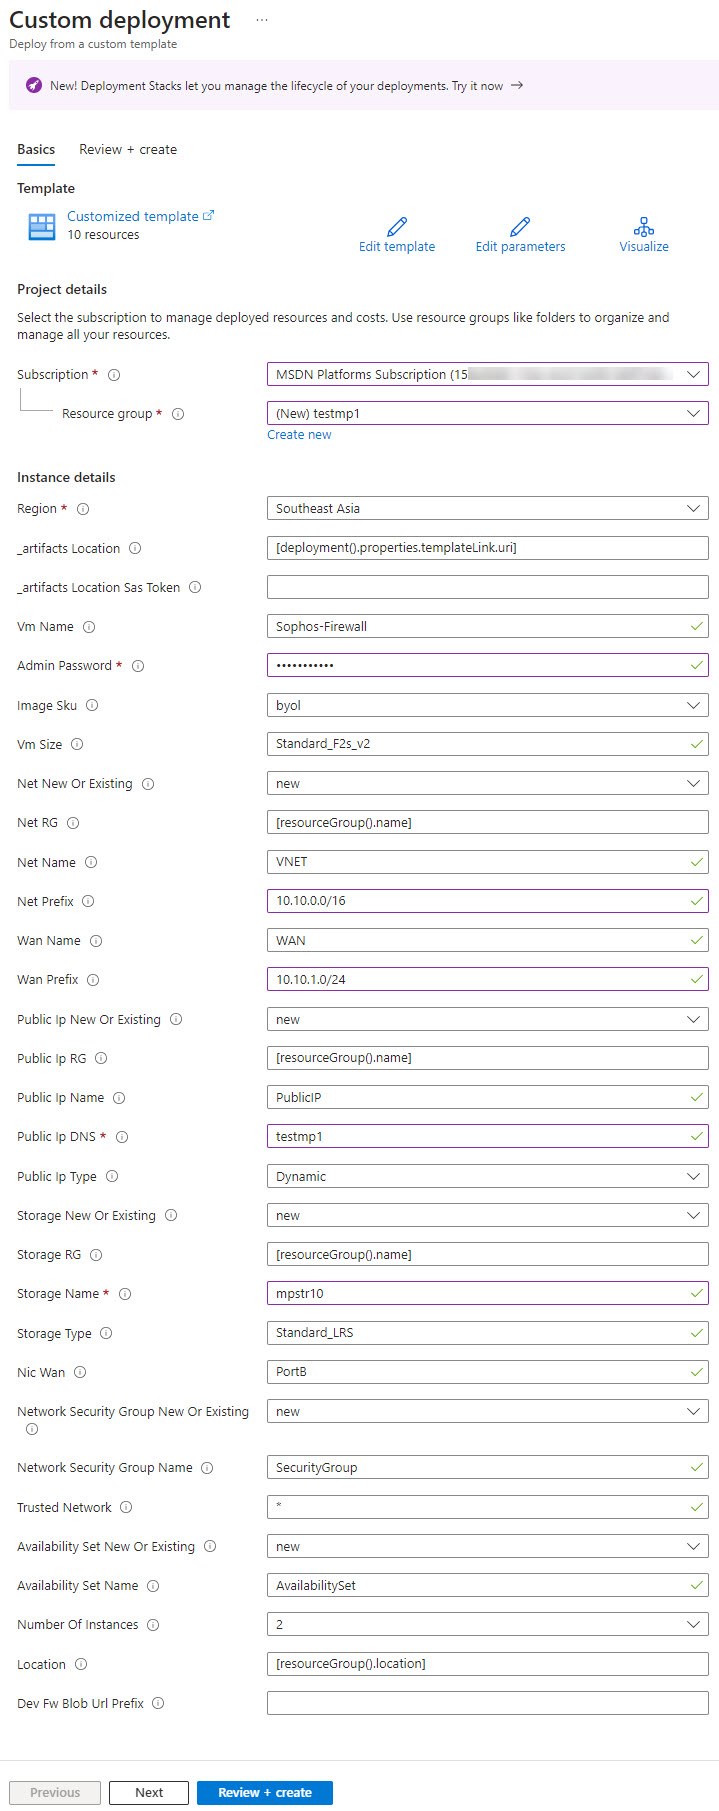
- Click Next.
Microsoft Azure validates the configuration. If the validation fails, fix the errors.
Example:
Standalone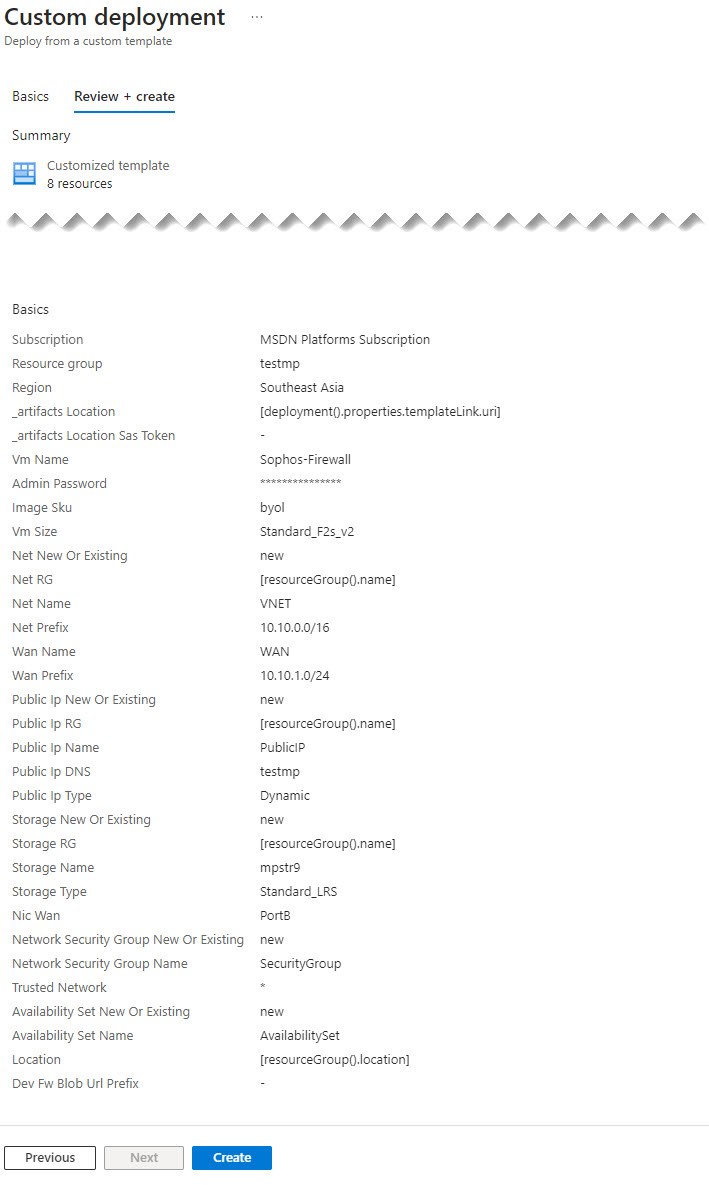
HA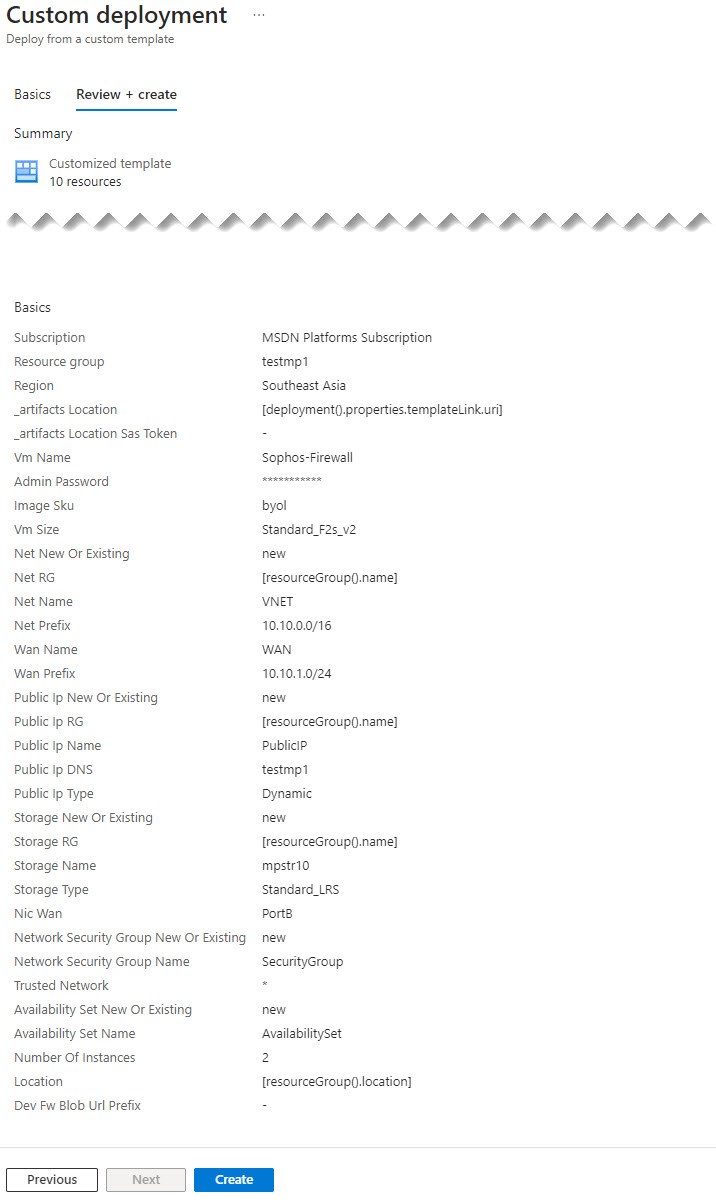
- Click Create.
The deployment starts. - Once the deployment is completed, click Go to resource group.
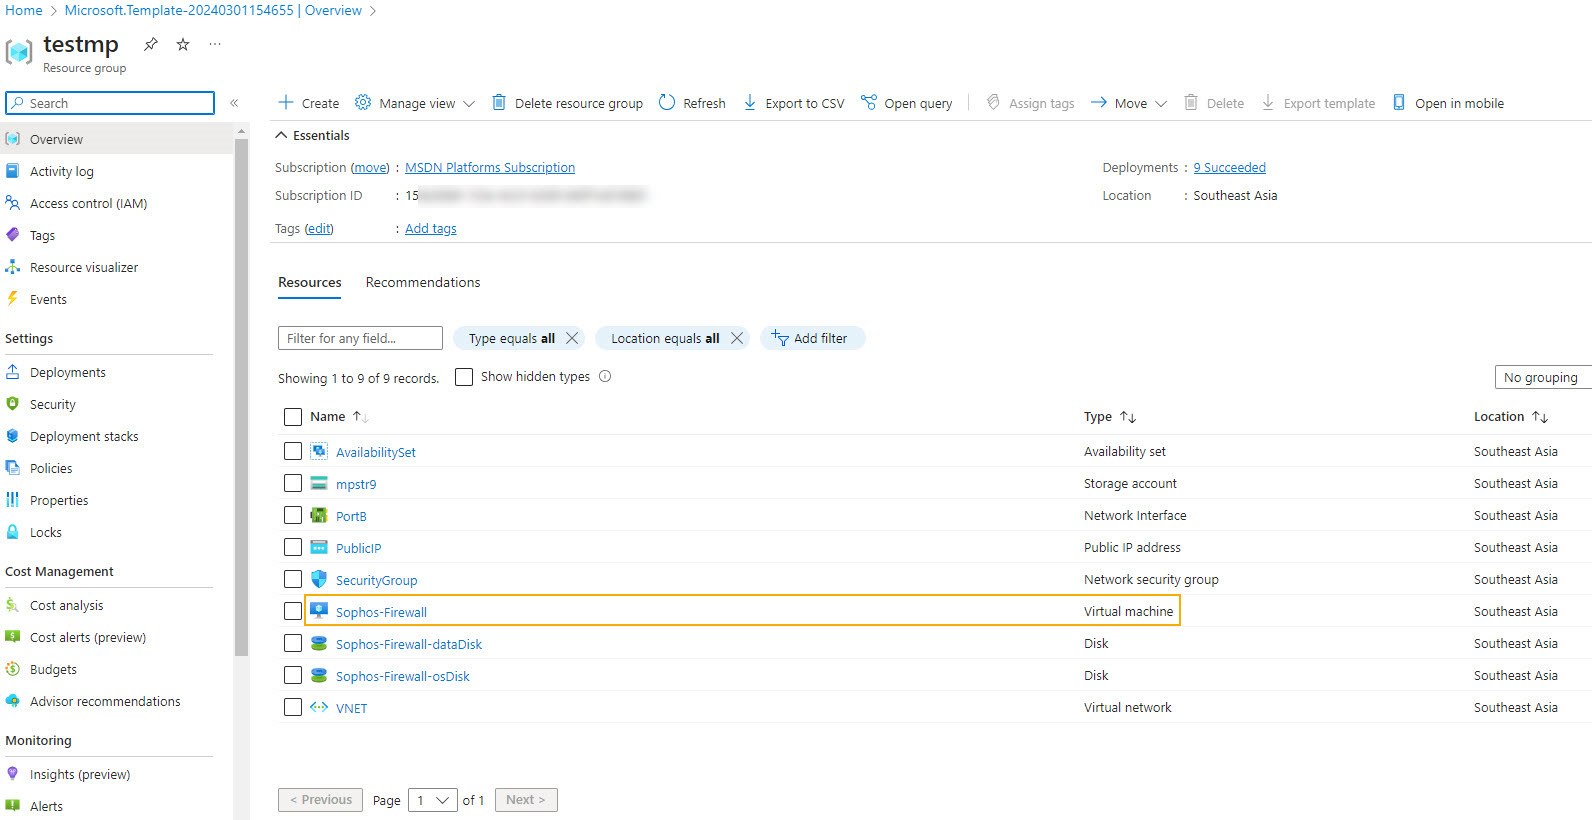
The created resources appear.
Example:
Standalone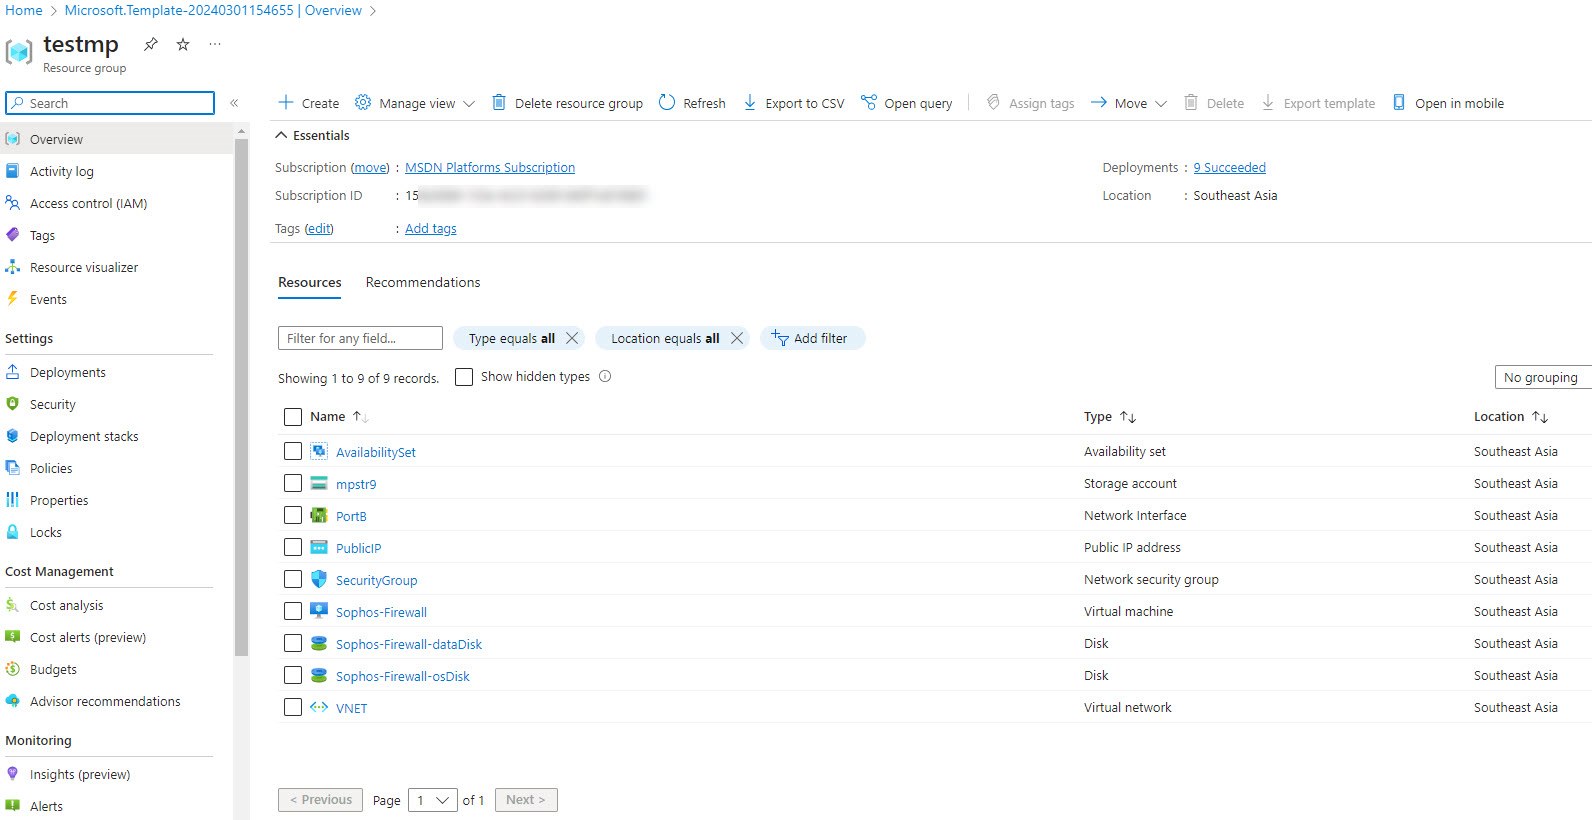
HA
You can see that two instances of Sophos Firewall are created.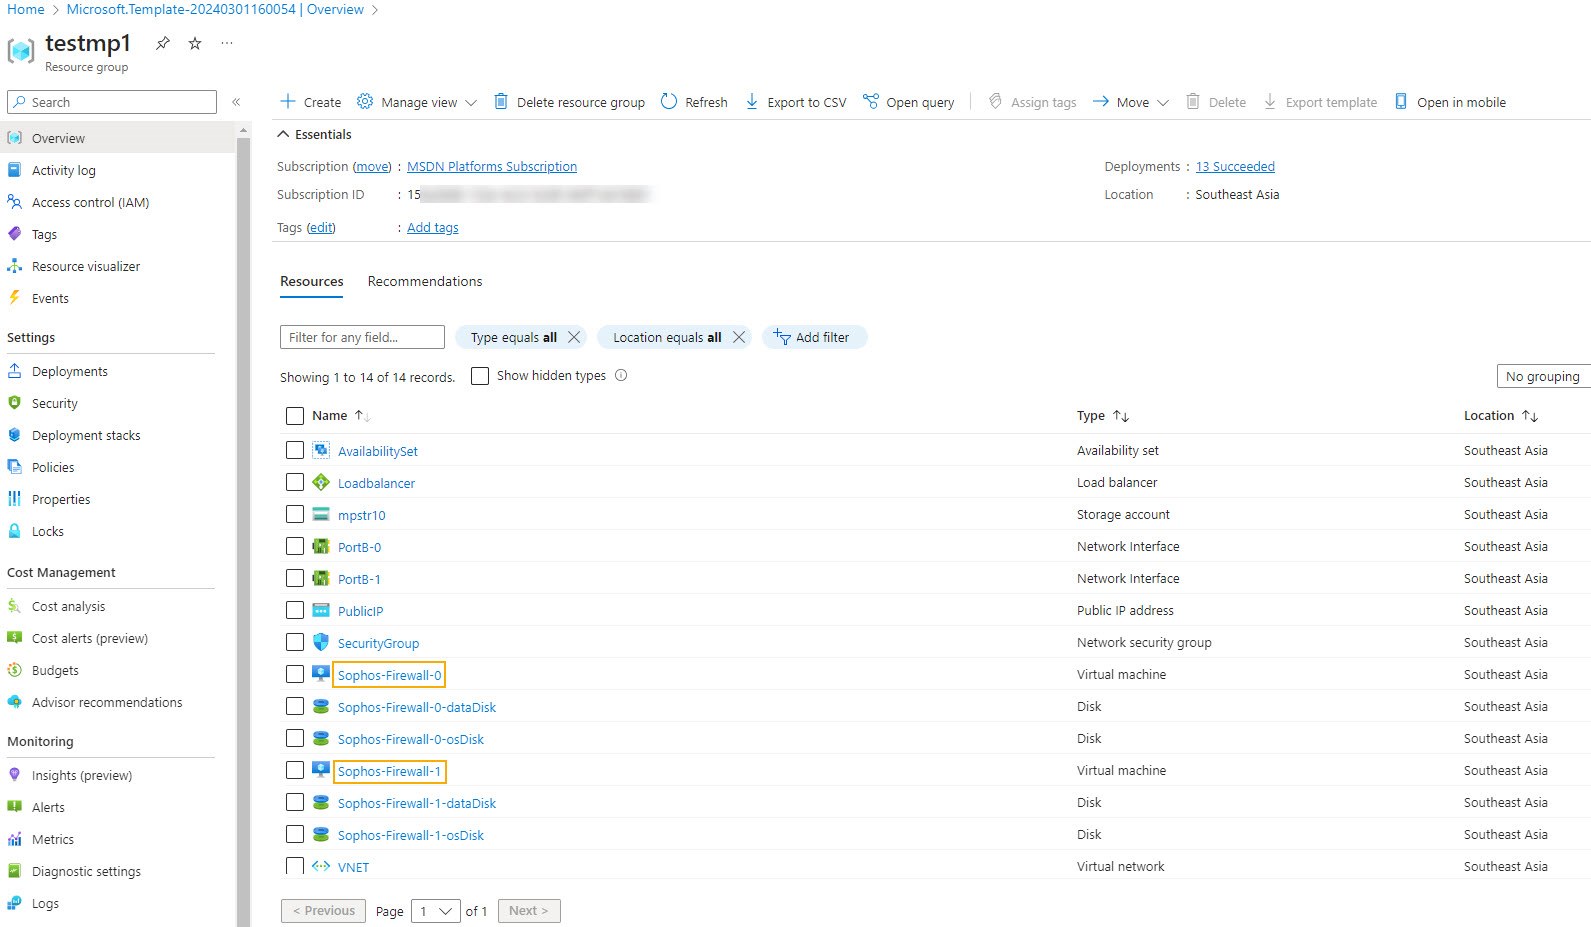
Set up the firewall
To set up the firewall, do as follows:
- On your resource group, click the Sophos Firewall virtual machine.
- Click Network settings.
You can see that only PortB (WAN) is configured.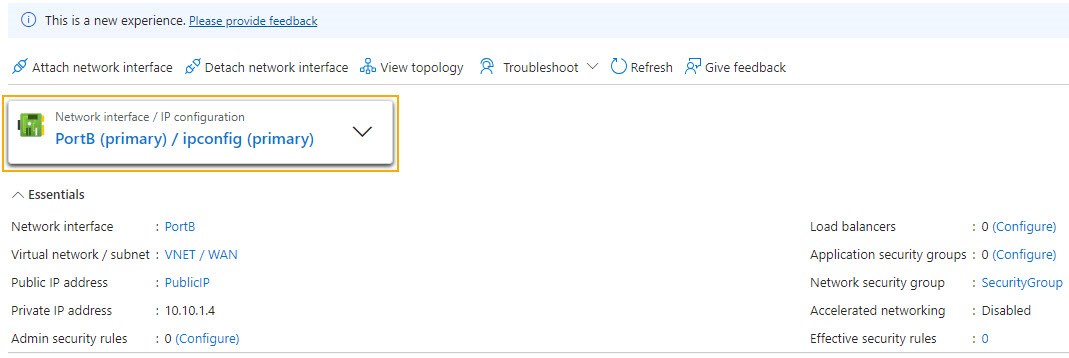
- Click Overview.
- Copy the public IP or the DNS name.

- Open a new browser window and access the firewall using the public IP or the DNS name.
Syntax: https://<Public IP or DNS name>:4444
Example:
- Sign in to the firewall and accept the Sophos End User Terms of Use.
- On the Register your firewall page, select an option that's applicable to you. In this example, we use the I have an existing serial number option and enter a serial number.
You can also select I do not want to register now if you want to register your firewall later.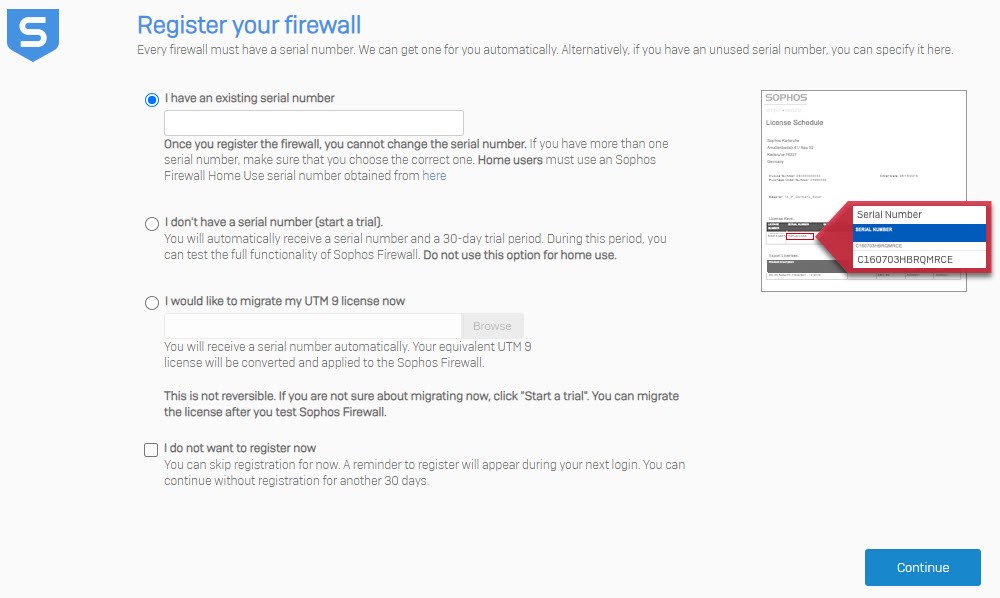
- Click Continue.
Claim your firewall with Sophos Central appears.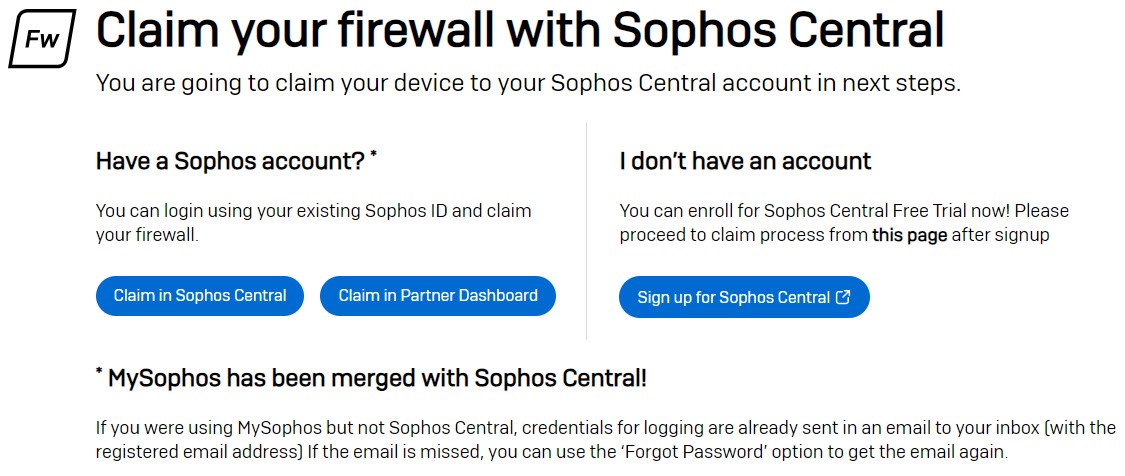
-
Click Claim in Sophos Central.
You're redirected to Sophos Central. You'll be prompted to sign in if you're not signed in already.
Claim firewall appears.
- Enter your firewall's serial number.
- Click Validate.
- Select Claim with 30 days Xstream Protection, Web Server Protection and Email Protection evaluation license or Just claim the firewall with Base license.
-
Click Claim firewall.
You're redirected to the firewall.
- Click Continue.
The firewall's Control center appears. - Go to Network > Interfaces.
You can see that only PortB (WAN) interface is configured.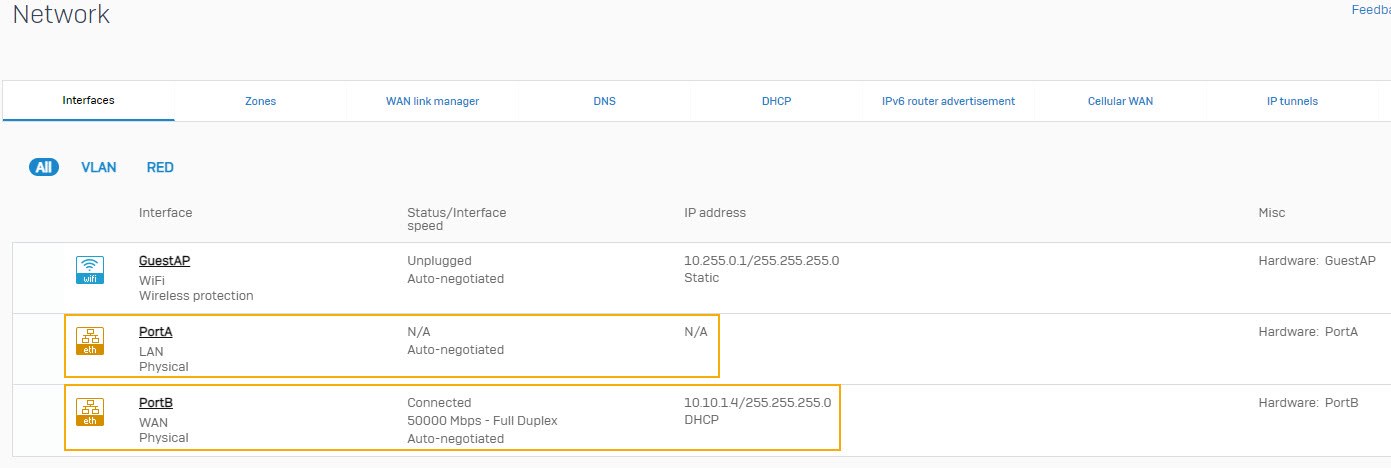
You have successfully deployed Sophos Firewall in single-arm mode.
Upgrade and backup/restore support
- Migration from dual-arm to single-arm or vice-versa isn't supported due to database dependencies.
- Backup and restore from a single-arm deployment to a dual-arm deployment or vice-versa isn't supported.
- Upgrade from version 20.0 to a later version is supported.
Limitations
- Multiple networking zone deployment isn't supported.
- Synchronized Security isn't supported.
- Web filtering using web proxy and captive portal isn't supported because of the missing LAN port.
- IPv6, LAG, bridge, IP tunnels, and VPN are out of scope.
More resources
- Sophos Firewall single arm GitHub
- Understand the structure and syntax of ARM templates
- Sophos Firewall: Implement a full HA (inbound/outbound) on Azure
Corrected spacing
[edited by: Erick Jan at 7:28 AM (GMT -8) on 13 Dec 2024]

