

Disclaimer: This information is provided as-is for the benefit of the Community. Please contact Sophos Professional Services if you require assistance with your specific environment.
Table of Contents
- Overview
- About Akamai SIA
- Hardware tested
- Software versions tested
- Akamai supported cipher suites for IPsec
- Akamai options for IPsec tunnels (all parameters)
- Sophos Firewall options for IPsec tunnels (all parameters)
- Traffic redirection mechanism on the device
- Verification of tunnel status on Akamai dashboard
- Verification of tunnel status on Sophos Firewall dashboard
- Troubleshooting
Overview
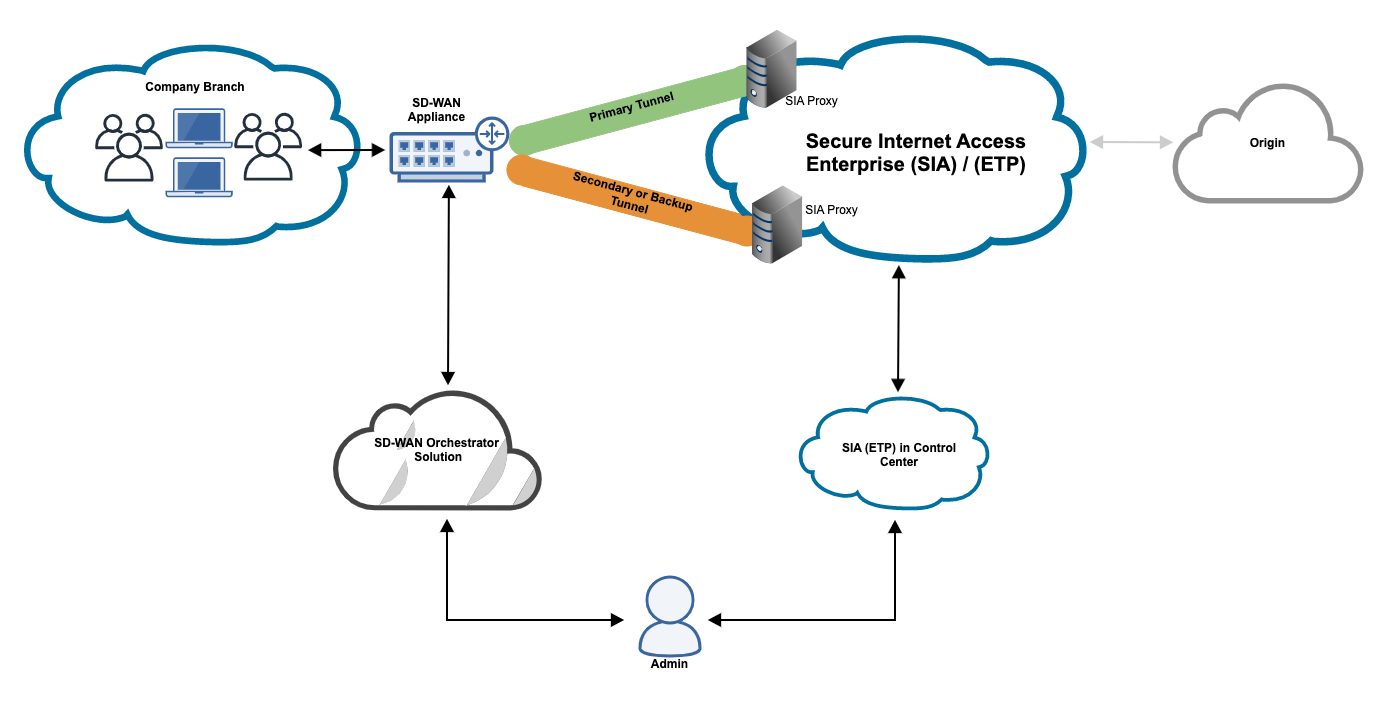
This Recommended Read describes how to configure SFOS with Akamai SIA
About Akamai SIA
Akamai Secure internet Access Enterprise (SIA) is a cloud-based, targeted threat protection solution that safeguards your organization from DNS and web-based threats, enforces authentication and acceptable use policies, and audits user internet access.
With SIA, you can:
- Inspect DNS, HTTP, and HTTPS traffic for threats.
- Block malicious domains and URLs.
- Identify compromised devices in your network.
- Use a client to extend SIA protection to devices on or off the corporate network.
- Customize a dashboard with widgets to track events and network activity.
- Control access to websites, web applications, sensitive data, and specific file types.
- Allow or block specific applications or application operations.
- Enforce web-based user authentication policies.
- Perform inline and offline payload analysis.
- Report all user activities for DNS, HTTP, and HTTPS traffic.
- Investigate detected threats.
- Protect against malware, ransomware downloads, and zero-day phishing attacks.
- Detect command and control calls.
Hardware tested
- Sophos Firewall hardware
- Sophos Firewall virtual appliance on VMware
Software versions tested
- SFOS version 19.5 MR2 and later
Akamai supported cipher suites for IPsec
Supported cipher suites for IKE protocol
|
Cipher Suite |
Diffie-Hellman (DH) Group |
Encryption Algorithm |
Integrity Algorithm |
|
aes256gcm16-sha384-ecp384 |
20 |
AES-GCM-256 |
SHA2-384 |
|
aes128gcm16-sha256-ecp256 |
19 |
AES-GCM-128 |
SHA2-256 |
|
aes256-sha256-ecp384 |
20 |
AES-CBC-256 |
SHA2-256 |
|
aes256-sha256-ecp256 |
19 |
AES-CBC-256 |
SHA2-256 |
|
aes256-sha512-modp4096 |
16 |
AES-CBC-256 |
SHA2-512 |
|
aes256-sha512-modp3072 |
15 |
AES-CBC-256 |
SHA2-512 |
|
aes256-sha512-modp2048 |
14 |
AES-CBC-256 |
SHA2-512 |
|
aes256-sha384-modp4096 |
16 |
AES-CBC-256 |
SHA2-384 |
|
aes256-sha384-modp3072 |
15 |
AES-CBC-256 |
SHA2-384 |
|
aes256-sha384-modp2048 |
14 |
AES-CBC-256 |
SHA2-384 |
|
aes256-sha256-modp4096 |
16 |
AES-CBC-256 |
SHA2-256 |
|
aes256-sha256-modp3072 |
15 |
AES-CBC-256 |
SHA2-256 |
|
aes256-sha256-modp2048 |
14 |
AES-CBC-256 |
SHA2-256 |
Supported cipher suites for ESP protocol
|
Cipher Suite |
DH Group |
Encryption Algorithm |
Integrity Algorithm |
|
aes256-sha256-ecp384 |
20 |
AES-CBC-256 |
SHA2-256 |
|
aes256-sha256-ecp256 |
19 |
AES-CBC-256 |
SHA2-256 |
|
aes256-sha512-modp4096 |
16 |
AES-CBC-256 |
SHA2-512 |
|
aes256-sha512-modp3072 |
15 |
AES-CBC-256 |
SHA2-512 |
|
aes256-sha512-modp2048 |
14 |
AES-CBC-256 |
SHA2-512 |
|
aes256-sha384-modp4096 |
16 |
AES-CBC-256 |
SHA2-384 |
|
aes256-sha384-modp3072 |
15 |
AES-CBC-256 |
SHA2-384 |
|
aes256-sha384-modp2048 |
14 |
AES-CBC-256 |
SHA2-384 |
|
aes256-sha256-modp4096 |
16 |
AES-CBC-256 |
SHA2-256 |
|
aes256-sha256-modp3072 |
15 |
AES-CBC-256 |
SHA2-256 |
|
aes256-sha256-modp2048 |
14 |
AES-CBC-256 |
SHA2-256 |
Reference: Supported cipher suites for IPsec
Akamai options for IPsec tunnels (all parameters)
- Configure your branches as locations in SIA. Make sure the public IP addresses of branches are configured as locations in SIA. To create a location, see Create a location.
To create a location with static IP addresses:
- In the Threat Protection menu of Enterprise Centre, select Locations.
- Click the plus sign (+) icon to add a new location.
- In the Location name field, enter a name for the location.
- In the Description field, enter a description for the location.
- If the policy you need is already created, select a policy from the Policy menu. Otherwise, assign a location to a policy when configuring the policy or edit this location later.
- Click the link icon for Identifiers.
- Select IP address as the location identifier.
- To configure static IP addresses or CIDR blocks, in the IP Address / CIDR field, enter an IP address or CIDR block in this format:
IPAddress/n
Where:
IPAddressis the IPv4 or IPv6 address.nis the bit prefix. The maximum CIDR block for IPv4 is /16, and for IPv6, it’s /48.
You can provide multiple IP addresses or CIDR blocks. If you enter multiple addresses, each address appears separately in the field.
- Click Save.
- To mask a sublocation's internal (private) IP address, ensure the Internal IP Mask toggle is turned on. When turned on, you can configure sub-locations with a subnet up to /28 for IPv4 or /56 for IPv6. Turn off this option to configure addresses with a subnet up to /32 for IPv4 or /128 for IPv6.
- To protect DNS traffic that arrives from an IPsec tunnel with the policy that’s assigned to the location, select Protect DNS in Tunnels.
- Click Save. To deploy the location with the save operation, click Save and Deploy.
- Generate or create a pre-shared key. You can manually create a key that contains a minimum of 24 characters and a random sequence of characters that can't be found in the dictionary. To use a command to do this on Linux or macOS, see Generate a pre-shared key.
On Linux or macOS, complete the following procedure to generate a pre-shared key (PSK) with a minimum of 24 characters.
Open a command line on Linux/MacOS and enter this command:
head -c 24 /dev/urandom | base64 - Take note of the IPsec fully qualified domain names (FQDNs). When configuring your SD-WAN solution, you need these FQDNs to establish a primary and secondary (backup) tunnel to SIA:
- primary.ipsec.akaetp.net
- secondary.ipsec.akaetp.net
Some SD-WAN solutions may require the IP addresses that resolve from these FQDNs. You’ll need to ping these FQDNs from your SD-WAN appliance to determine these IP addresses. - Configure IPsec credentials in SIA. Before configuring your SD-WAN solution, you must configure SIA with the PSK you generated and create the IKE Identifier. See Configure IPsec credentials in SIA.
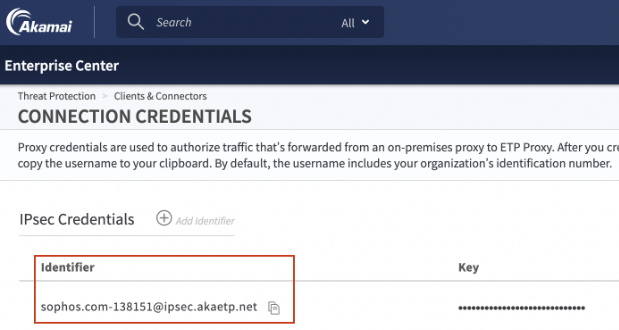
To configure IPsec credentials:
- In the Threat Protection menu of Enterprise Center, select Clients & Connectors > Connection Credentials.
- In the IPsec Credentials section, click the plus sign.
- Enter a unique identifier. This identifier you provide and the configuration ID and FQDN are already included in the IKE identifier.
- In the key field, enter the PSK and confirm the key value.
- Click Save.
Sophos Firewall options for IPsec tunnels (all parameters)
Create IPsec connection tunnel
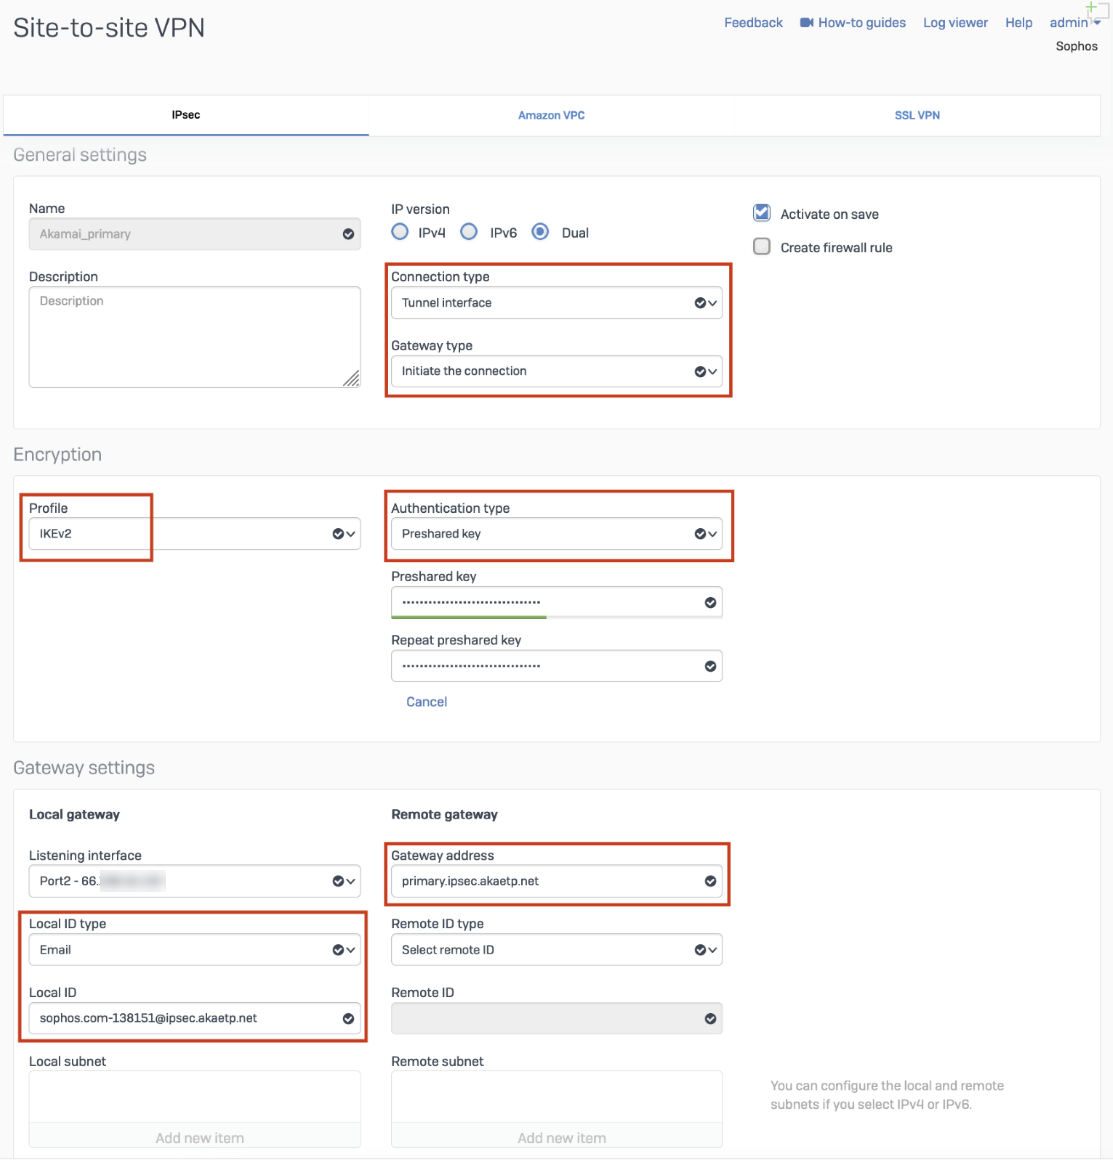
The next step involves configuring a site-to-site IPsec VPN connection on your Sophos Firewall device.
- Go to Configure > Site-to-site VPN.
- In IPsec, select Add.
- In the General settings group, configure as follows:
- Name: Give your site-to-site VPN a descriptive name.
- Connection type: Tunnel interface
- Gateway type: Initiate the connection
- In the Encryption group, configure as follows:
- Profile: IKEv2 (From default profile)
- Authentication type: Preshared key (use the PSK generated above)
- In Gateway settings, configure as follows:
- Gateway address: Enter SIA proxy gateway details for each tunnel.
- primary.ipsec.akaetp.net
- secondary.ipsec.akaetp.net
- Local ID type: select Email
- Local ID: IKE identifier value from the step Configure IPsec credentials in SIA.
- Gateway address: Enter SIA proxy gateway details for each tunnel.
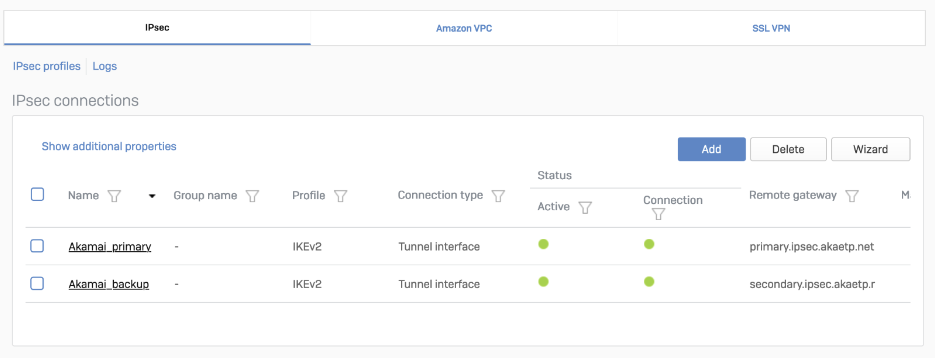
After setting up your IPsec tunnel, it’ll appear on the IPsec connections list with an Active status.
Assign the XFRM interface address
- Go to Configure > Network.
- In Interfaces, select the corresponding interface to the IPsec tunnel you created.
- Edit the interface to assign an address.
When you’re finished, it should look similar to the following:

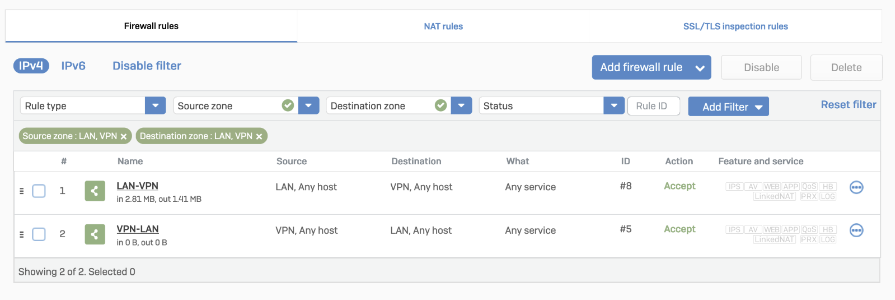
Add firewall rule
- Go to Protect > Rules and Policies.
- In Firewall rules, create a firewall rule with the criteria and security policies from your company that allows traffic to flow between Sophos and Akamai SIA Proxy.
Traffic redirection mechanism on the device
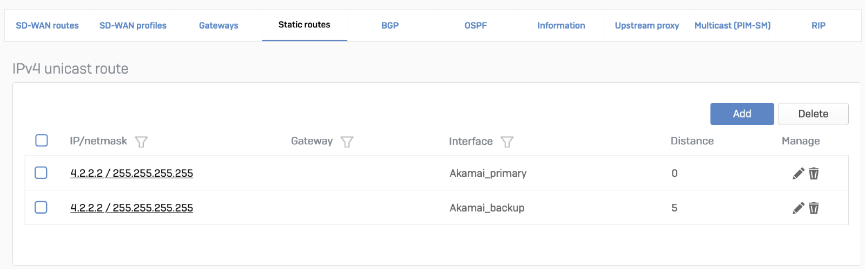
Static route
Go to Configure > Routing > Static routes to add an XFRM interface-based route. The interface will be automatically created when you set up a tunnel interface based on IPsec (such as the Akamai_primary/ Akamai_backup).
SD-WAN route
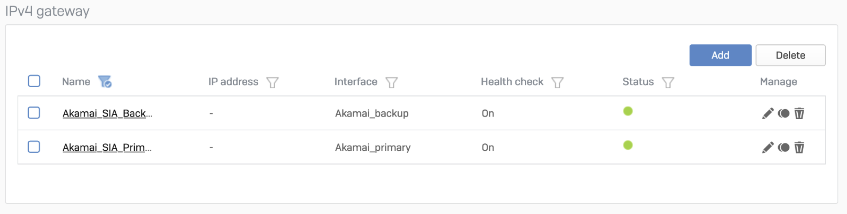
- Go to Configure > Routing > Gateways to create a custom gateway on the XFRM interface. The interface will be automatically created when you set up a tunnel interface based on IPsec.
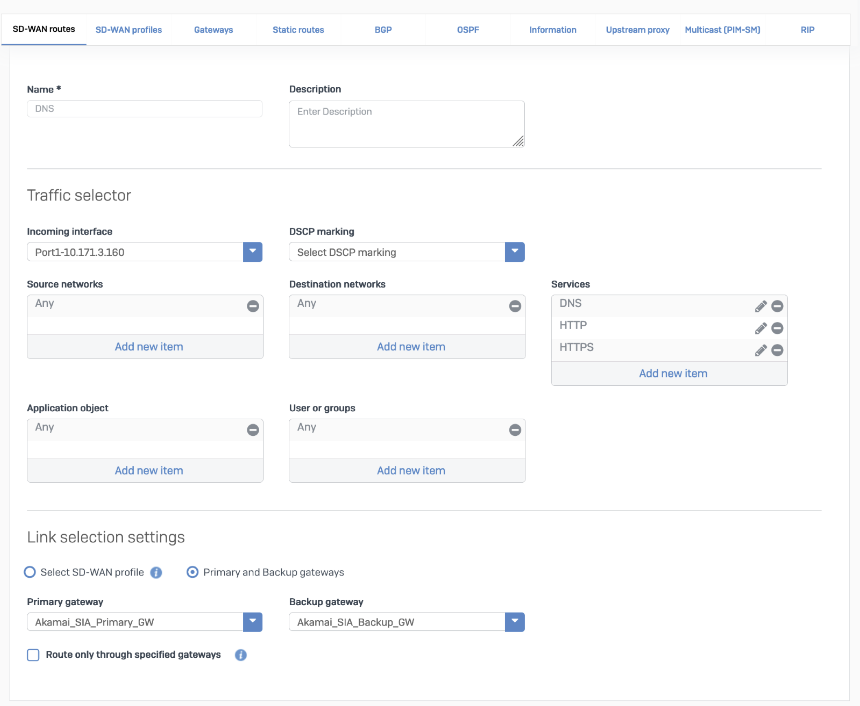
- In Configure > Routing > SD-WAN routes, click Add to add the desired networks and services in the route to redirect traffic to Akamai SIA Proxy. Enter a descriptive name for your connection. Don’t forget to choose the correct Primary and Backup gateways option or SD-WAN Profile.
Verification of tunnel status on Akamai dashboard
Sign in to Enterprise Center and go to Threat Protection > Reports > IPsec Tunnel Activity.

Verification of tunnel status on Sophos Firewall dashboard
When the tunnel is working, its Status will be green.

The corresponding XFRM interface will also show a Connected status.
Troubleshooting
- VPN Tunnels are up on both ends. If the tunnel isn’t coming up, check that the profile configuration is correct.
- Corresponding tunnel interfaces are up on SFOS.
- Routing configuration and route precedence are correctly set on SFOS.
- Do a
tcpdumpto see if packets are going via VPN tunnels as expected from SFOS. - Firewall rules for a specific zone and host/service are added in SFOS.
Changed to: Software versions tested SFOS version 19.5 MR2 and later
[edited by: DominicRemigio at 7:43 AM (GMT -8) on 18 Dec 2024]