

Disclaimer: This information is provided as-is for the benefit of the Community. Please contact Sophos Professional Services if you require assistance with your specific environment.
Table of Contents
- Overview
- Prerequisites and important information
- Network diagram
- Sophos Central for API credentials
- AWS web console
- CloudFormation stack
- Step 3.1 Specify Stack Details
- Step 3.2 Availability Zone
- Step 3.3 Trusted Network
- Step 3.4 Selecting Keypairs
- Step 3.5 Sophos Central Client ID
- Step 3.6 Auto Scaling Configuration
- Step 3.7 End User License Agreement
- Step 3.8 Tags
- Step 3.9 IAM Resources Submission
- Step 4.1 AWS EC2
- Step 4.2 Renaming Instances
- DNAT use-case configuration
- Additional information related to autoscaling deployment
Overview
This Recommended Read will help you to deploy the Sophos Firewall version 19 in the AWS cloud with an autoscaling feature turned on that facilitates the firewall EC2 instances to automatically scale up/down depending upon the load they’re experiencing and the trigger events to support this activity.
Sophos Central acts as a primary controller having the required configurations in place on the firewall group level itself, and the firewall EC2 instances in AWS act as worker nodes that get automatically provisioned, auto-approved, and placed in the correct firewall group of the Sophos Central.
Pre-requisites and important information
- You need an AWS account to deploy Sophos Firewall.
- Sophos Firewall must be running on version 19.0 MR1 or above.
- You must create API Credentials from Sophos Central with the Service Principal Firewall role.
- Firewall EC2 instance in autoscaling comes as single-arm deployment, which means it has only one functioning interface (PortB).
- Only PAYG licensing is supported as of now.
- It only supports inbound traffic flow use cases like DNAT and WAF.
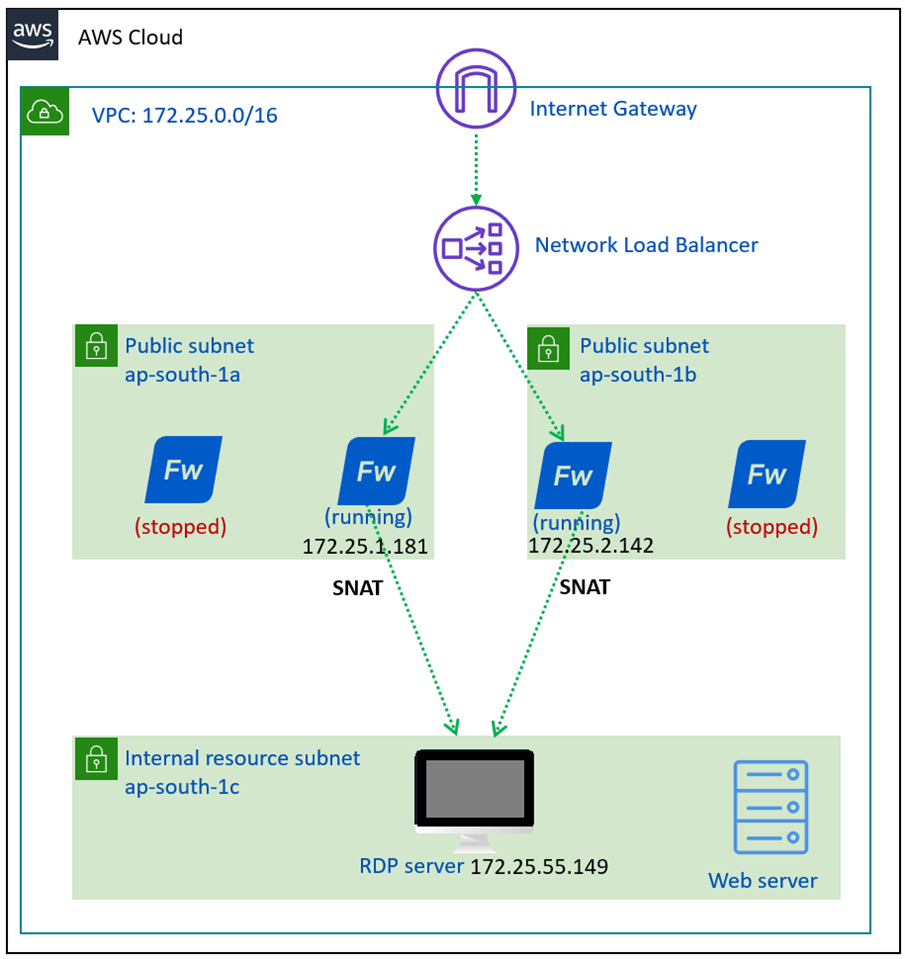
Network diagram
A basic architectural diagram of the setup can be found below.
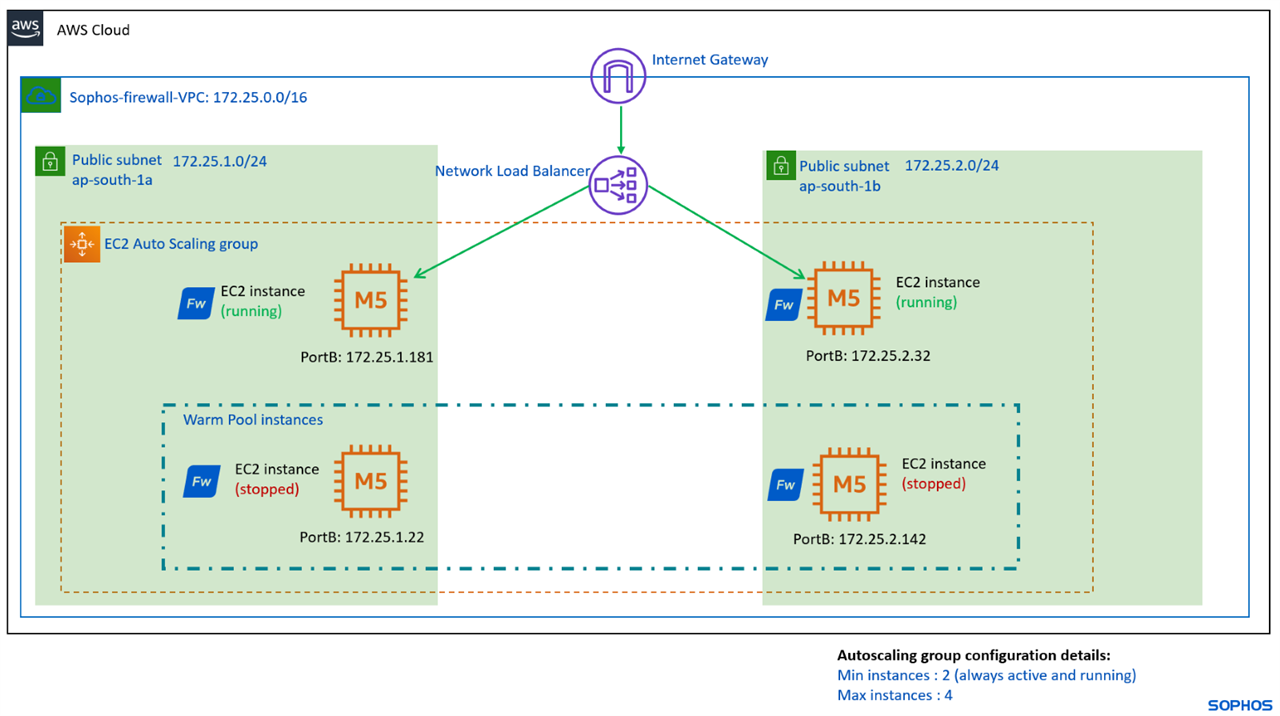
Note: The IP addresses used in this setup and document are for demo purposes. You may choose any IP subnet range and the values in autoscaling group parameters during the deployment.
Sophos Central for API credentials
Step 1.1 Sophos Central
Log in to the Sophos central account by accessing the website central.sophos.com and entering the credentials and OTP.
Step 1.2 API Credentials Management
Navigate to Global Settings > Administration > API Credentials Management and click on the Add credential button to create a new one.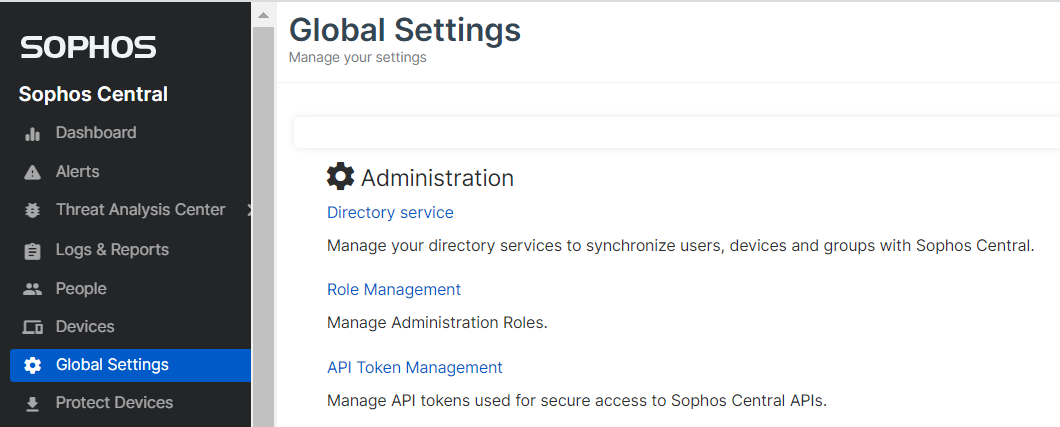
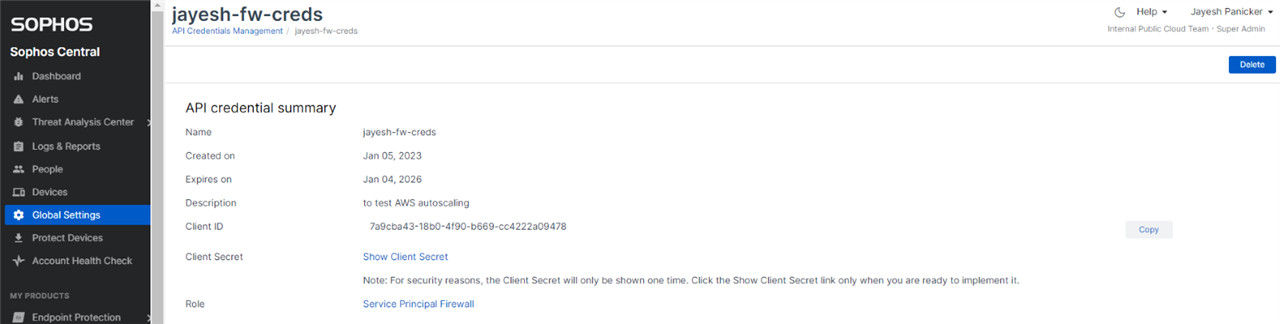
Step 1.3 Credentials and Role
Enter an appropriate credentials name, select the Role as Service Principal Firewall, and click the Add button.
Step 1.4 Client ID and Client Secret
Copy the values of the Client ID and Client secret and save them in a text file. We’ll need these values in the other Lab sections.
AWS web console
We’ll use the autoscaling template from the AWS Marketplace subscription, and it’ll be used to start the CloudFormation stack deployment of Sophos Firewall.
Note: This new autoscaling functionality is currently supported only for the Sophos Firewall PAYG pricing model.
Step 2.0 Key Pairs
You can skip to step 2.1 if you already have a key pair created in your AWS account.
Log in to the AWS web console and search for EC2 service, and once it’s displayed in the results, click it.
Go to Network & Security > Key pairs on the left side menu and click the Create key pair button.
Enter a name for the key, keep other parameters as-is, and click the Create key pair button to generate a new key pair.

Step 2.1 AWS Marketplace
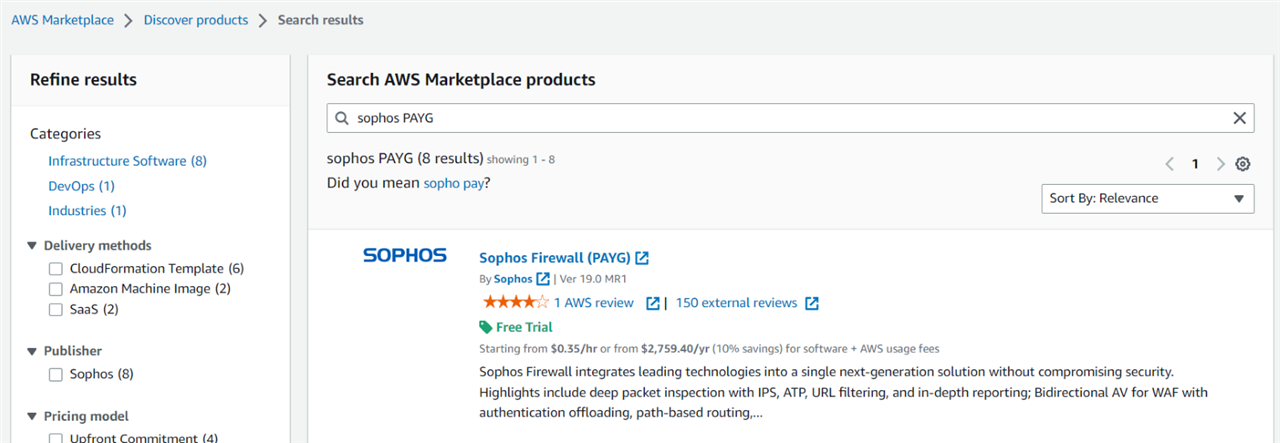
From your AWS web console, search for AWS Marketplace, then go to Discover products section and search for Sophos PAYG.
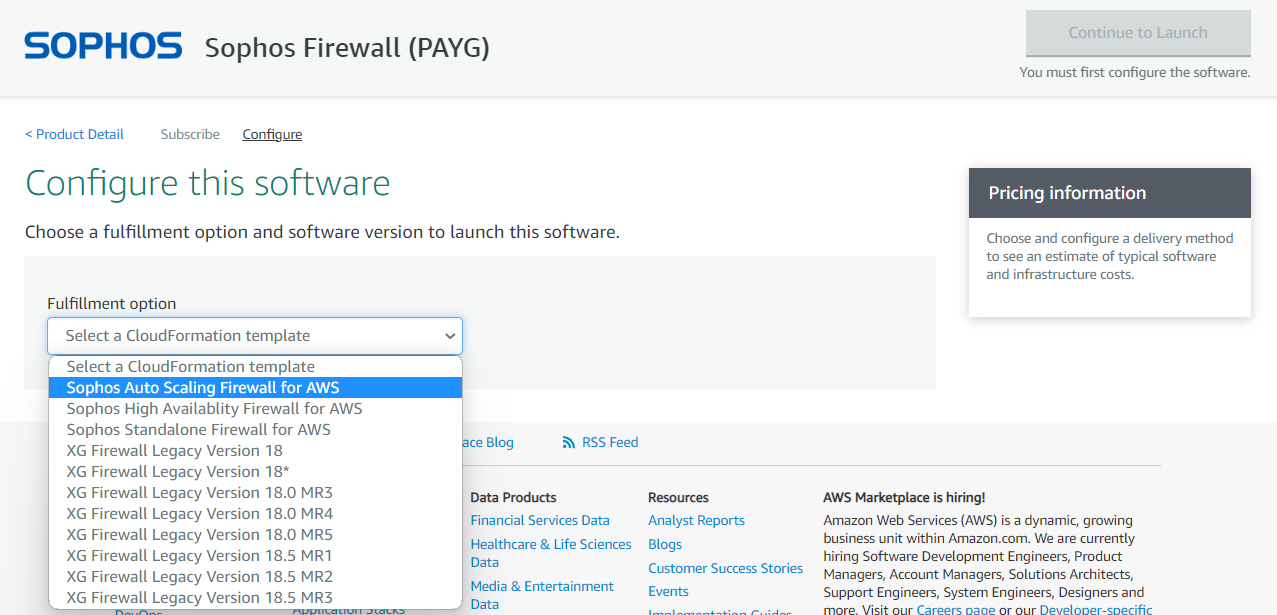
Step 2.2 Fulfillment Option
After subscribing to this PAYG model, under the fulfillment option, select Sophos Auto Scaling Firewall for AWS with the required deployment region and then click the Continue to Launch button.
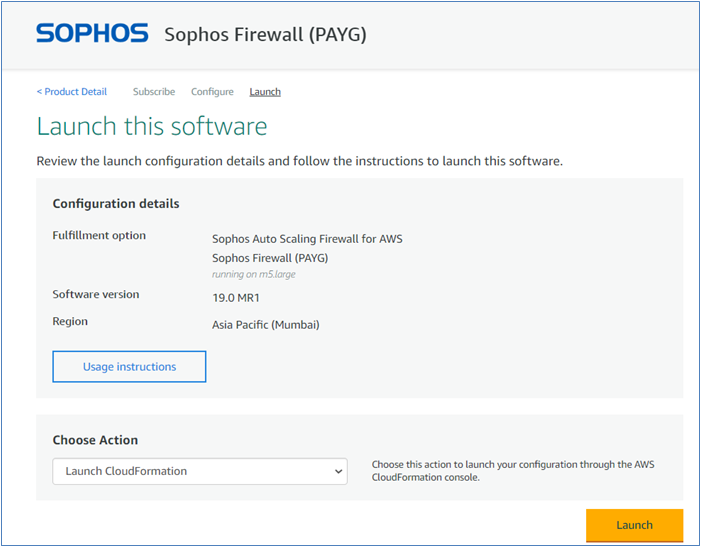
Step 2.3 Launching Software
Select the Launch CloudFormation option from the drop-down list and then click the Launch button.
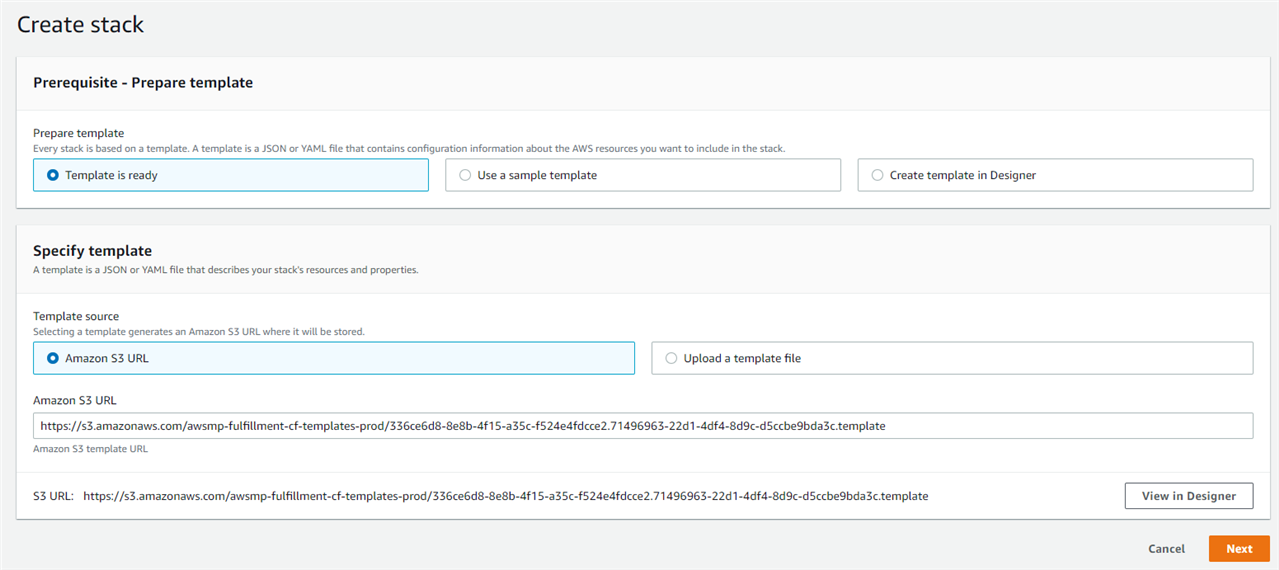
Step 2.4 Stack Creation
This will redirect you to the CloudFormation stack deployment page, having the template file detected in the S3 URL section. Click the Next button.
CloudFormation stack
Now, we’ll enter the details of the CloudFormation stack and start deploying Sophos Firewall instances.
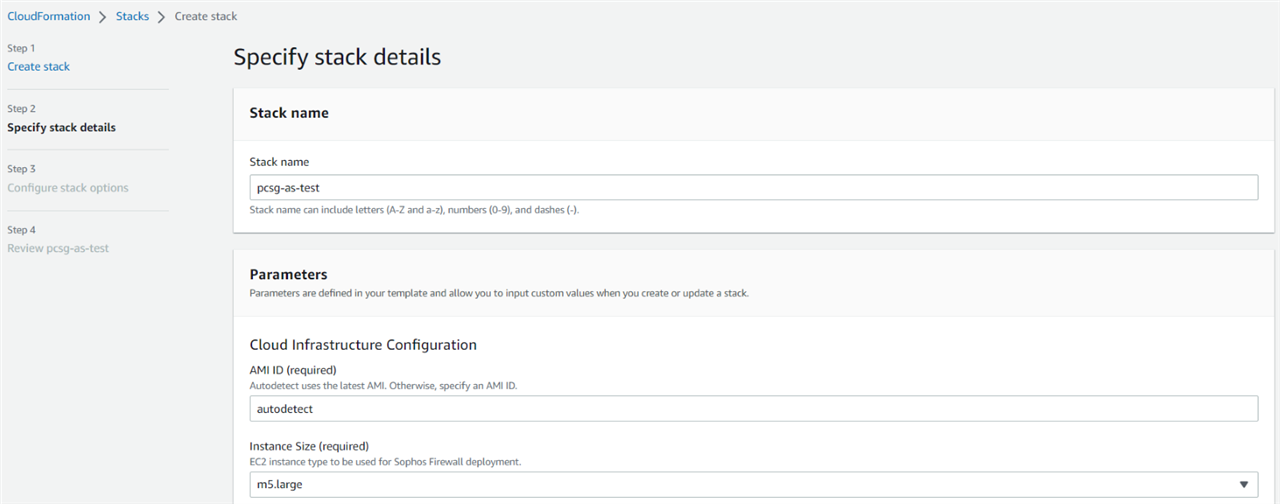
Step 3.1 Specify Stack Details
After clicking on the Next button in step 2.4, you’ll be asked to enter information about the deployment.
Enter a meaningful stack name for this CloudFormation stack, keep the AMI ID as autodetect and Instance size as m5.large. You may choose a smaller instance size, if needed.
Step 3.2 Availability Zone
Select separate Availability Zones for each drop-down section, so that the firewall EC2 instances get deployed in both the Availability Zones.
If you wish to deploy the firewall instances in a new VPC, enter the first two octets of the VPC network subnet that is unused as Network Address Prefix and leave other subsequent parameters blank.
Alternatively, if you wish to deploy the firewall EC2 instances in an existing VPC network, then along with the correct network prefix, you must compulsorily enter the VPC ID, public subnet ID, and private subnet ID.
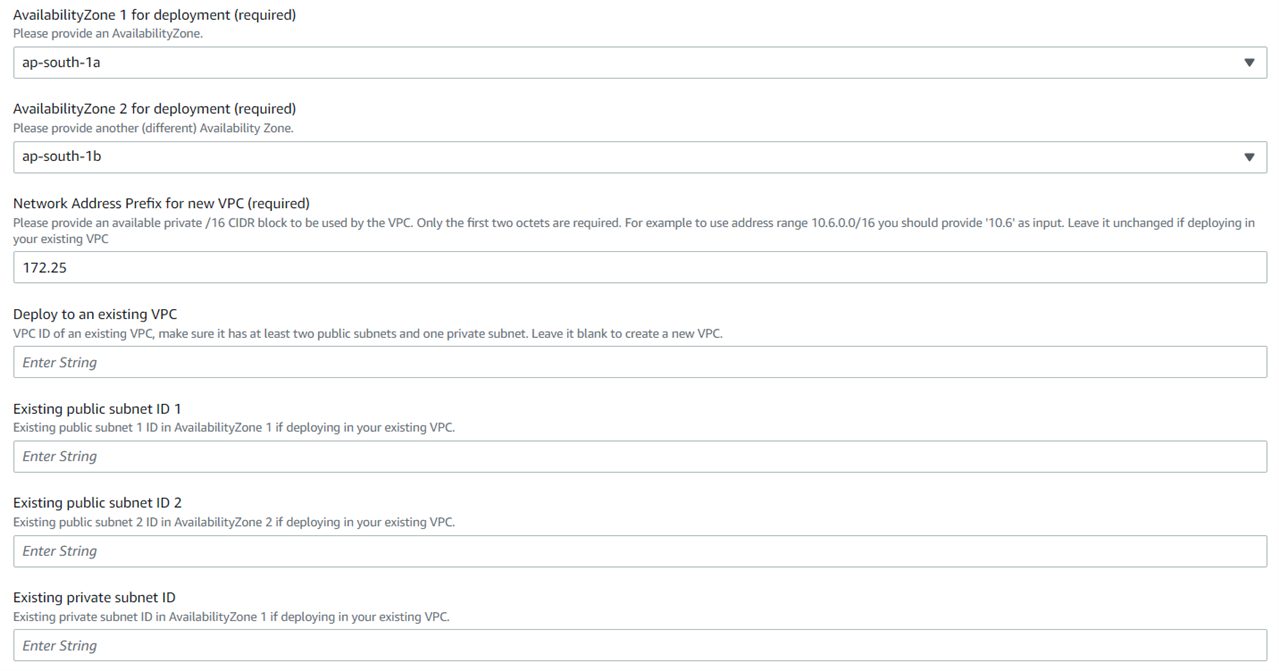
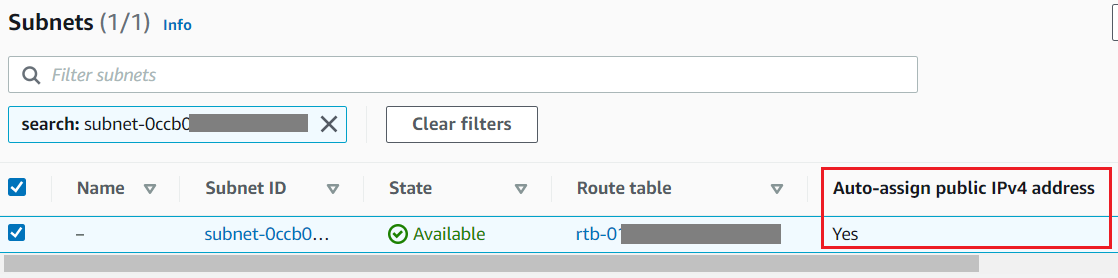
Note: If you’re using an existing subnet for your Sophos Firewalls, then you must ensure it has the ‘Auto-assign public IPv4 address option turned on (Yes).
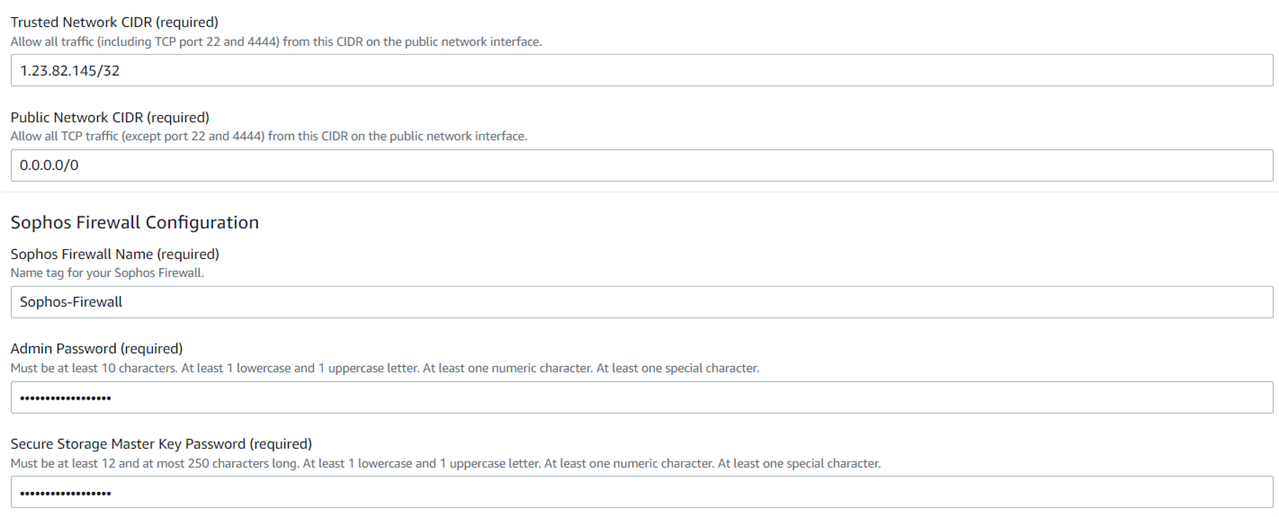
Step 3.3 Trusted Network
Check your public IP using www.whatismyip.com and then enter that public IP in Trusted Network CIDR with a /32. You must NOT enter 0.0.0.0/0 as it’ll open access to all the ports for the firewall over the internet.
Enter the following:
- Enter the Public Network CIDR as 0.0.0.0/0, as this will allow inbound traffic to the firewall instances from all the ports, except the management ports 22 and 4444.
- Name for your Sophos Firewall instances.
- Administrator password that is in line with the password policy and will be used by username admin for web console and CLI access.
- Also, enter the Secure Storage Master Key (SSMK) that you would want to be used by the firewall to encrypt its data.
Step 3.4 Selecting Keypairs
Select the previously created Keypairs in step 2.0.
CloudWatch integration is supported now, so that you can select yes for the Use CloudWatch option, and the firewall will start sending its logs to the CloudWatch for monitoring and storage purposes.
Enter the email ID and password of the Sophos Central account, so that the firewall instances get automatically registered without any manual intervention.
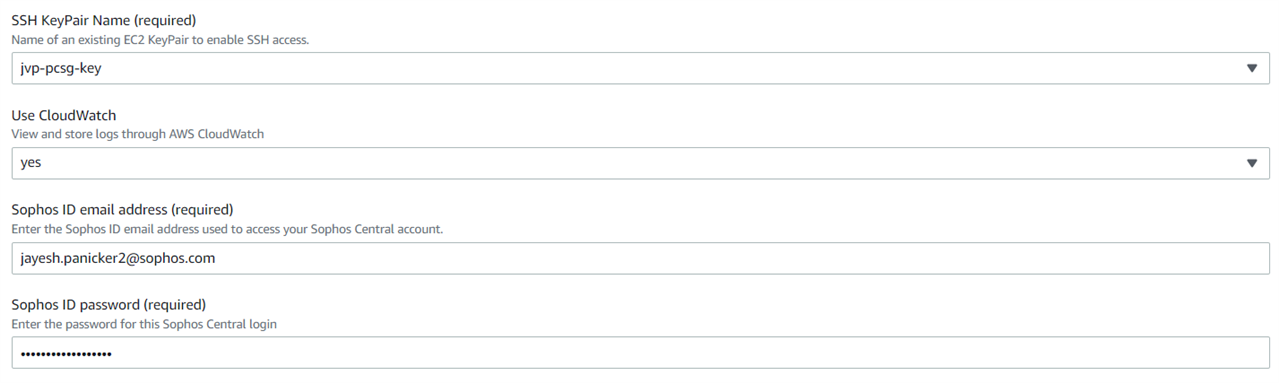
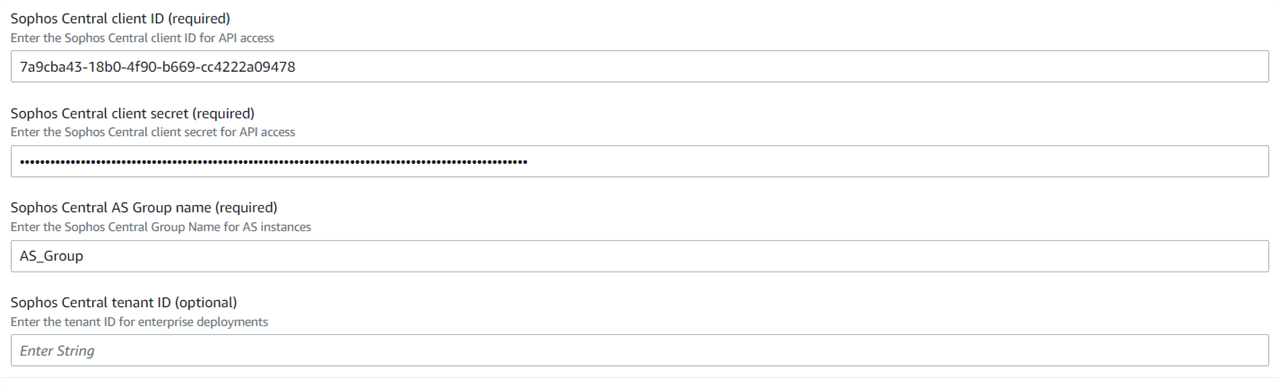
Step 3.5 Sophos Central Client ID
Paste the "Client ID" and "Client secret value" initially noted in step 1.4.
Enter the name of the Central Firewall Group that will be automatically created in the Sophos Central account.
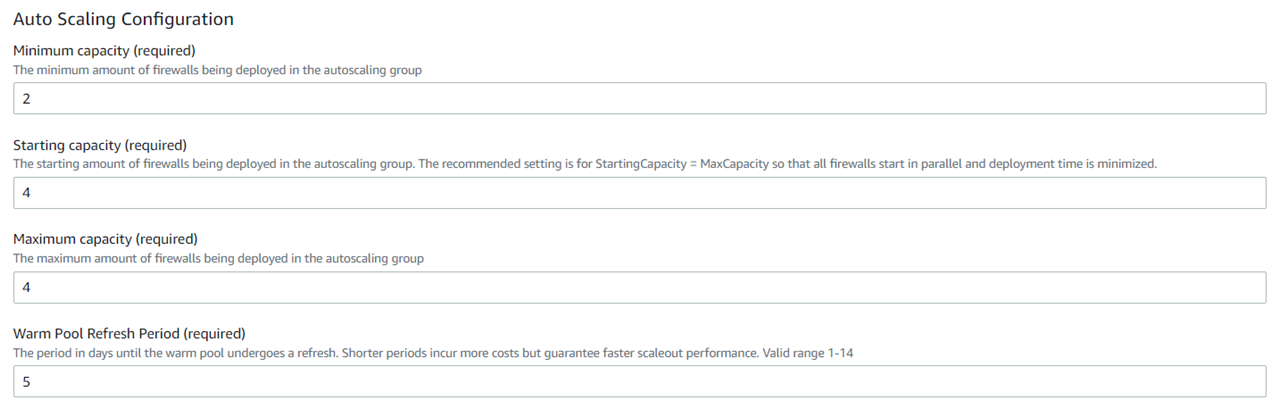
Step 3.6 Auto Scaling Configuration
We’ll define the number of firewall EC2 instances needed in this autoscaling group.
If you need a minimum of two instances to run all the time, then you can set the Minimum capacity value as 2.
In this example, we have set this value as 2.
Starting capacity would be the number of instances that will be deployed initially as a part of this deployment. So if the maximum instances are supposed to be 4, it’s recommended to see the same value as the starting capacity, so that all these instances are deployed simultaneously and get registered and added into the firewall group instantly. In this example, we set the value as 4.
Maximum capacity is the maximum number of firewall instances that would be a part of this autoscaling group, and we have set this value as 4.
The warm Pool Refresh Period is the number of days in which the instances that are in a stopped status will go into a running status, just to get synchronized with Sophos Central and get the updated configuration synced from Firewall Group. The default value is five days.
For example, out of 4 instances, if two are running all the time, the other two instances will also come into the running status once every five days, to remain updated with the configuration done on the Firewall Group level and also to sync with Sophos Central.
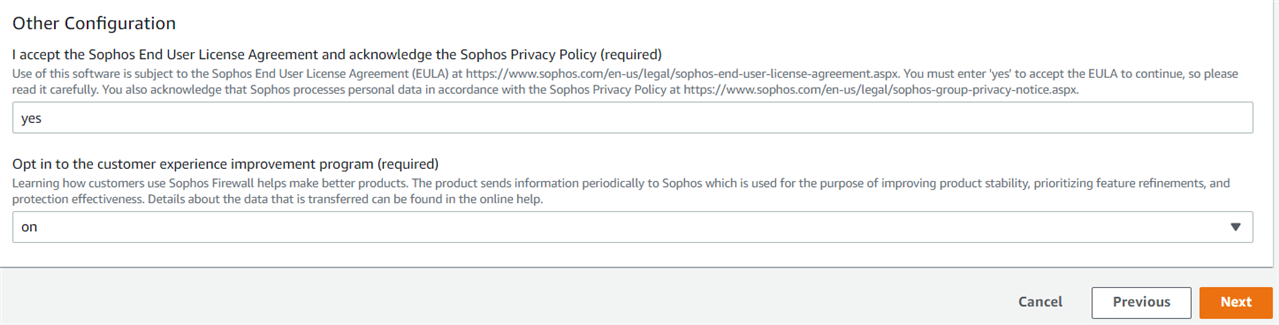
Step 3.7 End User License Agreement
You can type yes (case-sensitive) to agree with its terms and conditions.
Select an option from the drop-down list for customer experience improvement program participation and click the Next button.
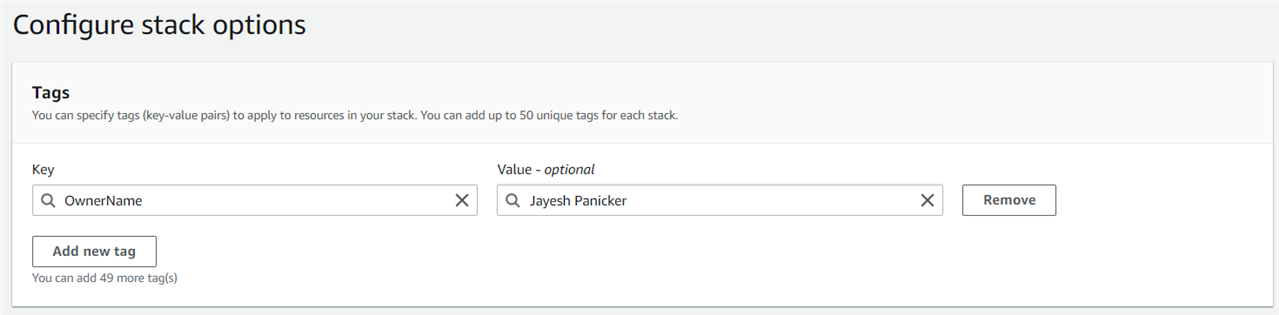
Step 3.8 Tags
It’s recommended to enter the Key as OwnerName and then type in your First and Last Name as its Value. This will help you to identify the owner of the resources in the AWS account. You may also use the naming conventions of your organization as tags.
Click on the Next button.
Step 3.9 IAM Resources Submission
Scroll down and turn on the tick mark for acknowledgement of IAM resources creation, and then click the Submit button.
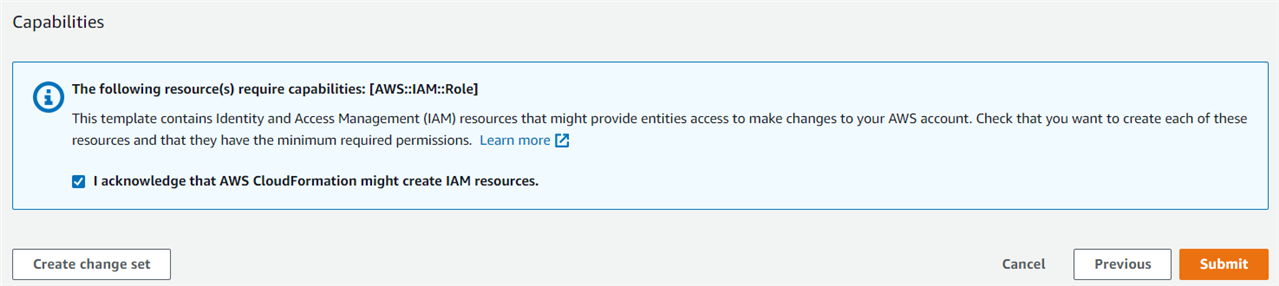
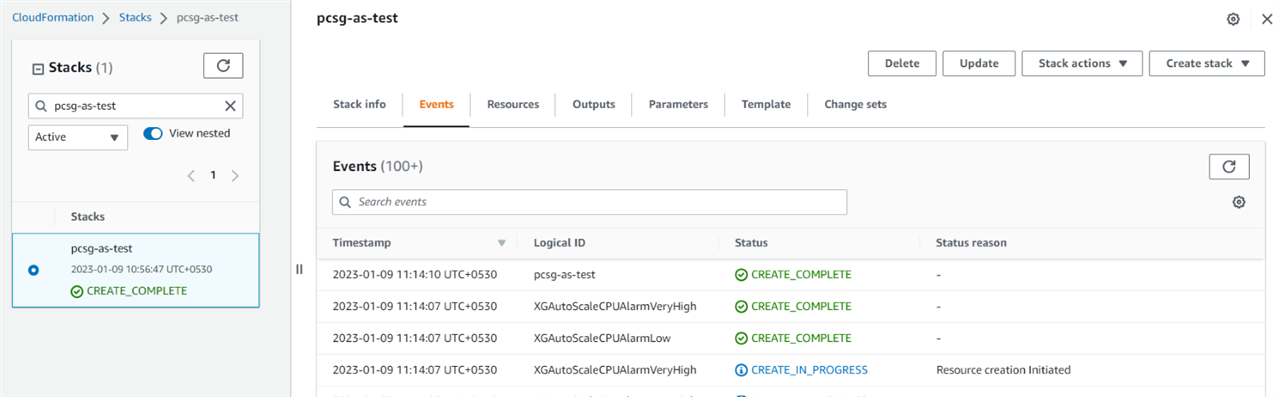
This will start the deployment process and will take approximately 15 to 20 minutes. Once the deployment is completed, you’ll see the status as CREATE_COMPLETE for your stack. At this stage, you have successfully deployed the Sophos Firewall EC2 instances in the autoscaling group.
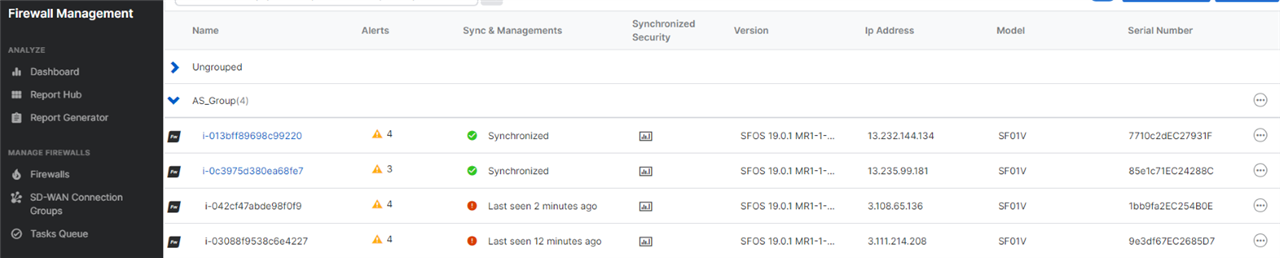
After the deployment is completed successfully, log in to your Sophos Central account, and it’ll show the Firewall Group and 4 Firewall PAYG instances automatically placed in that group.
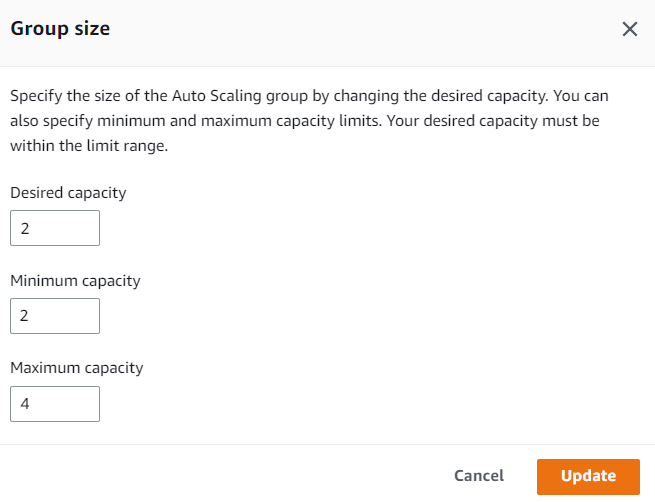
Now, we check the capacity values of the Autoscaling group and rename the firewall EC2 instances for easy identification purposes.
Step 4.1 AWS EC2
Log in to the AWS web console and go to the EC2 section.
On the left menu, scroll down and click Auto Scaling Groups, and you’ll see a new autoscaling group created by the CloudFormation stack.
Click it and see the values of capacity in Group details. Click the Edit button to modify those values, and if you always want at least 2 EC2 instances (one from each AZ) to be up and running all the time, then set the Desired capacity and Minimum capacity value as 2 and click the Update button.
Step 4.2 Renaming Instances
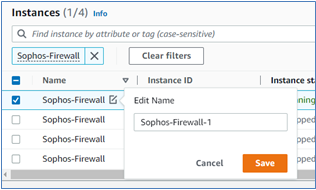
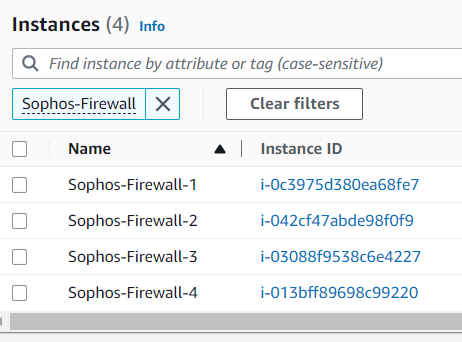
On the same left menu, scroll up and click Instances, and you can see 4 Firewall EC2 instances with the same name. So, click the rename icon and make sure that you give some unique value in their names so that you can identify each EC2 instance easily.
DNAT use-case configuration
We’ll configure DNAT for the RDP server in the Sophos Central firewall group so that all the firewall EC2 instances inherit the same configuration.
Following is a high-level architectural diagram of the network setup that we have used as a reference to show the configuration steps:
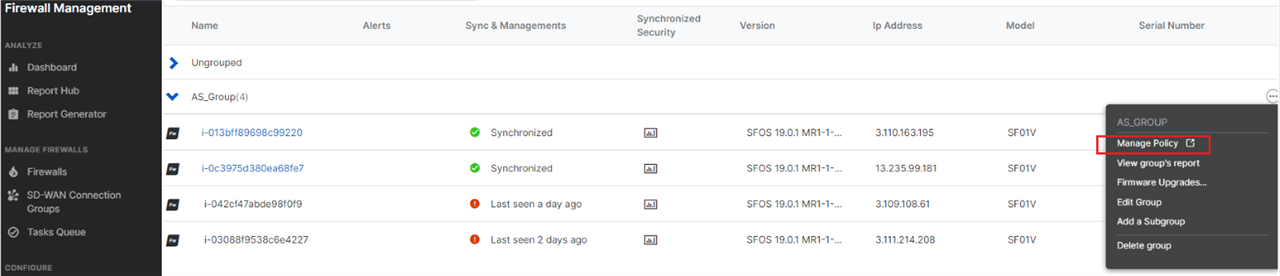
Step 5.1 Firewall Management
Login to your Sophos Central account, go to Firewall Management > Firewalls click the three dots icon on the right side of the group name, and click Manage policy
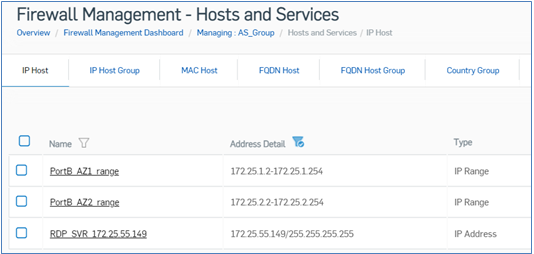
Step 5.2 IP Host
Inside the group policy, go to SYSTEM > Hosts and Services > IP Host and create IP Range hosts (except the first IP x.x.x.1) for subnets of both the AZs that belong to PortB.
Also, create an IP host object for the internal RDP server IP address.
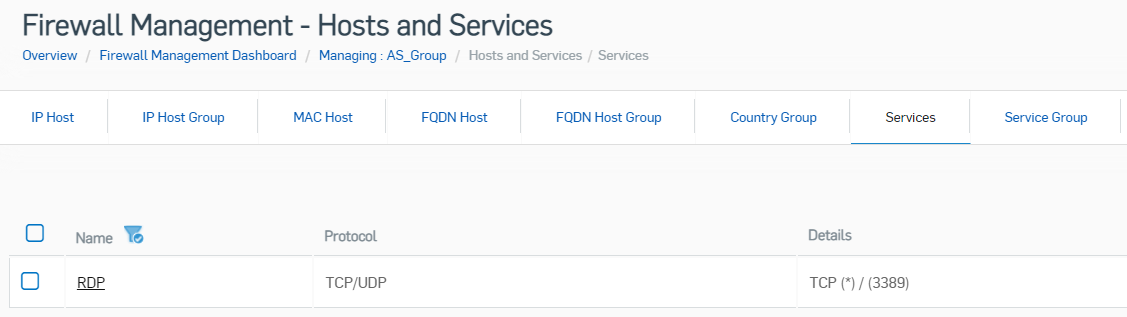
Step 5.3 Host & Services
Go to the Services section and create a new RDP port TCP 3389 service.
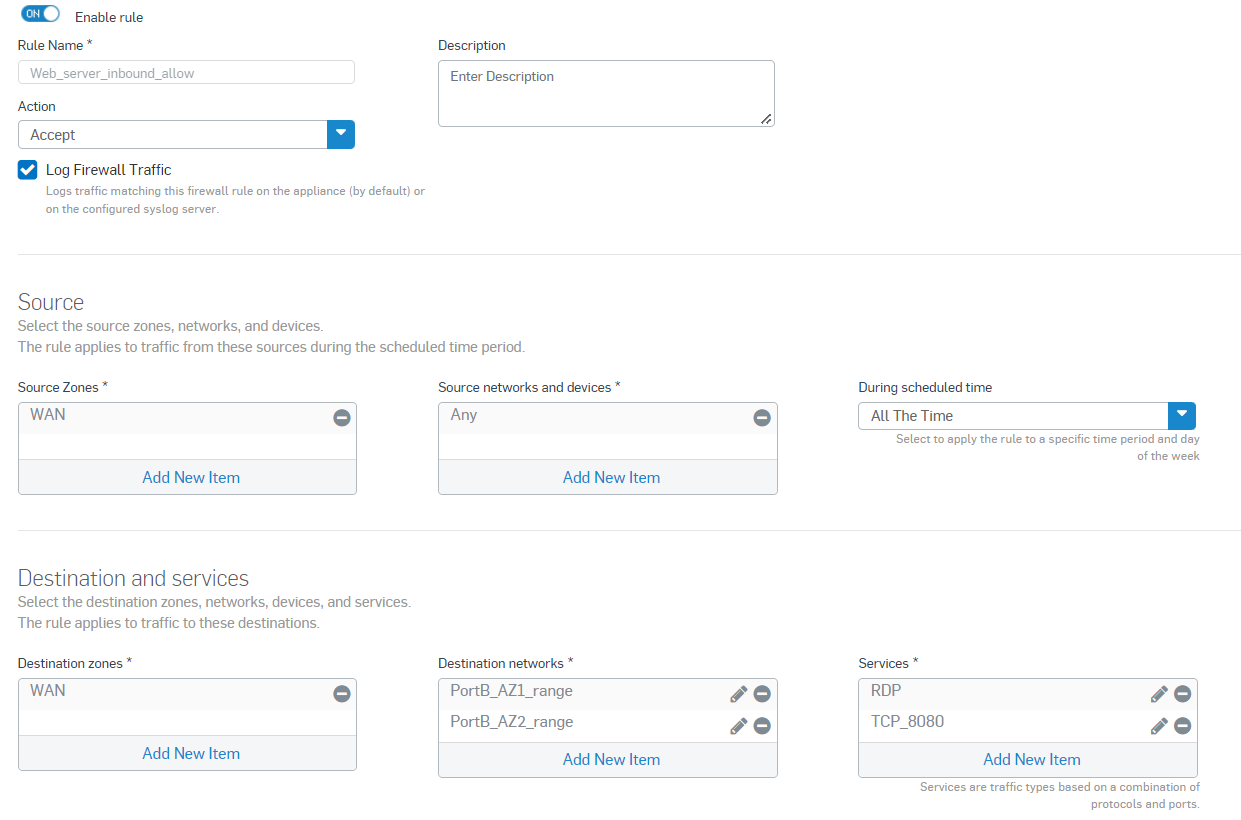
Step 5.4 Firewall Rules
On the left menu, scroll up and go to PROTECT > Rules and policies > Firewall rules and click Add Firewall Rule button to create a new rule.
Enter the firewall rule name logging option turned on.
- Select the Source zone as WAN,
- Source networks and devices as Any.
- Destination zone as WAN, Destination networks as IP range hosts created in step 5.2, and Services as RDP created in step 5.3
- Click Save.
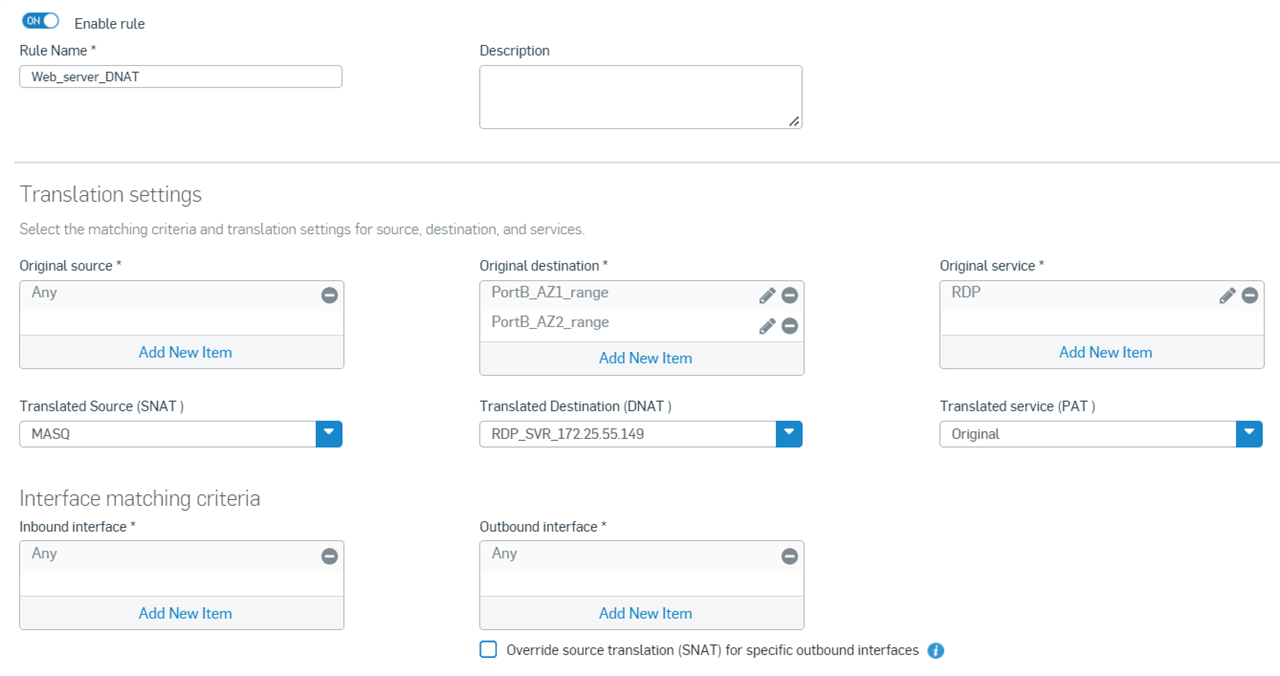
Step 5.5 NAT Rules
Go to NAT rules > Add NAT rule and click New NAT rule to create the DNAT rule for the RDP server.
- Select the Original source as Any, the Original destination as the IP range hosts created in step 5.2, and the Original Service as RDP created in step 5.3.
- Translated Source (SNAT) as MASQ, Translated Destination (DNAT) as the IP host object for RDP server internal IP created in step 5.2, and Translated service as Original.
- Keep the Inbound interface and Outbound interface as Any and click Save.
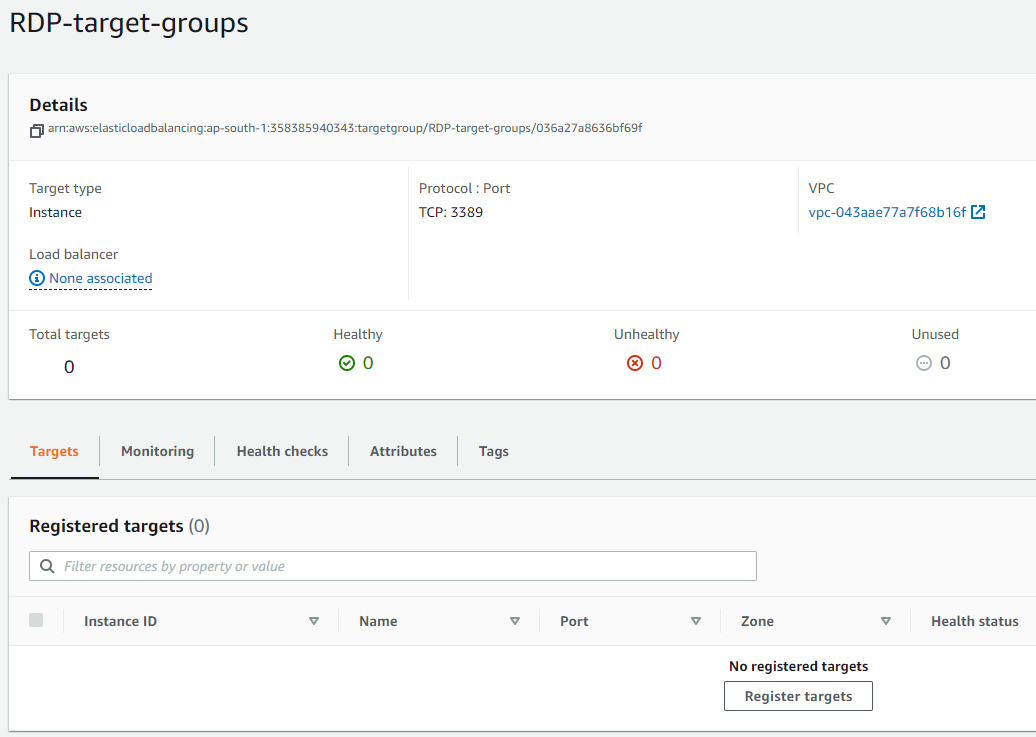
Step 5.6 RDP Target Groups
In the AWS web console, go to EC2 > Load Balancing > Load Balancers and select Target Groups.
It’ll show two target groups auto-created for ports 80 and 443.
Click Create target group and select the target type as Instances.
Enter the name of the Target group and select the Protocol and Port as TCP and 3389, respectively.
Select the correct VPC and click Next.
Do NOT select any EC2 instances and click Create target group.
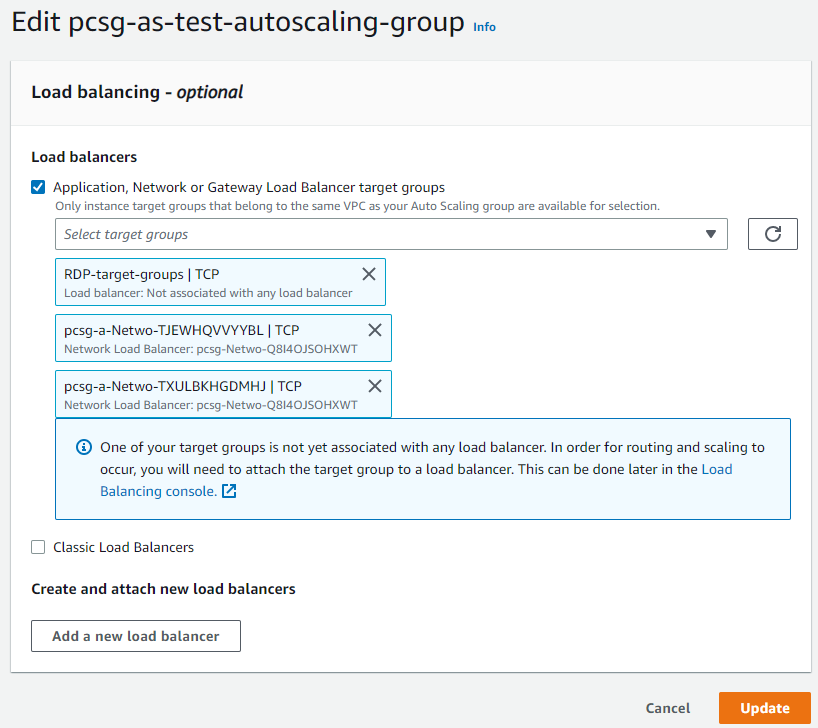
Step 5.7 Auto Scaling Group
Now select the Auto Scaling Groups in the left menu and click the name of the auto-scaling group created for the firewall EC2 instance.
In the Details tab, scroll down to Load Balancing and click Edit.
Select the newly created RDP target group from the drop-down list and click Update.
Step 5.8 Load Balancer
Now click Load Balancers in the left menu, and you will see the Load Balancer created for the autoscaling group of firewall EC2 instances.
Select the Listeners tab, and it’ll show TCP:80 and TCP:443 listeners auto-created.
Click Add Listener, select the Protocol as TCP, and enter the Port number 3389.
In the Default action, select the newly created Target group in step 5.6 and click Add.
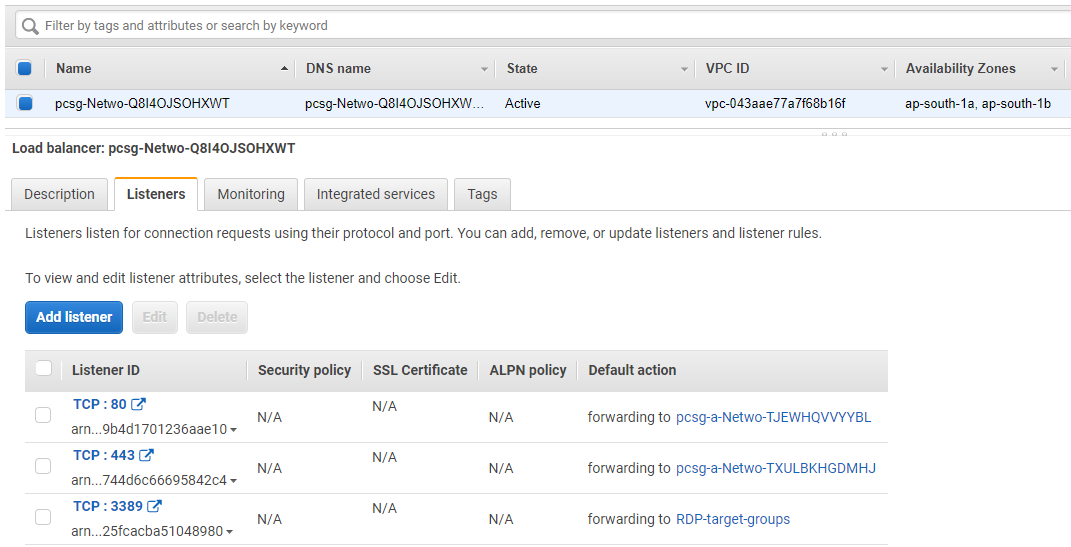
This will add a new listener to the network load balancer, which means that it’ll also start accepting RDP traffic initiated from outside and will forward it to the target groups (autoscaling group of firewall EC2 instances).
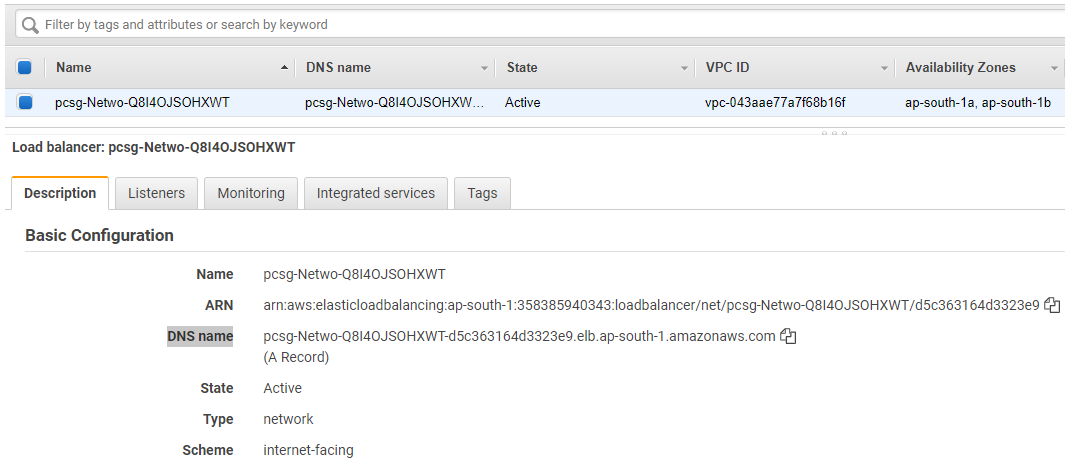
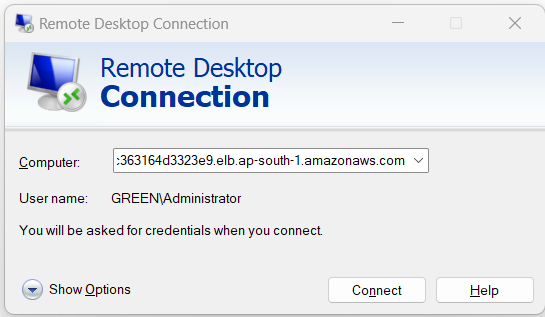
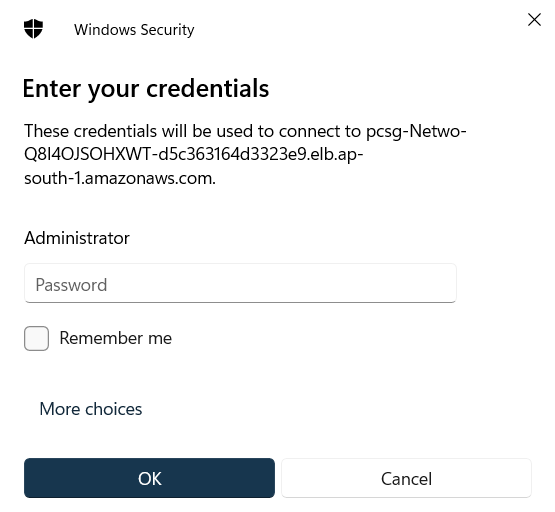
At this stage, you’ll have an RDP port opened from the AWS Network Load Balancer, and to get access to this server, copy the DNS name of the Network Load balancer from the Description tab.
Now you'll be able to get RDP access to the internal server, and the traffic will be served via one of the firewall EC2 instances.
Additional information related to autoscaling deployment
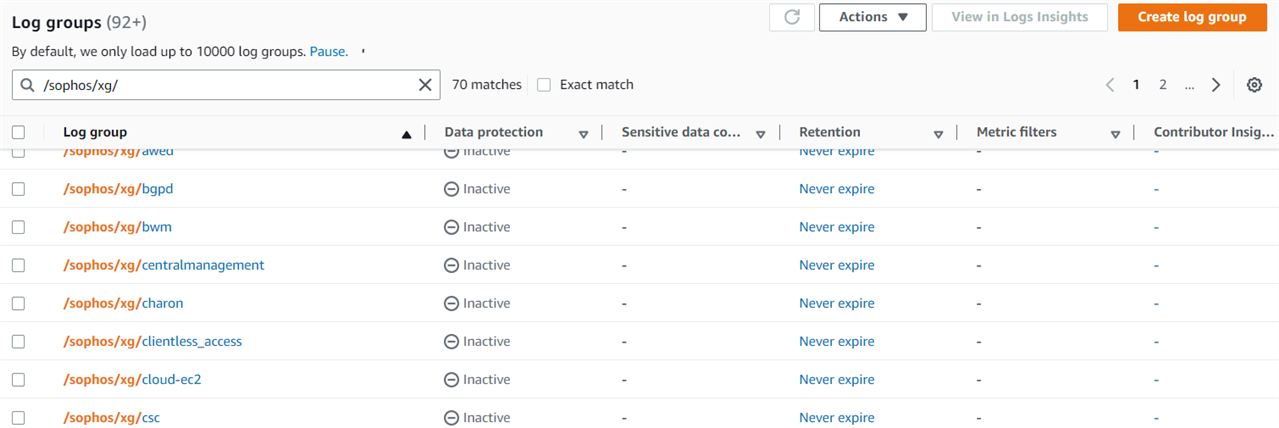
If you have turned on CloudWatch integration in step 3.4 during the CloudFormation deployment stage, then all the logs of Sophos Firewall EC2 instances will be stored in CloudWatch log groups of your AWS account, and you can find them by searching for /sophos/xg/ in the CloudWatch > Log groups section.
Sometimes, the firewall EC2 instances may be terminated depending upon the autoscaling trigger policy to maintain the dynamic nature of the load.
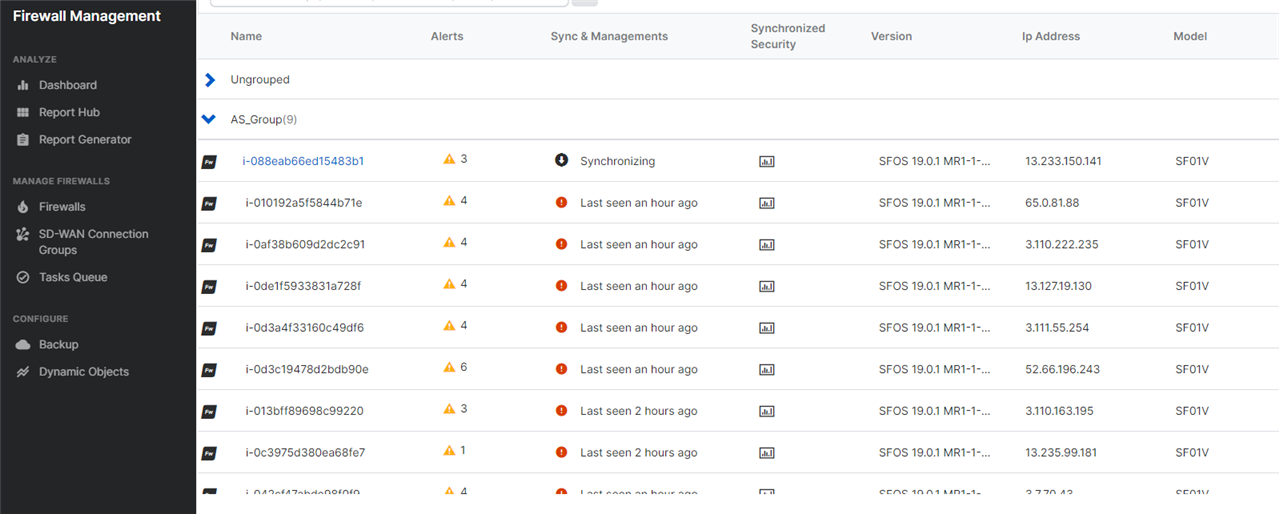
In the Sophos Central account, you may still see the firewall instances placed in the group that are already terminated in the AWS account, and this won’t be auto removed from the Sophos Central Firewall group. So, you need to delete the firewall instances manually.
This concludes the Sophos Firewall autoscaling in AWS deployment instructions of this article.
For any queries related to this deployment, kindly contact aws.marketplace@sophos.com.
Added TAG
[edited by: Erick Jan at 1:18 AM (GMT -8) on 14 Nov 2024]