Disclaimer: This information is provided as-is for the benefit of the Community. Please contact Sophos Professional Services if you require assistance with your specific environment.
Table of Contents
Overview
This recommended read describes how to set up a site-to-site IPsec VPN connection between a Sophos Firewall and a Palo Alto firewall using a pre-shared key to authenticate VPN peers.
This applies to the following Sophos products and versions
Sophos Firewall
Prerequisites
- You must have read-write permissions for the relevant features on the SFOS Admin Console and the Palo Alto web Admin Console.
- Palo Alto firewall must have at least two interfaces in Layer 3 mode.
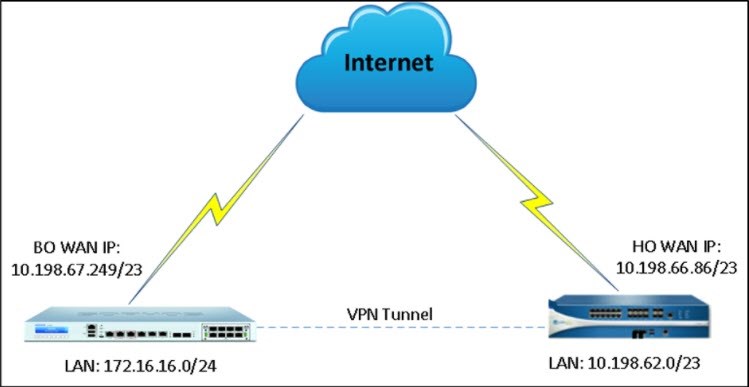
Network diagram
Configuration
Palo Alto Firewall
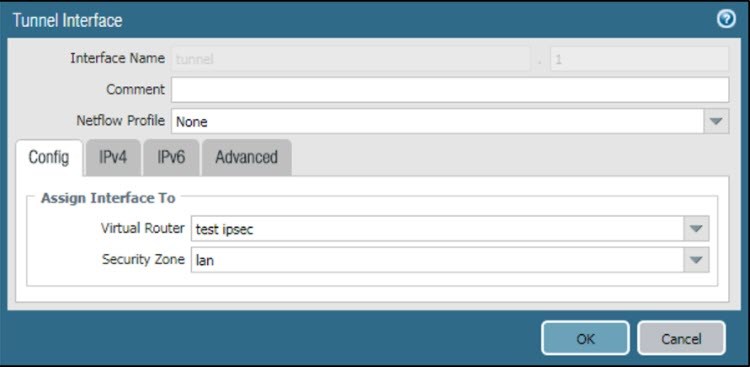
Create tunnel interface
- Go to Network > Interface > Tunnel and click Add.
- Enter the Interface Name.
- Select the existing Virtual Router.
- For the Security Zone, select layer 3 as the internal zone from which traffic will originate.
Configure IKE Gateway: Phase 1 parameters
- Go to Network Profiles > IKE Crypto > PA_IKE Crypto.
- In the IKE Crypto Profile, add group5 to DH Group, aes-256-cbc to Encryption, and sha1 to Authentication.
- Enter Seconds in Key Lifetime and 28800 as Lifetime.
- Set IKEv2 Authentication Multiple to 0.
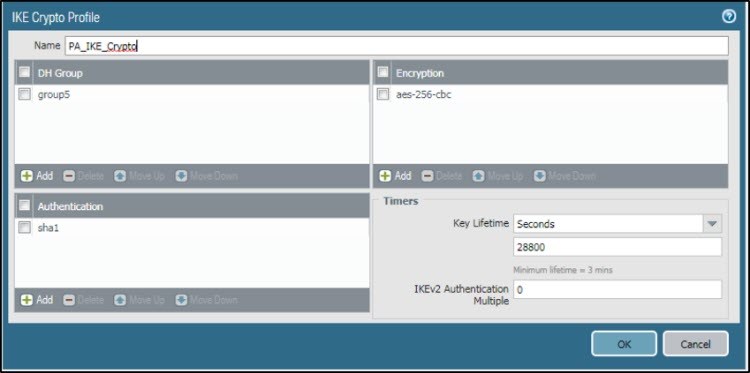
- Click OK.
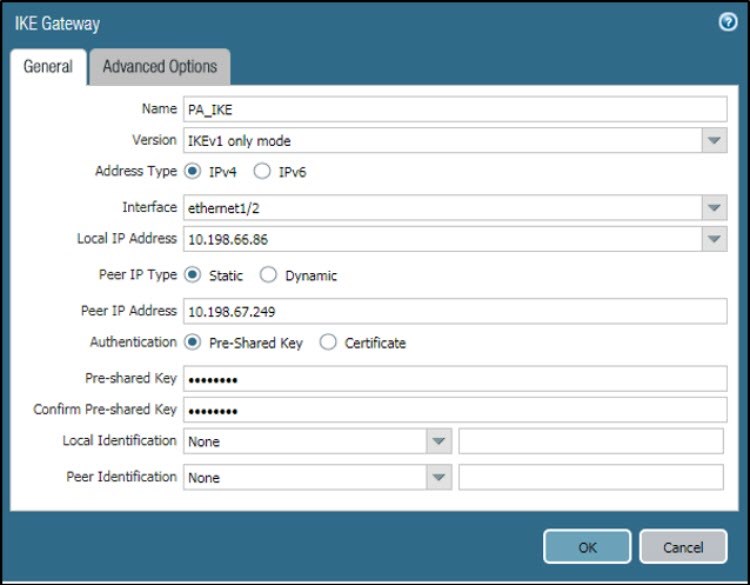
To add the PA_IKE_Crypto profile to IKE gateway:
- Go to Network > IKE Gateway > General and create a new gateway.
- Enter Name.
- Set Version to IKEv1 only mode.
- Set Address Type to IPv4.
- Set Interface to ethernet1/2, and Local IP Address to 10.198.66.86.
- Set Peer IP Type to Static.
- For Peer IP Address, enter 10.198.67.249.
- Set Authentication to Pre-Shared Key.
- Click OK.
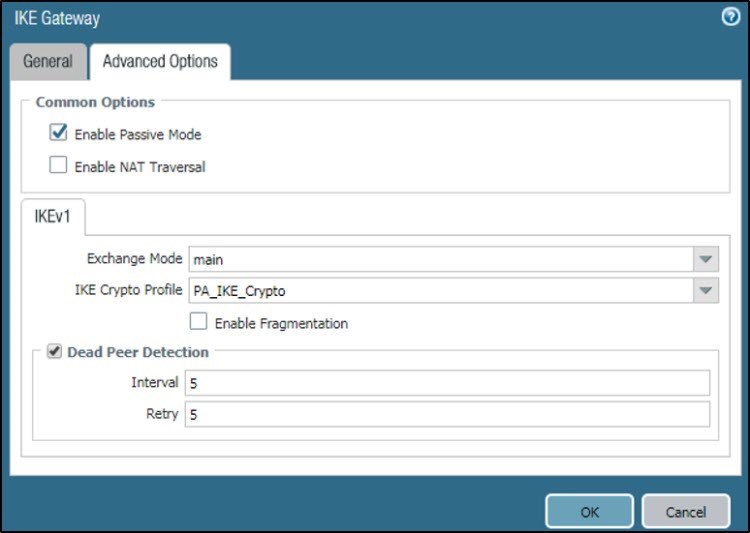
- Go to Network > IKE Gateway > Advanced Options.
- Under Common Options, select Enable Passive Mode, since Palo Alto will act as the responder for the IPsec connection.
- Under IKEv1, set Exchange Mode to main, and IKE Crypto Profile to PA_IKE_Crypto, which you have created.
- Select Dead Peer Detection. Set Interval and Retry to 5.
- Click OK.
Configure IPsec Phase 2 parameters
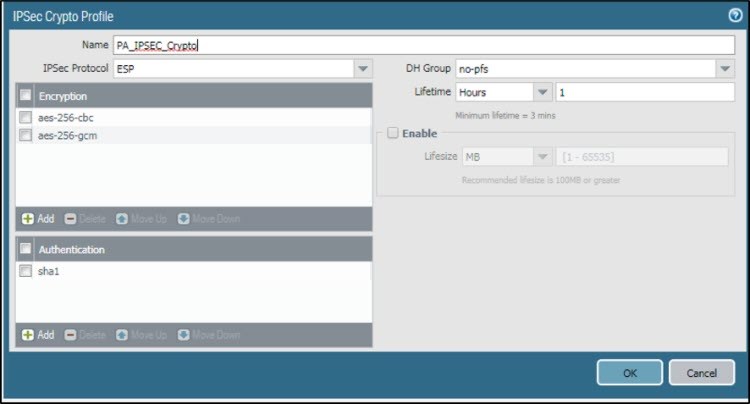
- Go to Network > IPsec Crypto and create a profile.
- Enter Name.
- Set IPSec Protocol to ESP, and DH Group to no-pfs.
- Add aes-256-cbc and aes-256-gcm to Encryption.
- Add sha1 to Authentication.
- Set Lifetime to Hours and enter 1.
- Click OK.
Define Monitor Profile
- Go to Network Profile > Monitor Profile.
- Enter Name.
- Set Action to Wait Recover.
- Enter the following values:
- Interval (sec): 3
- Threshold: 5
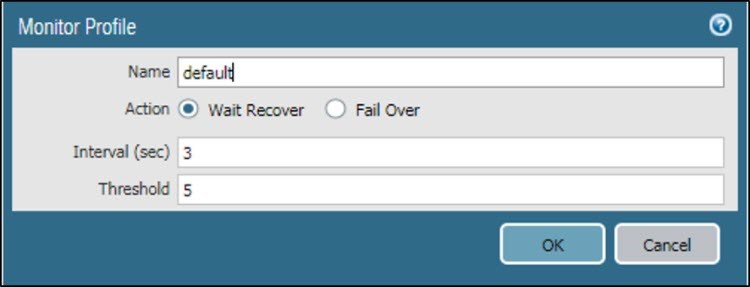
- Click OK.
Configure IPsec VPN Tunnel
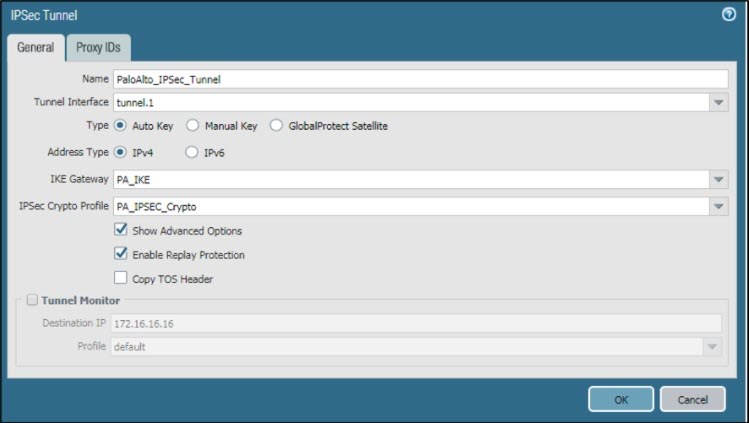
- Go to Network > IPSec Tunnel > General.
- Enter Name.
- Select the Tunnel Interface that was created in Create tunnel interface.
- Set Type to Auto Key and Address Type to IPv4.
- Set IKE Gateway to PA_IKE and IPSec Crypto Profile to PA_IPSEC_Crypto, which was created.
- Select Show Advanced Options and Enable Replay Protection.
- Click OK.
To Add Proxy ID:
Go to Network > IPSec Tunnel > Proxy IDs and configure the local and remote subnets for Head Office (HO) and Branch Office (BO).
Create a route for VPN traffic
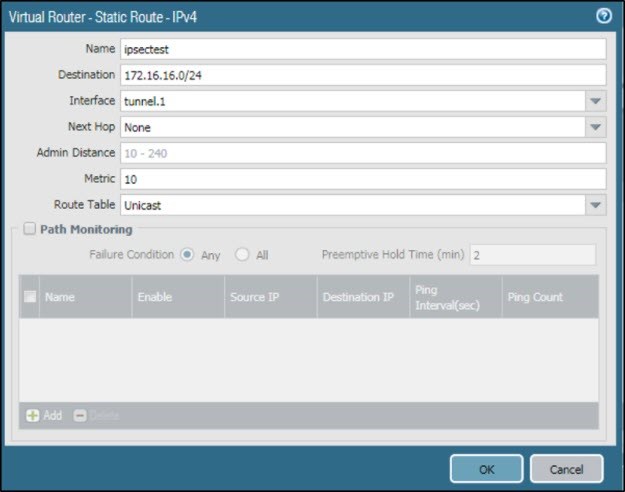
- Go to Virtual Router > Static Route > IPv4.
- Enter Name.
- For Destination, enter 172.16.16.0/24.
- Set Interface to tunnel.1, and Next Hop to None.
- For Metric, enter 10.
- Set Route Table to Unicast.
- Click OK.
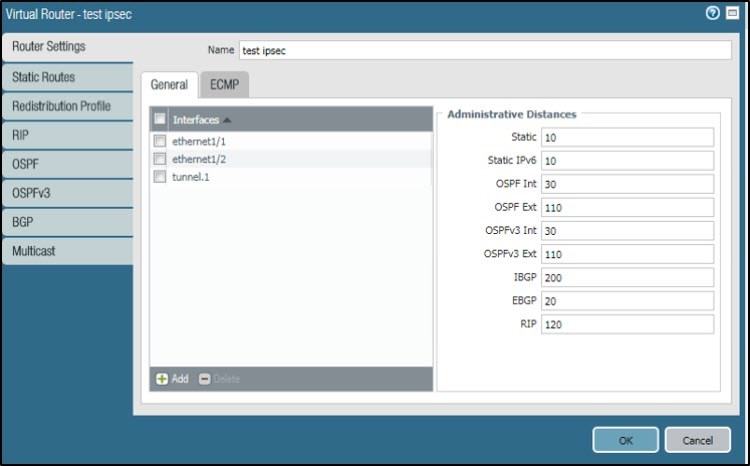
- Add tunnel interface in Virtual Router.
Create a firewall rule to allow VPN traffic
- Go to Policies > Security and create a firewall rule.

Sophos Firewall
Create IPsec VPN Policy for Phase 1 and Phase 2
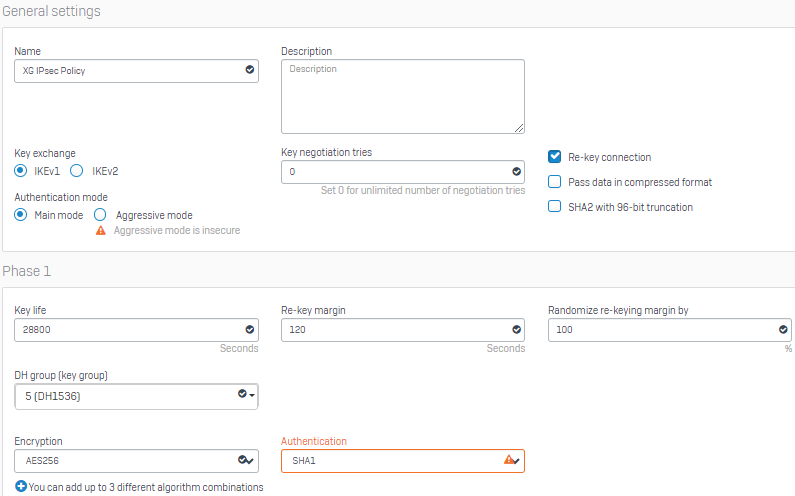
- Go to Configure > VPN > IPsec policies and click Add./ For Version 19.Go to System>Profile>IPsec Profiles>and click Add
- Enter Name.
- Set Key exchange to IKEv1 and Authentication mode to Main mode.
- Set Key negotiation tries to 0.
- Select Re-key connection.
- Under Phase 1, set Key life to 28800, Re-key margin to 120, and Randomize re-keying margin to 100.
- Set the DH group (key group) to 5 (DH1536).
- Set Encryption to AES256 and Authentication to SHA1.
- Under Phase 2, set PFS group (DH group) to Same as phase-I, and Key life to 3600.
- Set Encryption to AES256 and Authentication to SHA1.
- Under Dead Peer Detection, set Check peer after every to 30 seconds and Wait for response up to as 120 seconds.
- Set When peer unreachable to Re-initiate.
- Click Save.
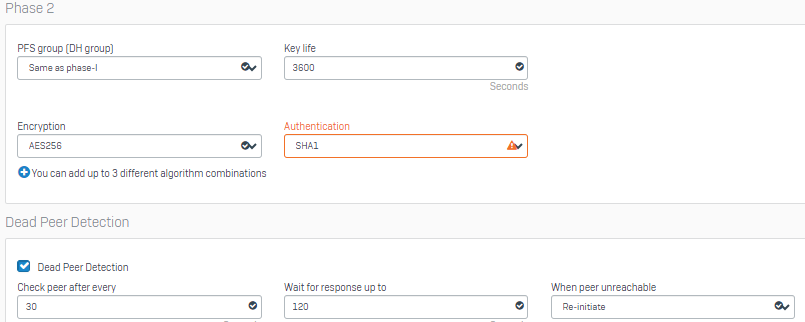
- You have created the following IPsec VPN policy.

Configure IPsec connection
- Go to Configure > VPN > IPsec connections and click Add./For Version 19. Go to Configure >Site-to-Site VPN>IPsec and click Add
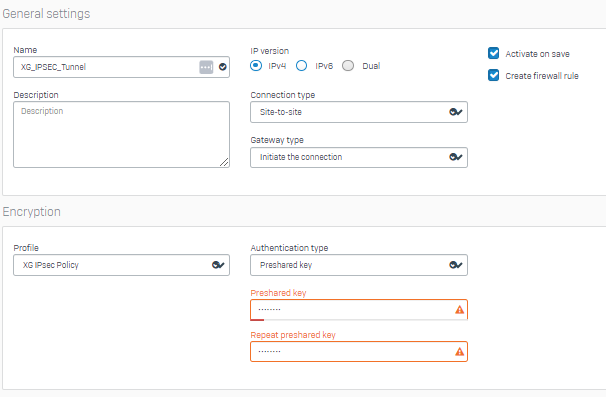
- Under General settings, enter Name.
- For IP version, select IPv4.
- Select Activate on save and Create firewall rule.
- Set Connection type to Site-to-site and Gateway type to Initiate the connection.
- Under Encryption, set Policy to XG IPsec Policy, which you have created.
- Set Authentication type to Preshared key. Enter and repeat the Preshared key.
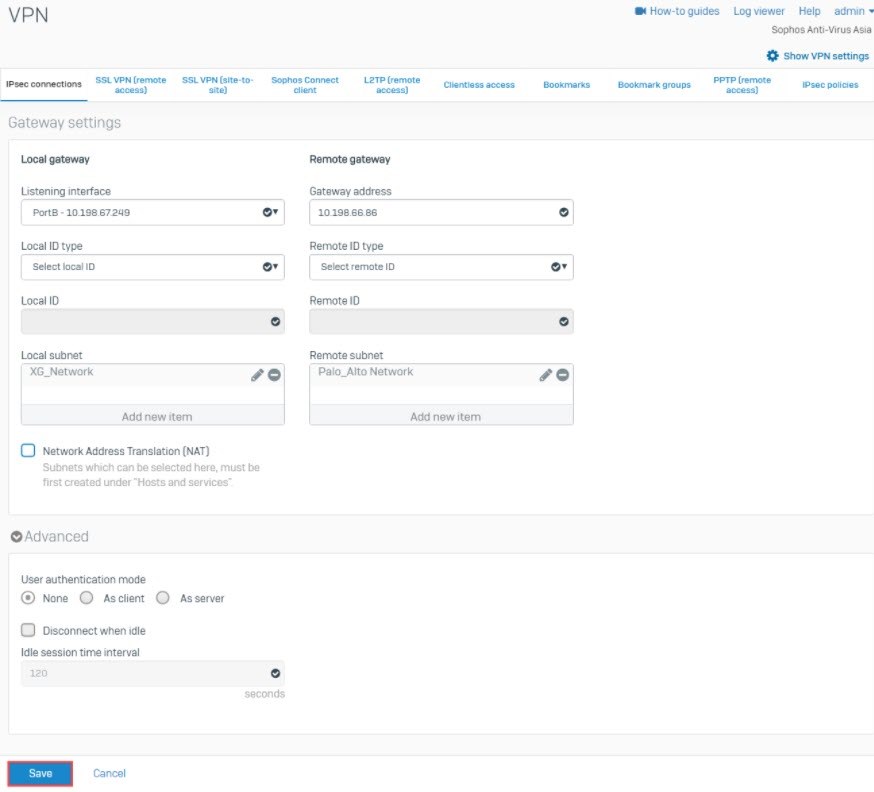
- Under Gateway settings > Local gateway, set Listening interface to PortB – 10.198.67.249 and Local ID type to Select local ID.
- Under Local subnet, add the XG_Network.
- Under Remote gateway, set Gateway address to 10.198.66.86 and Remote ID type to Select remote ID.
- Under Remote subnet, add the Palo_Alto Network.
- Click Save.
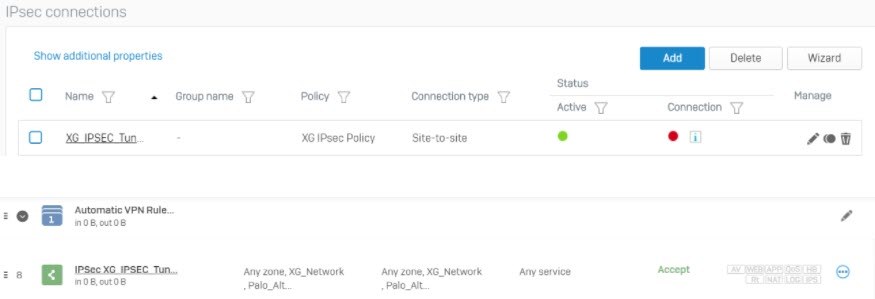
- The IPsec connection is automatically activated and an automatic firewall rule is also created.
Activate IPsec connection
- Go to Configure > VPN > IPsec connections.
- Under Status, click the
 under Connection to establish the connection.
Sign up for the Sophos Support Notification Service for the latest product release information and critical issues.
Added TAGs
[edited by: Raphael Alganes at 5:31 AM (GMT -7) on 17 Sep 2024]


