Disclaimer: This information is provided as-is for the benefit of the Community. Please contact Sophos Professional Services if you require assistance with your specific environment.
Overview
This recommended read describes creating an IPsec connection between an AWS VPN Gateway and Sophos Firewall.
Table of Contents
- Overview
- Pre-requisites
- Step 1: Create AWS Customer Gateway (with XG public IP details)
- Step 2: Create a Virtual Private Gateway ( Attaching the VGW with your VPC)
- Step 3: Create the Site-to-Site VPN connection (AWS)
- Step 4: Download and extract needed information from the configuration file (AWS)
- Step 5: Create a route in the route table associated with your VPC
- Step 6: Create the VPN Policy (Sophos Sophos Firewall)
- Step 7: Create the VPN Connection(Sophos Sophos Firewall)
- Step 8: Create firewall rules to allow inbound and outbound traffic through the VPN (Sophos Sophos Firewall)
- Step 9: Configure the xfrm tunnel interface (Sophos Sophos Firewall)
- Step 10: Configure static routing to the AWS network (Sophos Sophos Firewall)
- Step 11: Verify the VPN connection
Pre-requisites
- SFOS v18 firmware and later
- Your OnPrem Sophos Firewall and the following information:
- The public IP of the Sophos Firewall.
- The IP address space behind your Sophos Firewall.
- Your Amazon AWS VPC and the following information:
- IP address space of the VPC.
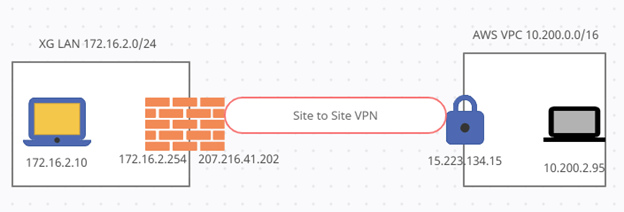
Step 1: Create AWS Customer Gateway (with Sophos Firewall public IP details)
The local network gateway typically refers to your on-premises location. You'll need the public IP address of your On-Prem Sophos Sophos Firewall and your On-Prem Private IP address spaces.
Please note that this configuration assumes that the public IP address is directly configured on the On-Prem Sophos Firewall. Your configuration will be slightly different if your On-Prem Sophos Firewall sits behind a NAT device.
- Go to the AWS Portal: https://aws.amazon.com/console/ and sign in with your credentials.
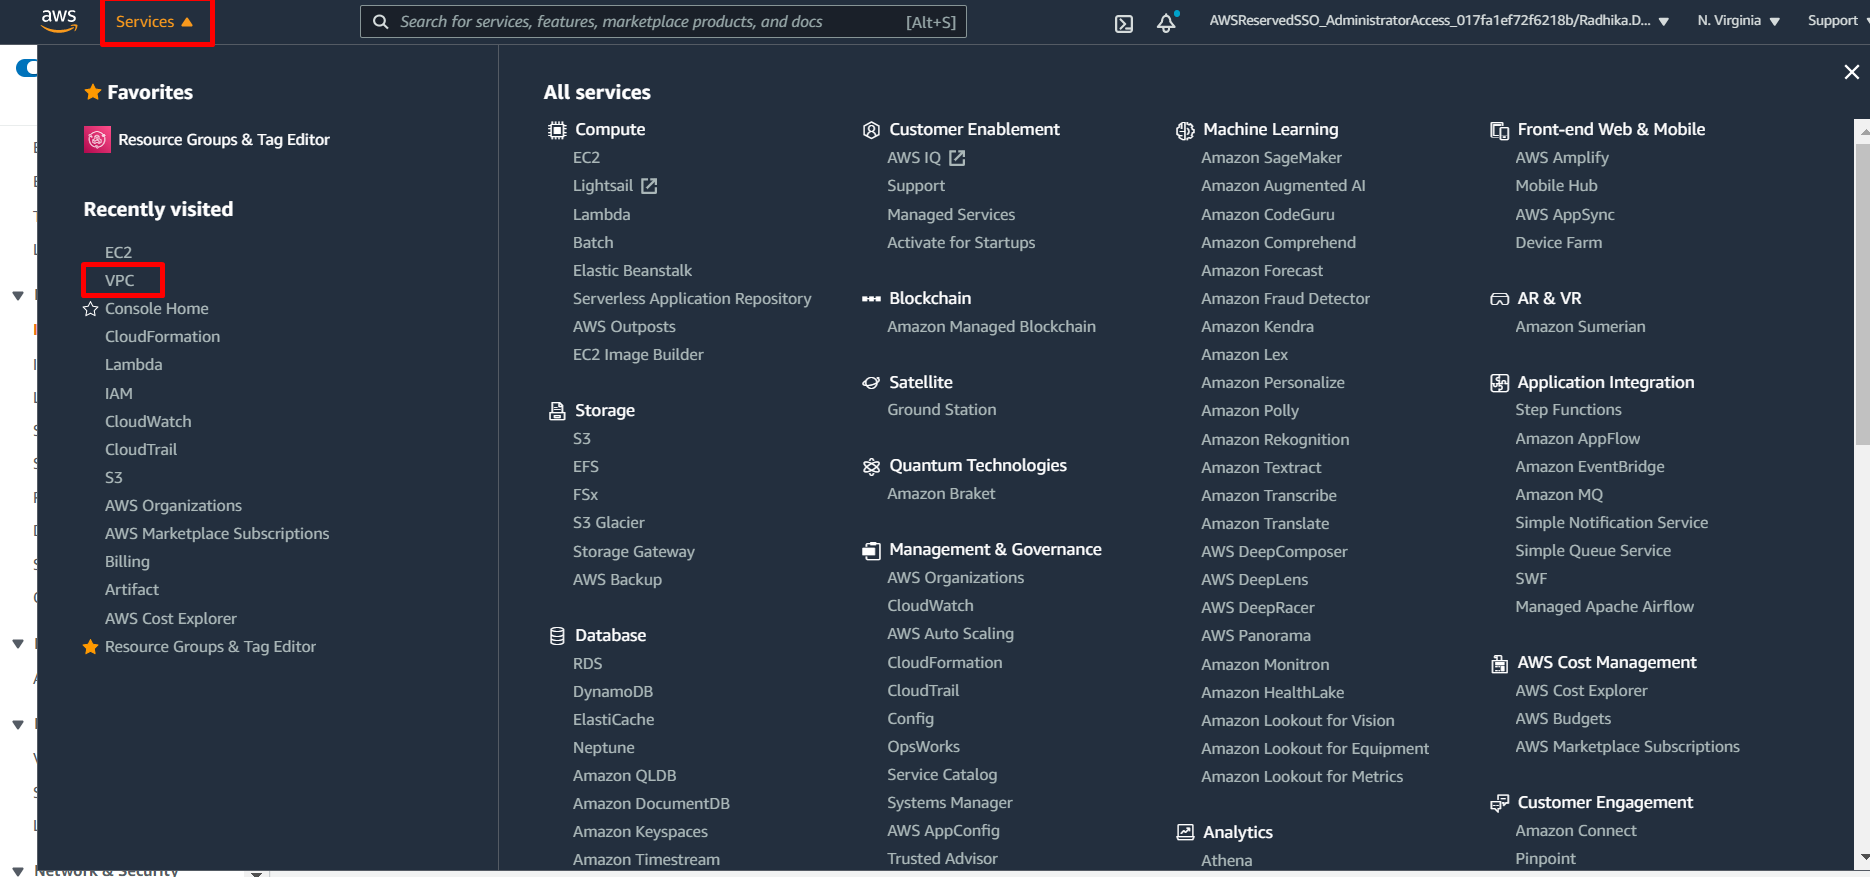
- Under 'Services', click on 'VPC'.
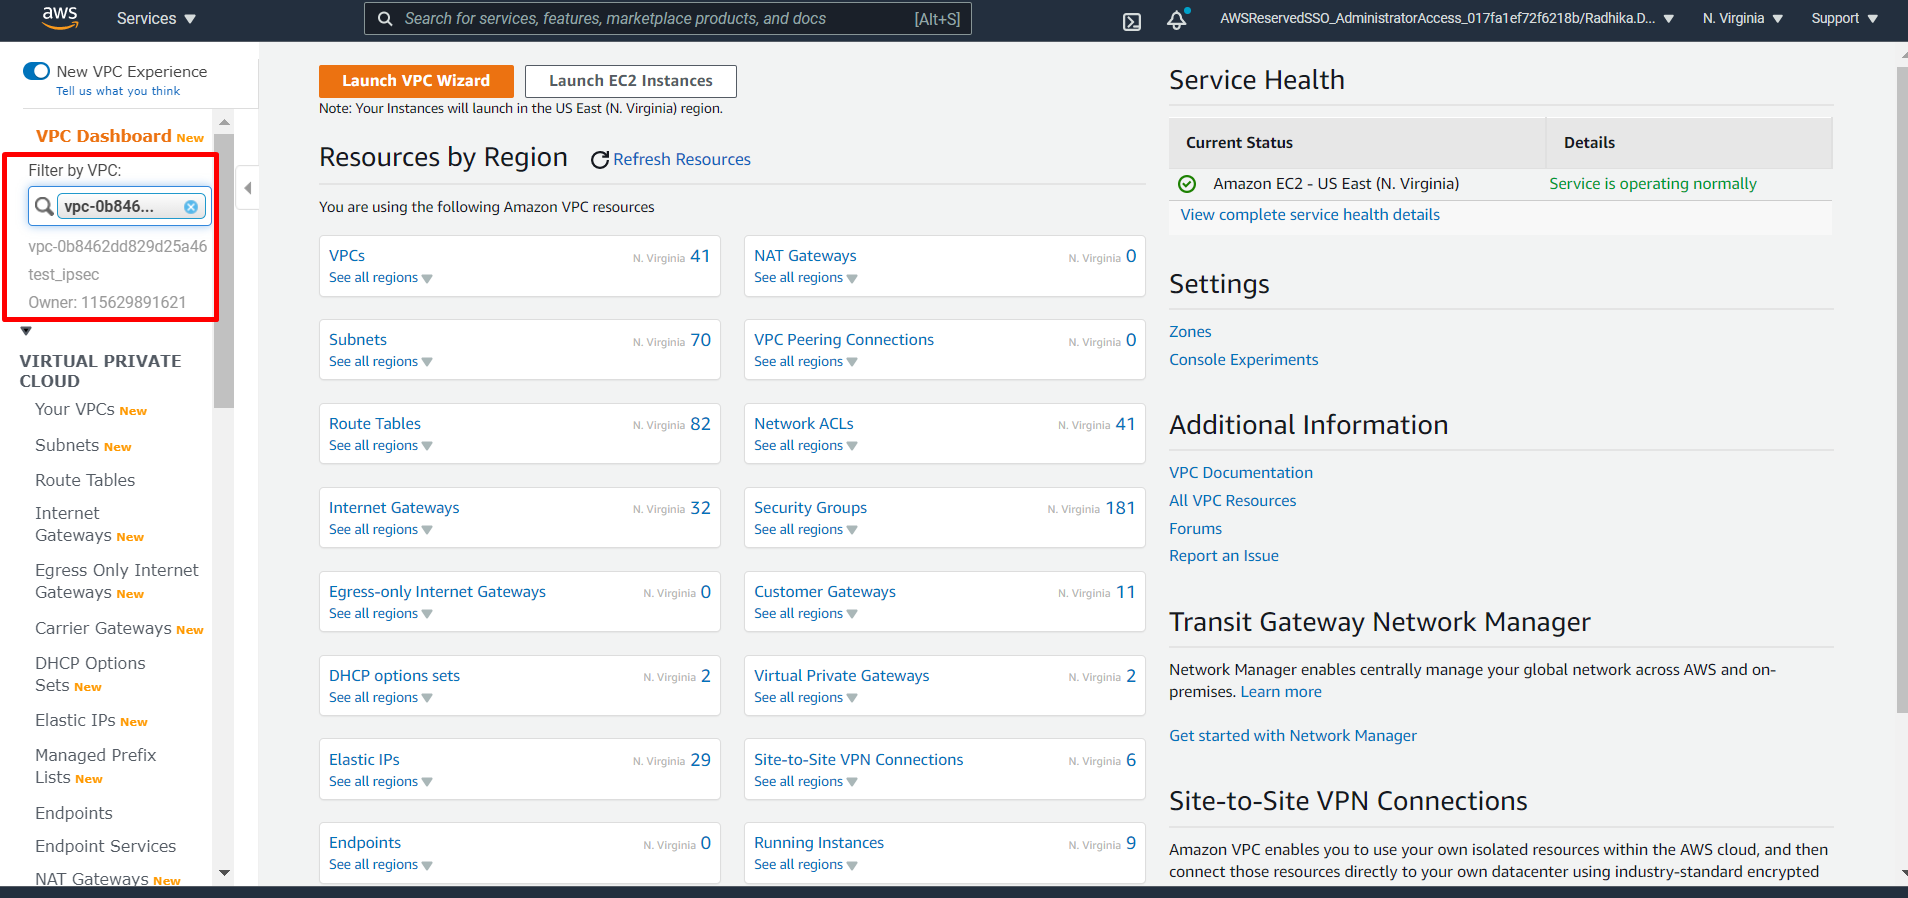
- Filter your VPC for ease of menu.
- On the left navigation pane, scroll down to VIRTUAL PRIVATE NETWORK (VPN).
- Click 'Customer Gateways'.
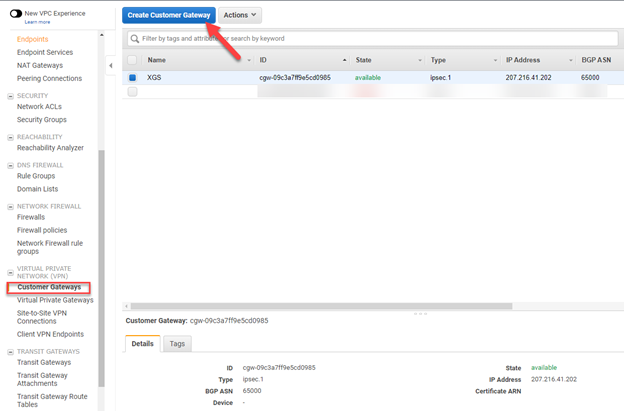
- Click 'Customer Gateways'.
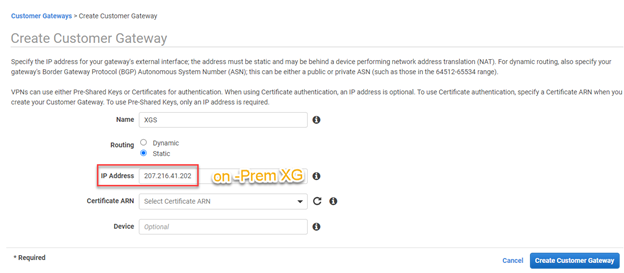
- In the "Create customer gateway" blade, configure the following:
- Name: Specify any descriptive name.
- Routing: Specify the mode of routing to be used. In our scenario, Select Static.
- IP Address: Specify the public IP address of your Sophos Sophos Firewall.
- Certificate ARN(optional): No Certificate is selected in our scenario.
- Device(optional): In our scenario, no Device is selected.
- Click Create Customer Gateway.
Step 2: Create a Virtual Private Gateway ( Attaching the VGW with your VPC)
- Select the virtual network for which you want to create a virtual network gateway.
- In the left menu pane, scroll down to VIRTUAL PRIVATE NETWORK (VPN).
- Click 'Virtual Private Gateways'.
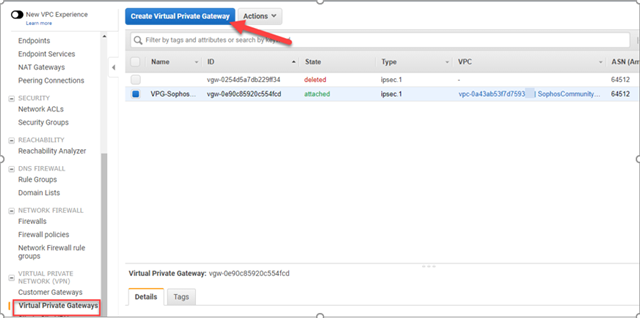
- In the "Create Virtual Private Gateway" blade, configure the following:
- Name tag: Specify a descriptive Name
- ASN: Select the applicable option. In our scenario, select Amazon default ASN.
- Click Create Virtual Private Gateway.
Note: To view the newly created Virtual Private Gateway, remove the filter applied on the VPC in Step 1(3). The filter needs to be removed as the VGW isn’t yet attached to the filtered VPC.
- Attach Virtual Private Gateway (VGW) to the VPC.
- Select the newly created VGW.
- Click Actions and select Attach to VPC.
Once the VGW is attached to the VPC, reapply the filter on your VPC as described in Step 1(3).
Step 3: Create the Site-to-Site VPN connection (AWS)
- In the left menu pane, scroll down to Site-to-Site VPN Connections.
- Click 'Create VPN Connection'.
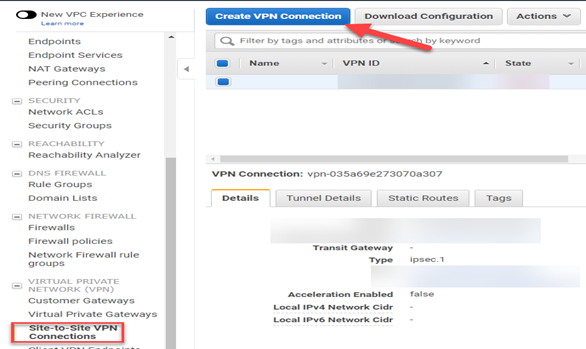
- In the "Create VPN Connection" blade, configure the following:
- Name Tag: Specify a descriptive Name for the VPN connection
- Target Gateway Type: Select Virtual Private Gateway
- Virtual Private Gateway: From the drop-down box, Select the gateway created in Step 2(4) (Use your values here, not the values shown in the screenshot)
- Customer Gateway: Select Existing.
- Customer Gateway ID: From the drop-down box, Select the gateway created in Step 1(4)(Use your values here, not the values shown in the screenshot)
- Routing Options: The routing option should match the routing mode selected in Step 1(4). In our scenario, Select Static.
- Static IP Prefixes: Provide the remote private IP address range behind the on-premise Sophos Sophos Firewall.(Use your values here, not those shown in the screenshot). Typically, the remote private IP address is the LAN interface network on the on-prem Sophos Sophos Firewall.
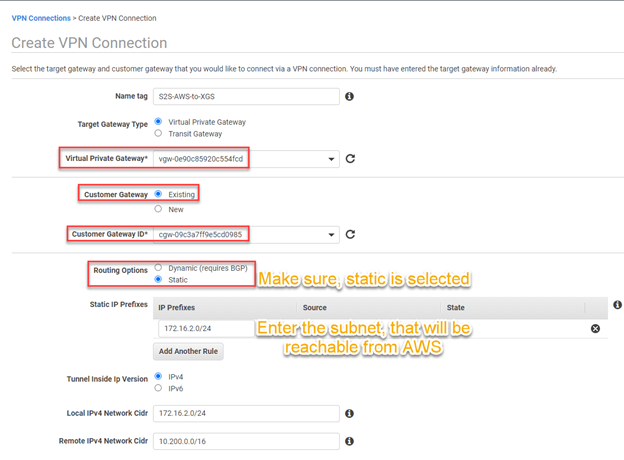
- Local IPv4 Network = XG LAN resources
- Remote IPv4 Network = AWS side resources
- Click 'Create VPN Connection' to create the AWS VPN.
Step 4: Download and extract the needed information from the configuration file (AWS)
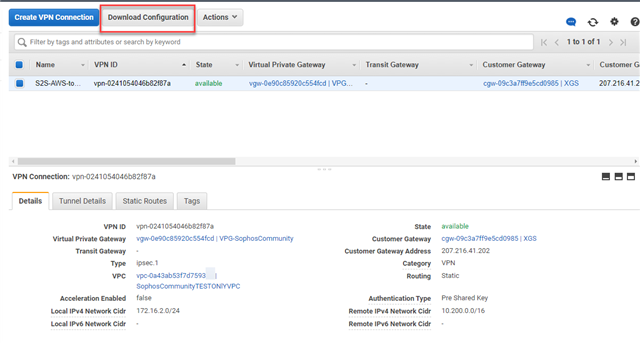
- Select the newly created VPN connection and click Download Configuration.
-
In the "Download configuration" blade, select the following:
- Vendor: Generic
- Platform: Generic
- Software: Vendor Agnostic
- Click "Download"
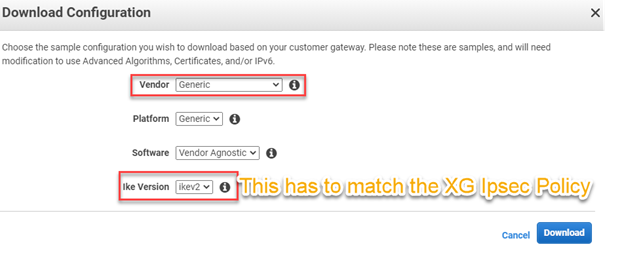
The configuration file is downloaded in txt format. The parameters given in the downloaded file must match the Phase 1 & Phase 2 parameters in the on-prem Sophos Firewall IPSec policy.
Step 5: Create a route in the route table associated with your VPC
-
In the left menu pane:
- Filter by VPC: Select your VPC.
- Filter by VPC: Select your VPC.
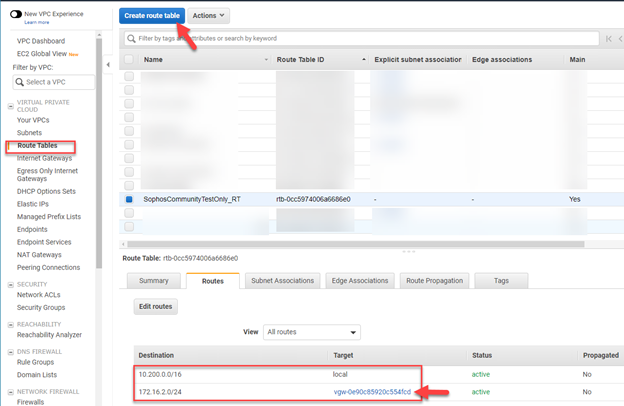
- Go to to VIRTUAL PRIVATE CLOUD > Route Tables.
- Select the associated Route Table.
-
In the bottom menu:
- Select the Routes tab.
- Click Edit routes.
-
Click Add route and configure the following:
- Destination: The private IP address range behind the Sophos Firewall.Typically, the remote private IP address is the LAN interface network on the on-prem Sophos firewall.
- Target: Select the Virtual gateway created in Step 2.
- Click Save routes.

Step 6: Create the VPN Policy (Sophos Firewall)
- Log into the WebAdmin of your On-Premises Sophos Sophos Firewall.
- Create a new policy in Sophos Firewall matching the parameters specified in the document downloaded in the previous step.
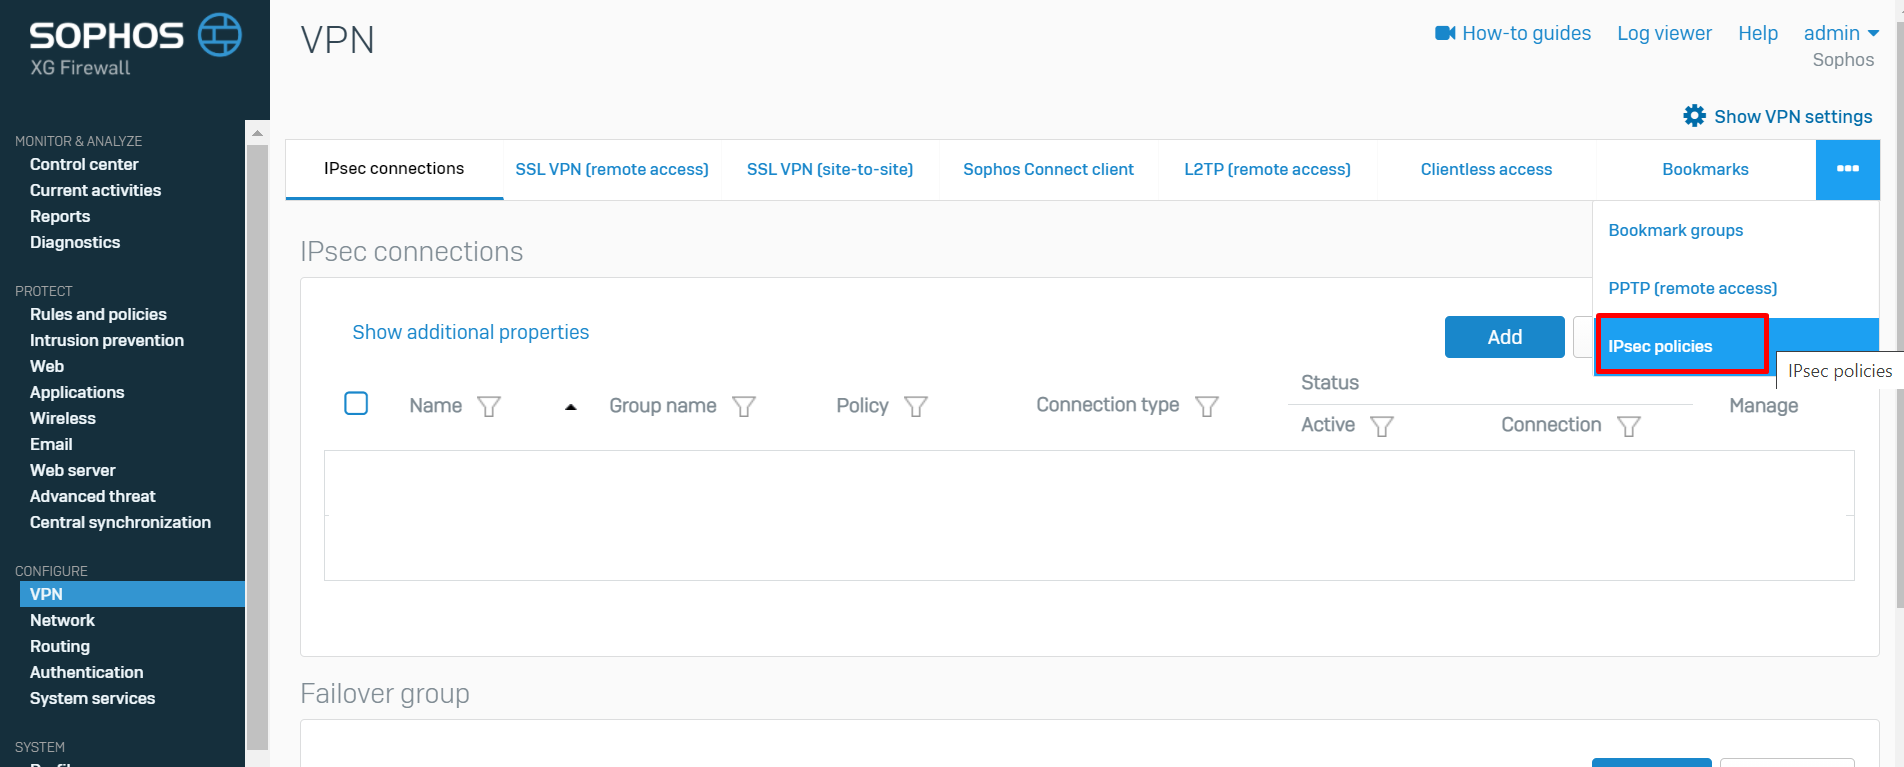
- Go to to CONFIGURE>VPN.
- Click the "..." to expand the menu, and select IPsec policies.
-
In the IPSec policies blade, configure the following:
- Name: Specify a descriptive name
- Key exchange: Select IKEv1
- Authentication mode: Select Main mode
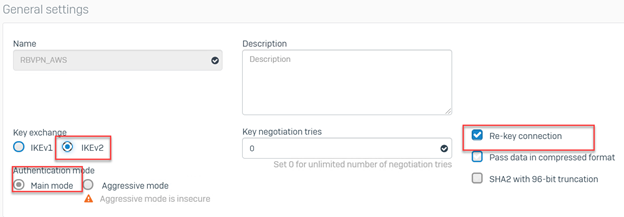
- Scroll down to configure the parameters for Phase 1. These should match the downloaded configuration obtained in Step 4(2).
-
In our scenario, configure the following Phase 1 parameters on Sophos Firewall:
- Key life: 28800
- DH group (key group): 2[DH1024]
- Encryption: AES128
- Authentication: SHA1


- Scroll down to configure the parameters for Phase 2. These should match the downloaded configuration obtained in Step 4(2).
-
In our scenario, configure the following Phase 2 parameters on Sophos Firewall:
- Key life: 3600
- DH group (key group): Same as phase-I
- Encryption: AES128
- Authentication: SHA1


-
Scroll down to configure the parameters for Dead Peer Detection.
- Enable the Dead Peer Detection checkmark.
- Click Save.

Step 7: Create the VPN Connection(Sophos Firewall)
- Under "Configure", click "VPN" → "IPSEC Connections" → "Add".
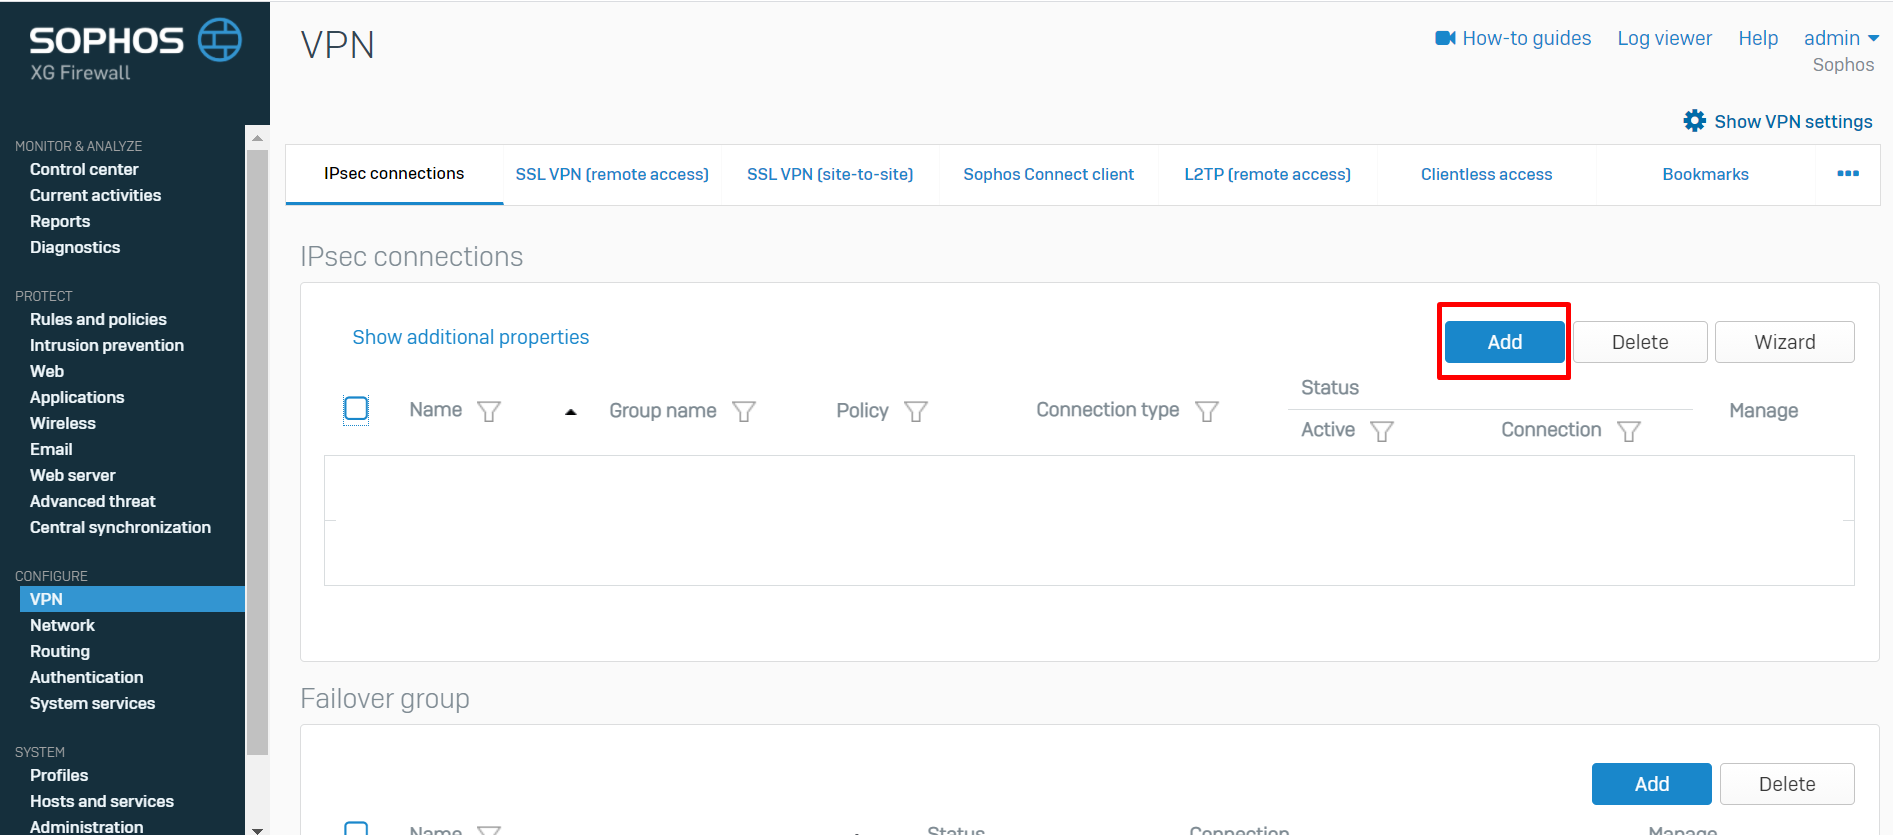
-
Configure the following settings:
General Settings
- Name: Input any preferred name
- Connection Type: Tunnel interface
- IP Version: Dual
- Gateway Type: Initiate the Connection
- Activate on Save: Selected
- Description: Add a description for the connection

Encryption
- Policy: Select the policy created in Step 6
- Authentication Type: Preshared Key
- Preshared Key: Enter the preshared key from the downloaded configuration obtained in Step 4(2).
- Repeat Preshared Key: Confirm the above-preshared key.
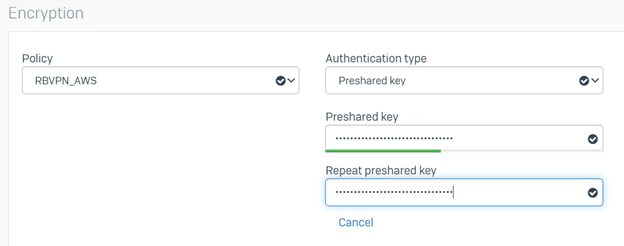
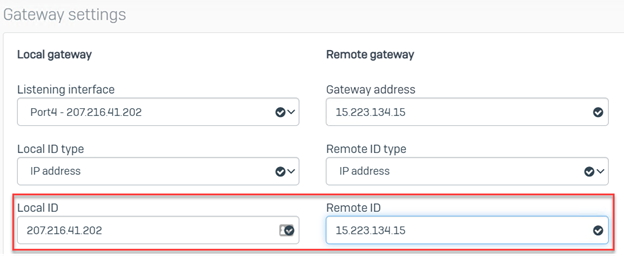
Gateway Settings
- Listening Interface: Select the WAN interface of the Sophos Sophos Firewall
- Gateway Address: Input the public IP of the AWS VPN gateway. The AWS public IP /Virtual Private Gateway is available from the downloaded configuration obtained in Step 4(2).
- Local ID: IP Address
- Remote ID: IP Address
- Local ID: Enter the public IP of the OnPrem Sophos Sophos Firewall
- Remote ID: Input the public IP of the AWS VPN gateway. The AWS public IP /Virtual Private Gateway is available from the downloaded configuration obtained in Step 4(2).
- There is no option to configure the "Local Subnet" and "Remote Subnet". They’ll both be set to "0.0.0.0/0".
Advanced
- Leave default settings
- Click "Save".
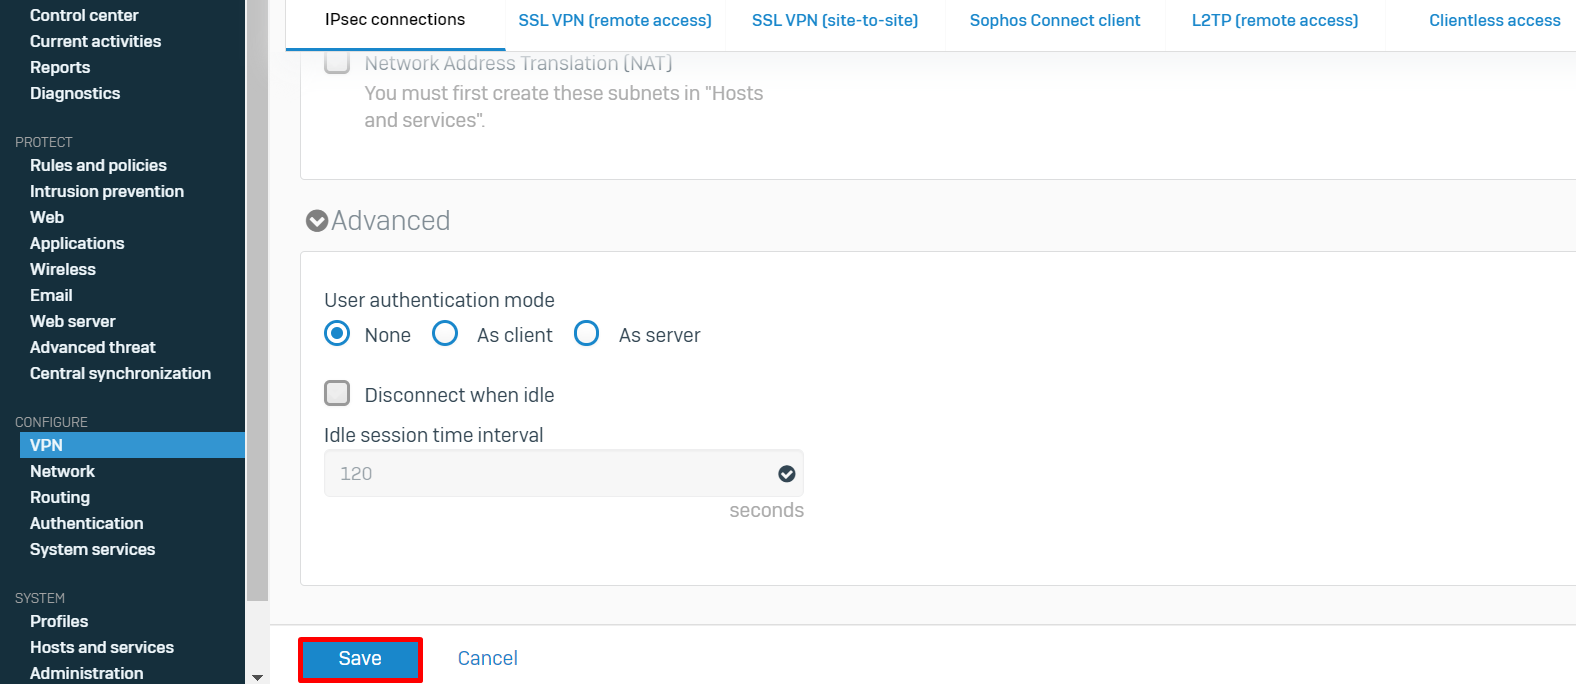
- Click "OK" when prompted about the "Preshared key".

- The connection should now be active and in a connected state.

(Optional) Configure a redundant tunnel to the AWS gateway by repeating Step 6 using the configuration of IPSec Tunnel #2, as obtained in Step 4(2).
Step 8: Create firewall rules to allow inbound and outbound traffic through the VPN (Sophos Firewall)
- Log into the WebAdmin of your On-Premises Sophos Sophos Firewall.
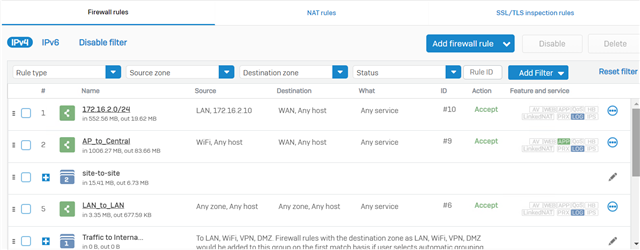
- Under "Protect", click "Rules and Policies" → "Add Firewall Rule" → "New Firewall Rule".
-
In the "Add Firewall Rule" window, configure the incoming firewall rule as follows:
- Rule status: ON
- Rule Name:XGS_to_AWS
- Action: Accept
- Rule Position: Top
- Rule group: Automatic or select your VPN group
- Log firewall traffic: Selected

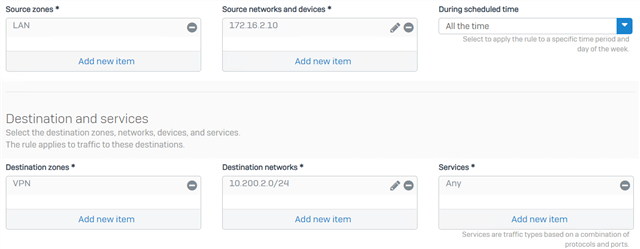
Source and destination
- Source Zones: LAN
- Source Networks and Devices: IP or Network of the device(s) that will be reaching AWS
- Destination Zones: VPN
- Destination Networks: IP or Network of the device(s) in AWS
- During Scheduled Time: Leave the default setting
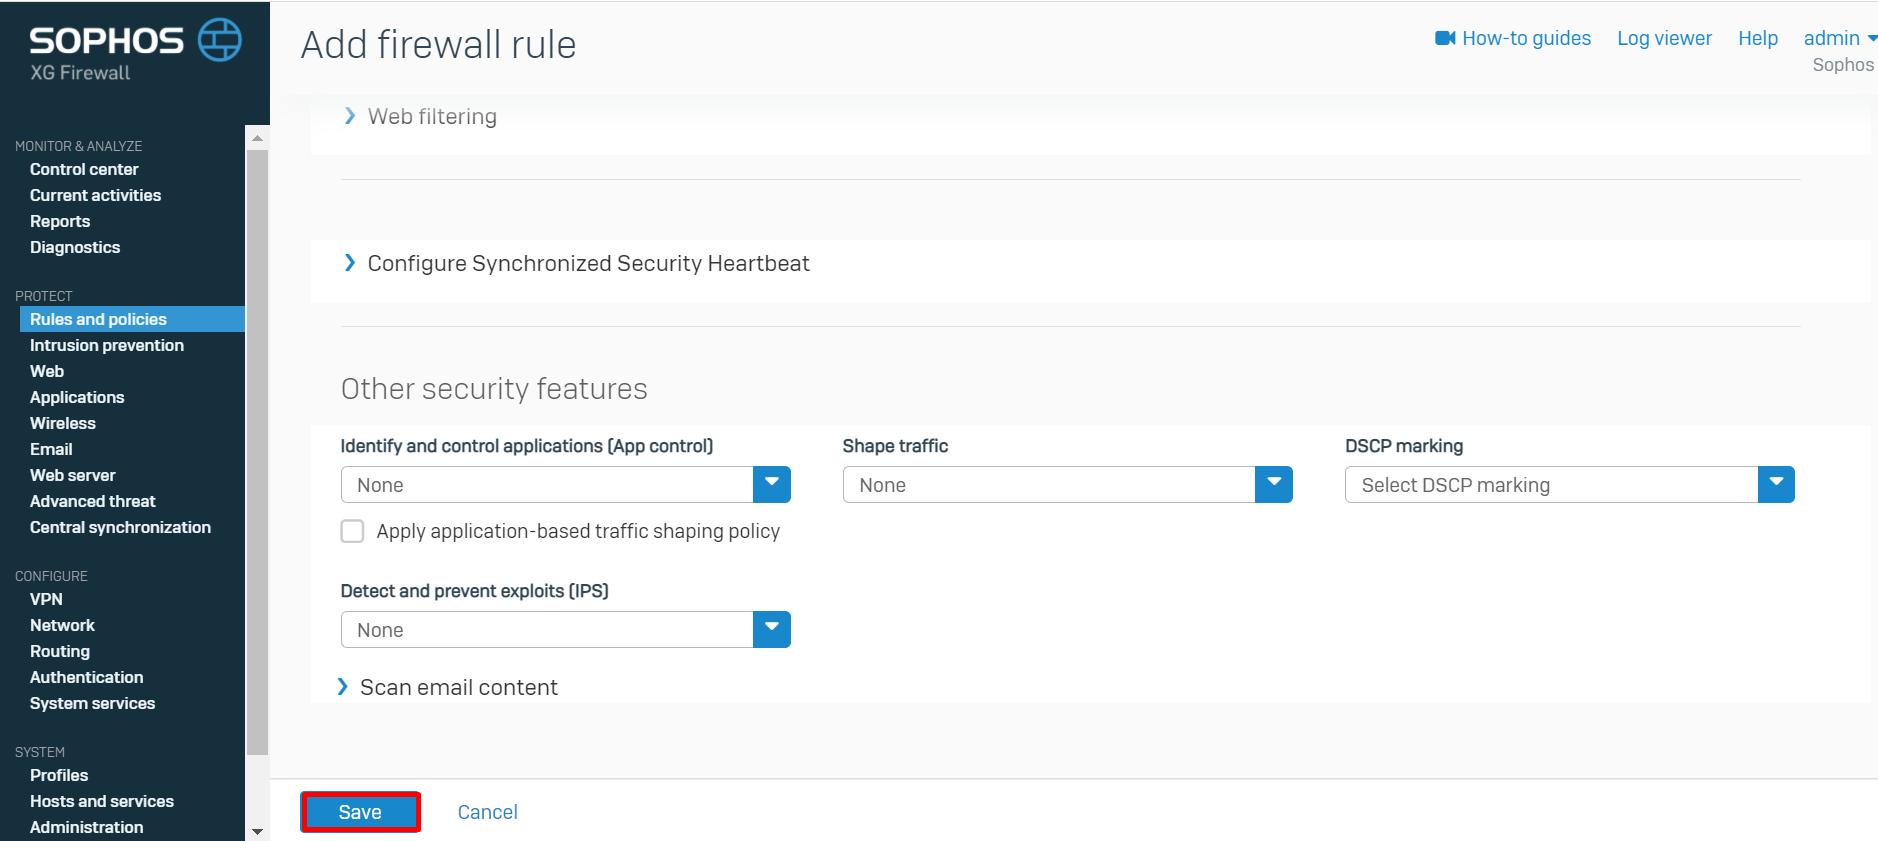
- Leave other settings as default.
- You can configure the security checks of the XG for the traffic if you want to.
- You can configure the security checks of the XG for the traffic if you want to.
- Click "Save".
- Create a Second Firewall Rule in case Traffic is initiated by the AWS side.
Rule status: ON
Rule Name: AWS_TO_XGS
Action: Accept
Rule Position: Top
Rule group: Automatic or select your VPN group
Log firewall traffic: Selected
Source
- Source Zones: VPN
- Source Networks and Devices: IP or Network of the device(s) that will be reaching XGS
- Destination Zones: LAN
- Destination Networks: IP or Network of the device(s) behind the XGS
- During Scheduled Time: Leave the default setting
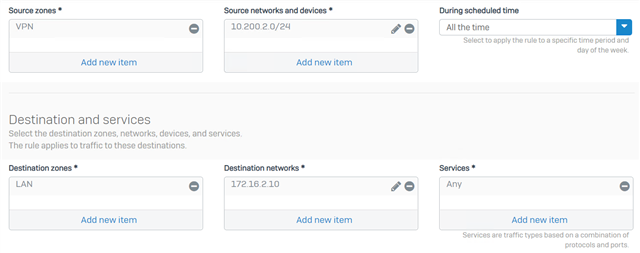
- Leave other settings as default.
- You can configure the security checks of the XG for the traffic if you want to.
- You can configure the security checks of the XG for the traffic if you want to.
- Click "Save".

- Note: You will most likely NOT see Traffic hitting this specific Firewall Rule, as this rule will be hit only if the EC2 instance initiates the traffic. However, it’s best practice to have a Firewall Rule for each Zone and Destination.

Step 9: Configure the XFRM tunnel interface (Sophos Firewall)
- Log into the WebAdmin of your On-Premises Sophos Sophos Firewall.
- Under "Configure", Click on "Network" → Under "Interfaces", click the XFRMinterface.

-
In the "Network" configuration window, configure the following:
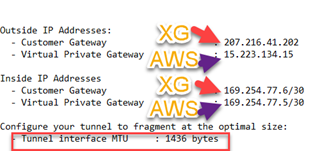
- IPv4/netmask: Enter the IP address. The IP address can be found under Inside IP Addresses >Customer Gateway, as obtained from the configuration file downloaded in Step 4(2).
- Expand "Advanced Settings"
- Select "Override MSS" and enter the MSS value as obtained from the configuration file downloaded in Step 4(2).
- Click "Save".


- In the "Update interface" prompt, click "Update interface".

Step 10: Configure static routing to the AWS network (Sophos Firewall)
- Log into the WebAdmin of your On-Premises Sophos Sophos Firewall.
- Under "Configure", click "Routing" → Under "Static Routing", click "Add".
-
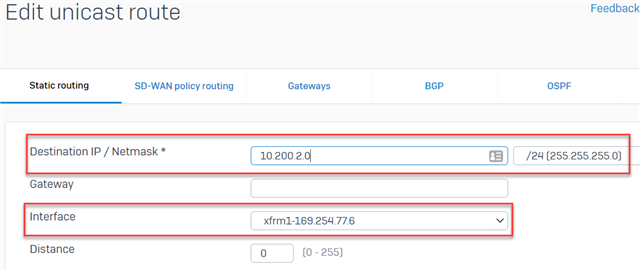
In the "Add unicast route" window, configure the following:
- Destination IP/Netmask: Enter the network IP and subnet mask of your AWS virtual network
- Gateway: To be left empty
- Interface: Select the XG's XFRM tunnel interface
- Distance: Leave the default setting
- Click "Save"
Step 11: Verify the VPN connection
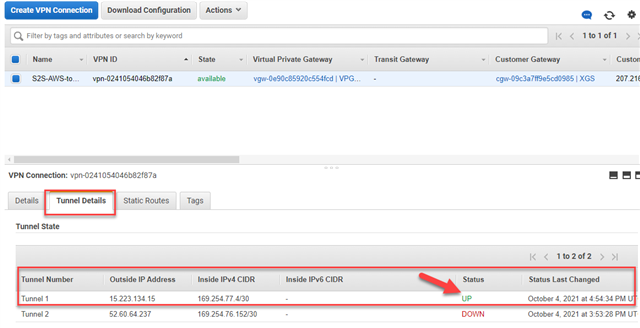
- In the AWS Portal: https://console.aws.amazon.com/, go to "Virtual Private Network(VPN") and select Site-to-Site VPN Connections.
- In the "VPN Connection" blade, ensure that the status of the Tunnel is "UP".
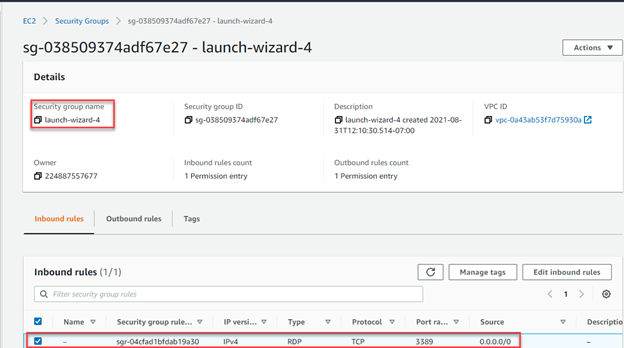
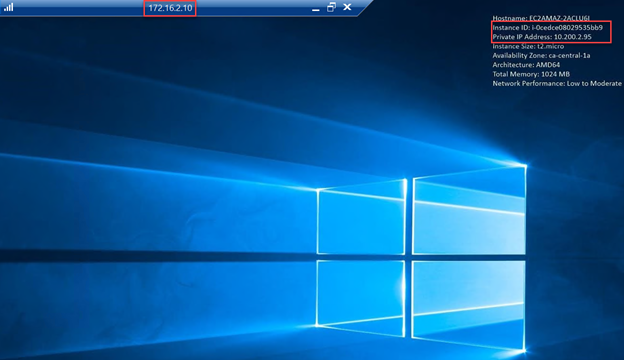
- Check the EC2 Security Groups are allowing RDP
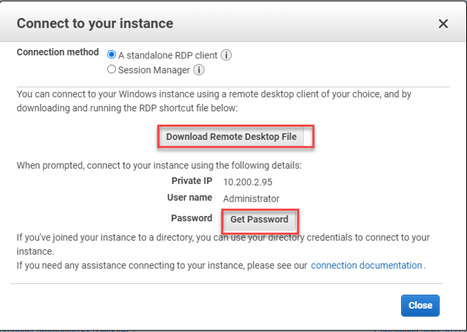
- Download the Remote Desktop file for your EC2 instance from AWS.
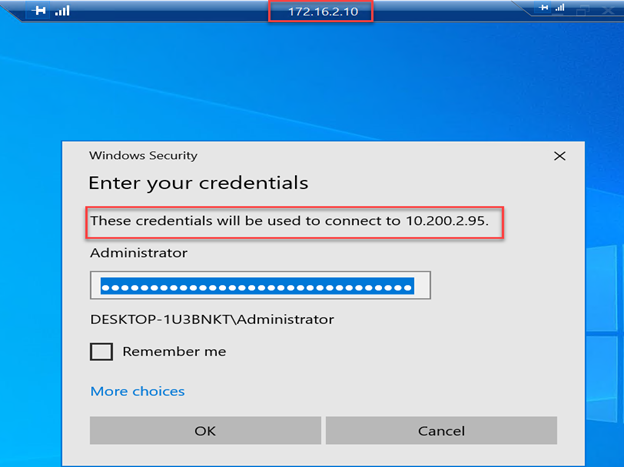
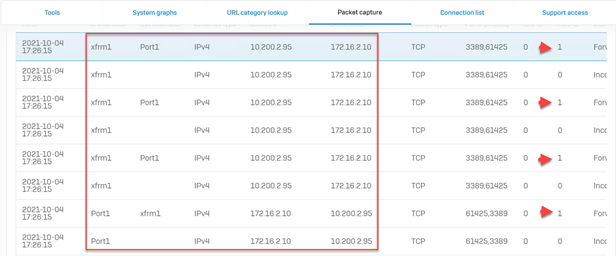
- Perform a connectivity test from an on-premise instance to an AWS VM.
Revamped RR
[edited by: Erick Jan at 3:54 AM (GMT -8) on 6 Dec 2024]

