

Disclaimer: This information is provided as-is for the benefit of the Community. Please contact Sophos Professional Services if you require assistance with your specific environment.
Overview
This document covers how to setup Google LDP with Sophos Central.
This Recommended Read assumes that you have already users created in Google that you wish to grant access to.
Table of Contents
- Overview
- 1. Label Pre-Setup on Google
- 2. Domain Verification
- 3. Adding an Identify Provider
- 3.2 Step A: Setup Open ID Connect
- 3.3 Step B: Configured OpenID Connect Settings
- 3.4 Step C:Configure Domains
- 3.5 Confirm Identity provider MFA enforcement
- 3.6 Turn on LDP
- 4. Configuring Client ID for Web Application
- 5. Activating LDP on Sophos Central
- 6. Error Conditions (Unexpected ISS Value)
Configuration
1. Label Pre-Setup on Google
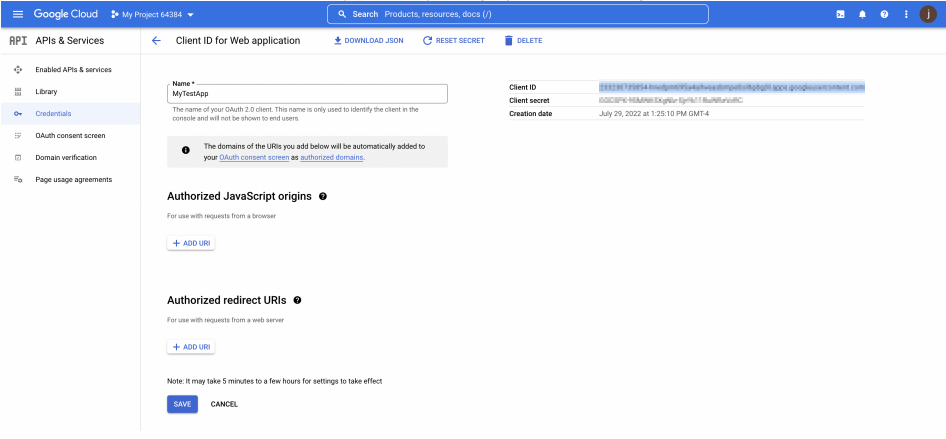
Upon creation of an application (“credentials”) in Google, you’ll see a page like the screenshot below, make a note of the Client ID (highlighted in blue) as you will need it in step "3.3 Client ID".
2. Domain Verification
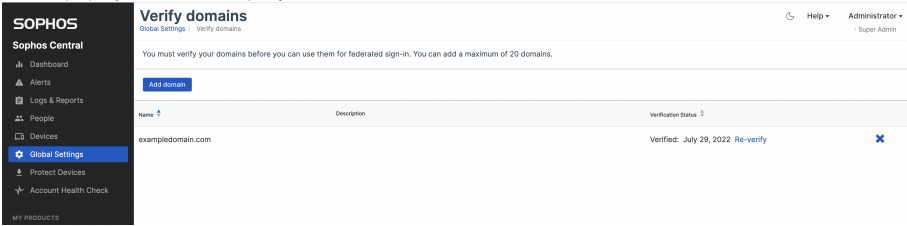
- 2.1 Login to your Sophos Central account, using your Administrator Account.
- 2.2 Go to overview > Global Setttings > Verify Domain. *Make sure your domain is verified.
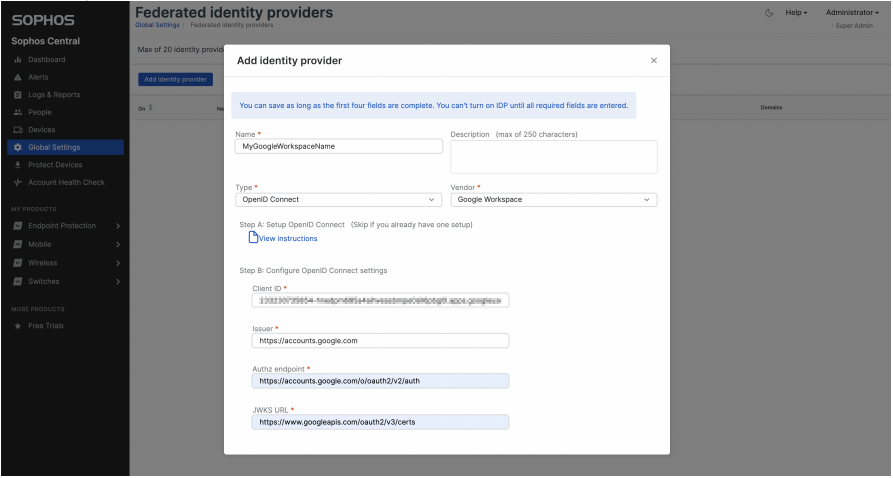
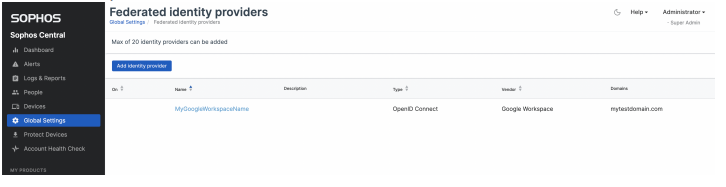
3. Adding an Identify Provider
- 3.1 Navigate to Global Settings > Federated Identify Providers > Add Identify provider.

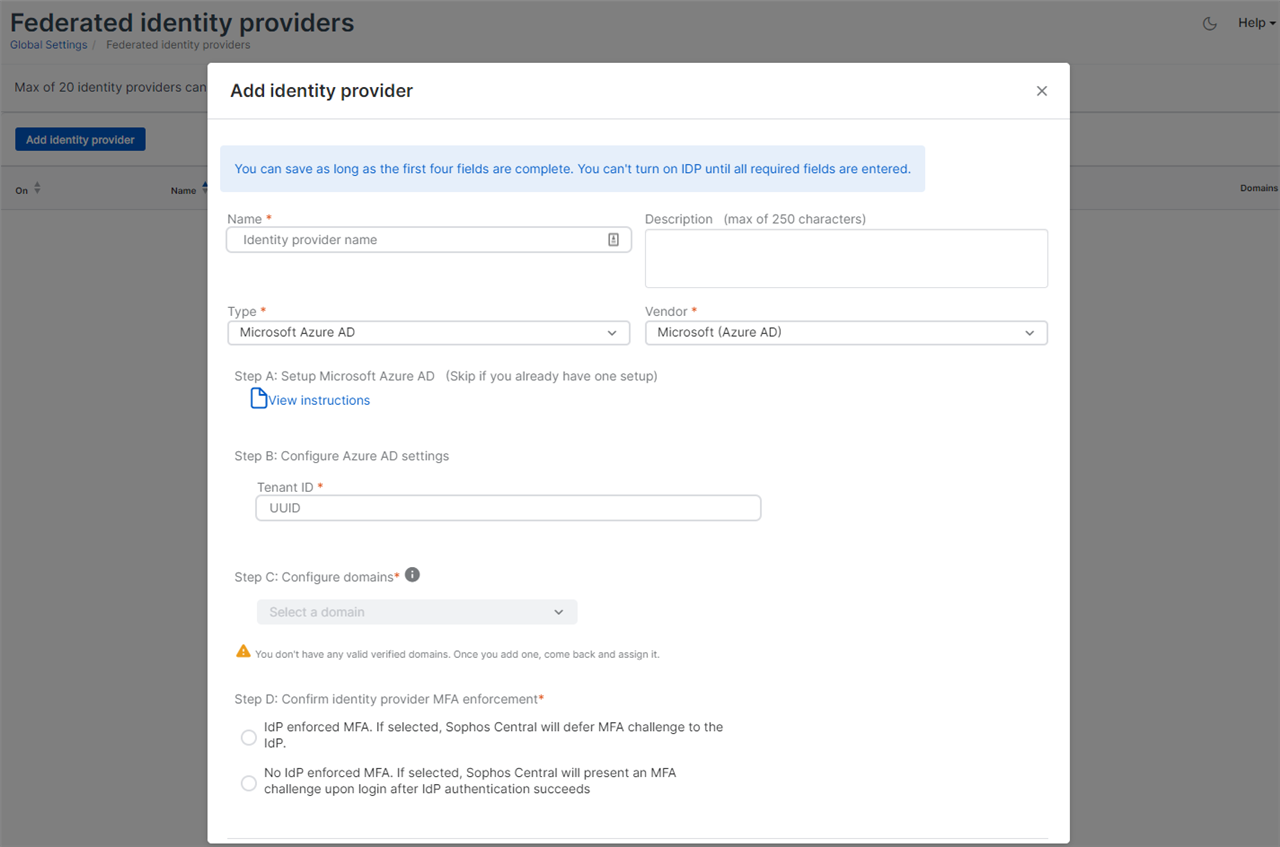
3.2 Step A: Setup Open ID Connect
- Enter a Name
- Select OpenID Connect from the Type drop down
- Select Google Workspace for the Vendor drop down
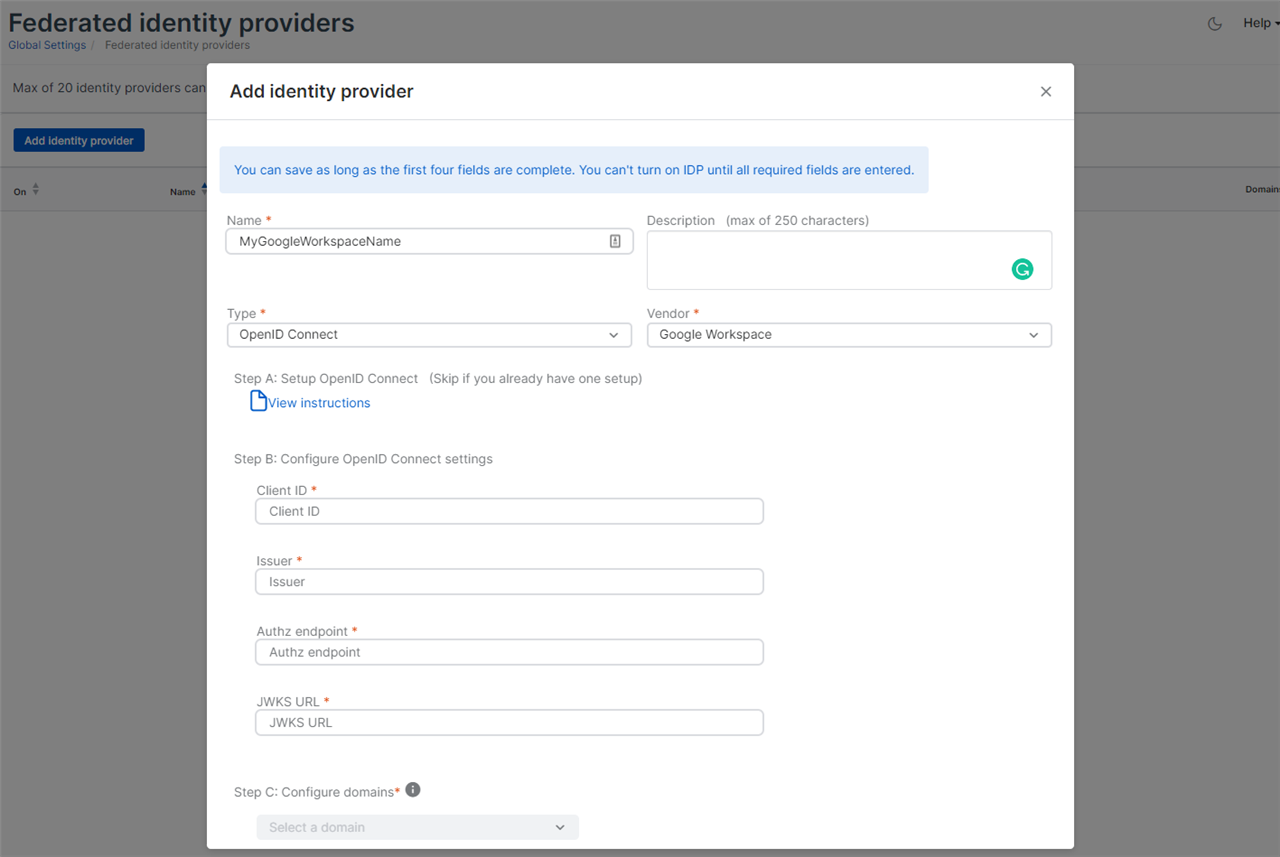
3.3 Step B: Configured OpenID Connect Settings
- Client ID: Enter the Client ID highlighted in the Label PRE-SETUP (Image 1) for your unique Client ID for Web Application
- Issuer: https://accounts.google.com
- Authz endpoint: https://accounts.google.com/o/oauth2/v2/auth
- JWKS URL: https://www.googleapis.com/oauth2/v3/certs
3.4 Step C:Configure Domains
Select from the drop down the domain your previously configured

3.5 Confirm Identity provider MFA enforcement
Select a radio button indicating if the LDP will enforce MFA (1st option) or if Sophos will enforce MFA (2nd option)
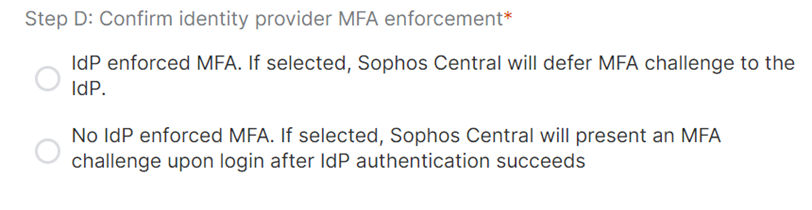
After selecting one option, you should be able to Save and see your domain listed
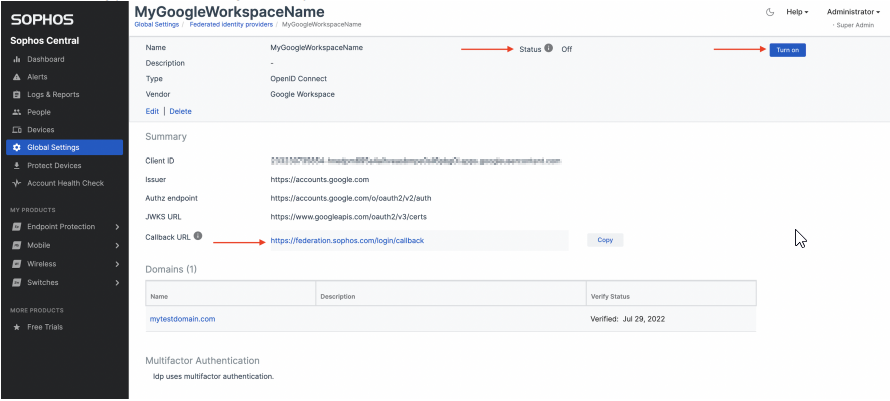
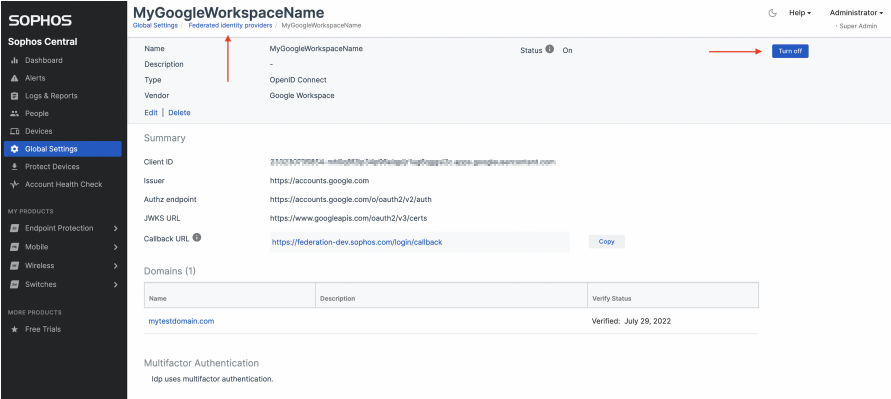
3.6 Turn on LDP
- Click on the NAME link of the LDP you just created
- In the new Details page, find and click "turn on"
- Copy the Callback URL
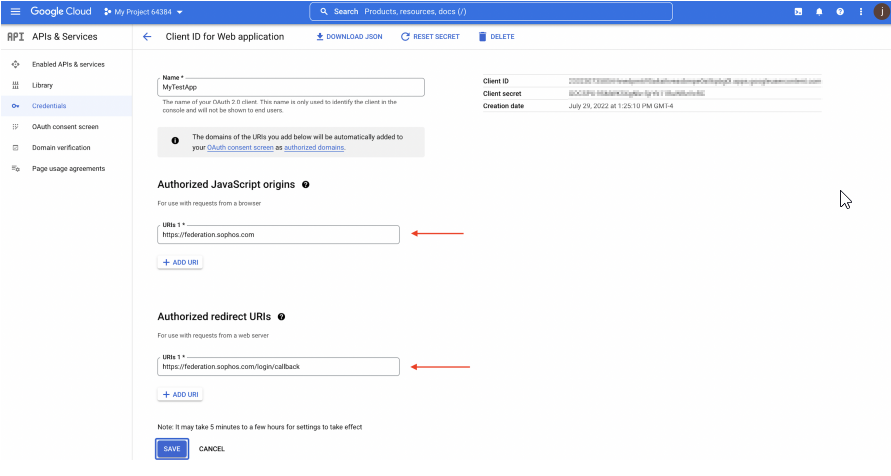
4. Configuring Client ID for Web Application
- 4.1 Go back to your Google Workspace credential page
- Under Authorized Javascript origins paste: https://federation.sophos.com
- Under Authorized Redirected URIs paste: https://federation.sophos.com/login/callback
- Save
5. Activating LDP on Sophos Central
- 5.1 Go back to Sophos Central > Overview > Global Settings > Federated Identity Provider > Click the Name and then click the "Turn On" button ( this will switch to off).
- The "Status" should change to "On" (You can reference the image in Step 3.6 Turn on LDP, for further clarification)
At this point the LDP is ready for use with Sophos.
Note: Without users configured in the LDP and in Sophos Dashboard (under the People side bar menu), no one will be allowed to log in. If the user used for this configuration has access to the LDP (account created under the LDP), logging back will now require a Sign in with SSO button

Clicking Sign in with SSO should redirect you to the Google Authentication Screen.
Note if you are logged in, in the same browser, it may automatically log you in. To test this further you can use a private browsing window, so you
can remain logged in.
6. Error Conditions (Unexpected ISS Value)
Google provides you with a Download json link, that you can click and should provide you with the URLs for Authz and JWKS. We have found those URLs don’t work
properly and you should use different versions of the URLs. If you have followed the document above, its unlikely you run into this problem but
regardless, you may see the following, after authenticating with Google (and attempting to redirect back to Sophos).
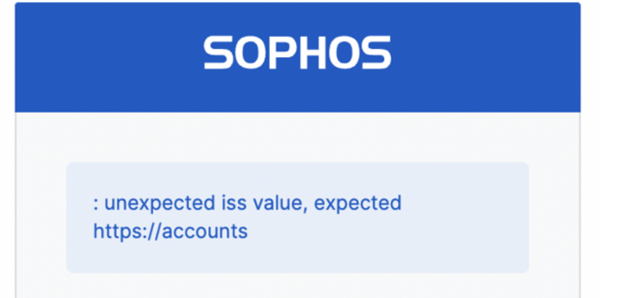
If encountered, kindly recheck step 3.3 Step B: Configure OpenID connect Settings and ensure you have correctly input the following details:
- Authz endpoint: https://accounts.google.com/o/oauth2/v2/auth
- JWKS URL: https://www.googleapis.com/oauth2/v3/certs
NOTE: To edit an existing IdP, click its name in the IdP list, and click Edit in the screen that opens. Edit is a hyperlink, located just below Vendor in the top section of the screen.
NOTE: To edit an existing IdP you may need to turn the IdP off, first
Added Disclaimer
[edited by: GlennSen at 8:15 AM (GMT -7) on 5 Apr 2023]