Disclaimer: This information is provided as-is for the benefit of the Community. Please contact Sophos Professional Services if you require assistance with your specific environment.
Table of Contents
Overview
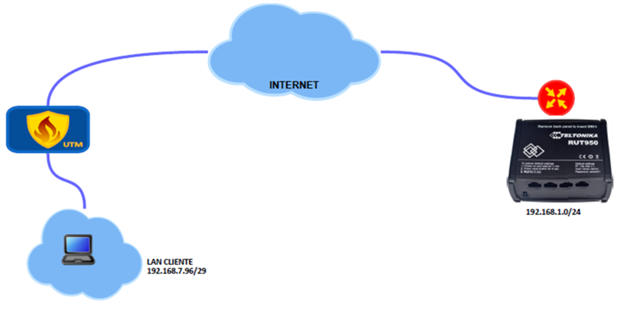
This Recommended Read instructs on how to configure a Site-to-site IPsec VPN between Sophos Firewall and Teltonik.

Configuring Sophos Firewall
Add local and remote LAN
Go to SYSTEM>Hosts and Services > IP Host and select Add to create the local LAN.

Next, Click SYSTEM>Hosts and Servivces> IP Host, and select Add to create the remote LAN.
Create an IPsec Connection
Go to CONFIGURE > Site-to-site VPN > IPsec > IPsec profiles and select Add to create the policy.

Dead Peer Detection: Disabled

Create site-to-site Connection
Go to CONFIGURE > site-to-site VPN > IPsec > IPsec Connections and select Add to create a new VPN.
- Enter a Name: to_teltonika_device2
- Select IP version: IPv4
- Connection type: Site-to-site
- Gateway type: Respond only
..
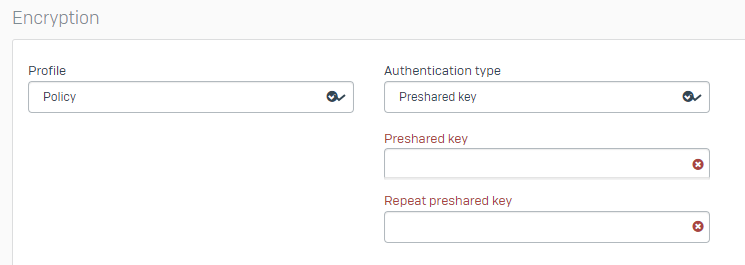
Encryption
- Select your Profile: Policy
- Authentication type: Preshared key
Enter a pre-shared key and Repeat preshared key

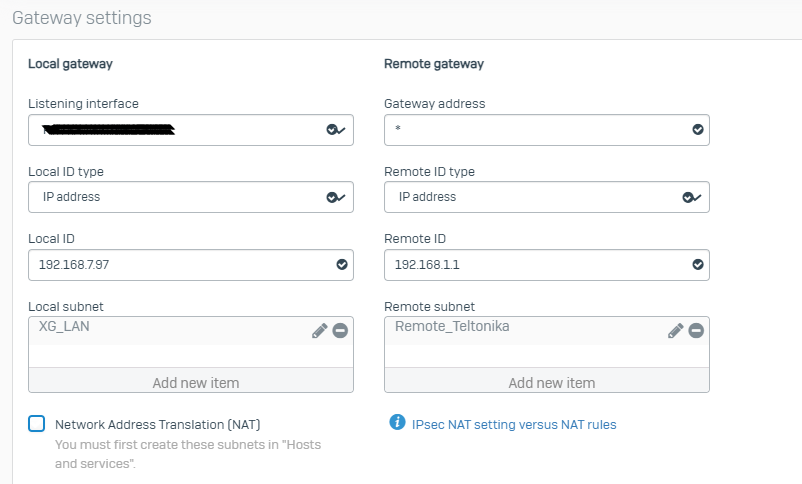
Global Settings
- Listening interface: select your WAN port
- Remote Gateway: Enter the Public IP of the Teltonik router or a * if the device is behind another Firewall
- Local ID type: IP Address
- Remote ID type: IP Address
- Local ID: set your local ID (an IP)
- Remote ID: set the router's ID (on the router's interface - My identifier) (IP)

Configuring Router Teltonika RUT2XX
Creating an IPsec instance
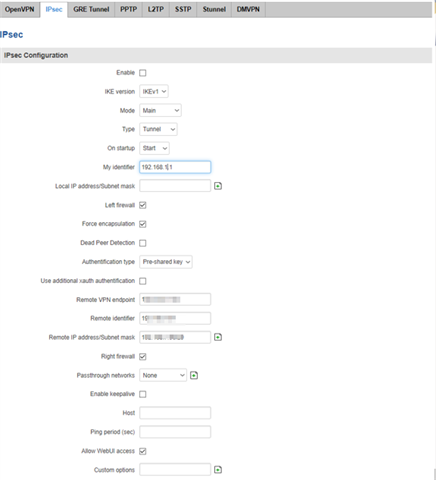
Log in to the router’s web UI, go to Services -> VPN -> IPsec
Enter any name for the instance and hit ‘Add.’
Click Edit on the newly created instance.

- Enable Checkbox: Enabled
- IKE version: IKEv1
- Mode: Main
- Type: Tunnel
On Startup: Start
- My identifier is 192.168.1.1 (ROUTER LAN GATEWAY)
- Local IP address/Subnet mask: LAN IP address and prefix (for ex. 192.168.1.0/24)
- Left firewall: Enabled
- Force encapsulation1: Enabled
- Dead Peer Detection: Disabled
- Remote VPN endpoint: 190.0.241.163
- Remote identifier: 192.168.7.97 (REMOTE LAN ADDRESS)
- Remote IP address/Subnet mask: 192.168.7.96/29 (Remote IP Subnet)
- Right firewall: Enabled
- Passthrough networks: NONE
- Enable keepalive: Disabled
- Host: EMPTY
- Ping period (sec)
- Allow WebUI access: Enabled
- Custom options: EMPTY

Phase 1:
- Encryption algorithm: 3DES
- Authentication: SHA1
- DH group: MODP1536
- Lifetime (h): 3600 (seconds)
- Testing the connection
Check the status of the tunnel
-
Teltonik
On the router, Go to Services -> CLI
- Username: root
- Password: your router's Admin Password
Once logged in, put in IPsec status and hit Enter
You’ll see a tunnel formed, as in the example below

Sophos Firewall
You'll see a green status light under VPN - IPsec connections.
Added TAGs
[edited by: Raphael Alganes at 7:51 AM (GMT -7) on 17 Sep 2024]

