

Disclaimer: This information is provided as-is for the benefit of the Community. Please contact Sophos Professional Services if you require assistance with your specific environment.
Overview
If you find that the SophosFileScanner.exe process is consuming more CPU resources than expected with real-time scanning enabled, this is often due to a high number of read and write operations on the drive.
This article outlines steps to identify which directories and files are being scanned.

What To Do
If you wish to monitor what the Sophos File Scanner process is scanning in real-time:
Increase Log Level to “Info”
1. Disable Tamper Protection.
a. Using the “Tools” section of Sophos Endpoint Self Help, increase the log level on the "SFS" component to "info".
Sophos Endpoint: Self Help Tool for Windows
OR
b. Run the following command via PowerShell:
New-ItemProperty -path "HKLM:\SOFTWARE\Sophos\Logging\SFS" -Name "LogLevel" -Value 1
3. Restart the SophosFileScanner Service.
Parse the logs
1. Run the following command through PowerShell to analyze the generated logs:
Get-Content "C:\ProgramData\Sophos\Sophos File Scanner\Logs\SophosFileScanner.log" -wait -tail 1 | where {$_ -match 'I End ScanDispatcher Request' -and $_ -notmatch 'SophosFileScanner.log'}
2. Once done, revert the log-level changes to the default configuration.
Related information:
Sophos Endpoint Self Help: Product Logging
If the issue is not as frequent, or if you want to allow a system to run for some time:
Increase Log Level to “Debug”
1. Disable Tamper Protection.
a. Using the “Tools” section of Sophos Endpoint Self Help, increase the log level on the "SFS" component to "Debug".
Sophos Endpoint: Self Help Tool for Windows
OR
b. Run the following command via Powershell:
New-ItemProperty -path "HKLM:\SOFTWARE\Sophos\Logging\SFS" -Name "LogLevel" -Value 0
3. Restart the SophosFileScanner Service
Parse the logs
Allow your system to run for some time, so logs are generated. Remember that the logs may increase in size and rotate if left running for an extended period of time.
1. Open the log file C:\ProgramData\Sophos\Sophos File Scanner\Logs\sophosfilescanner.log in Notepad++.
2. Search for all lines which start with: \t\t\t"path" (That is 3 tabs before the "Path")
These are the scan responses: 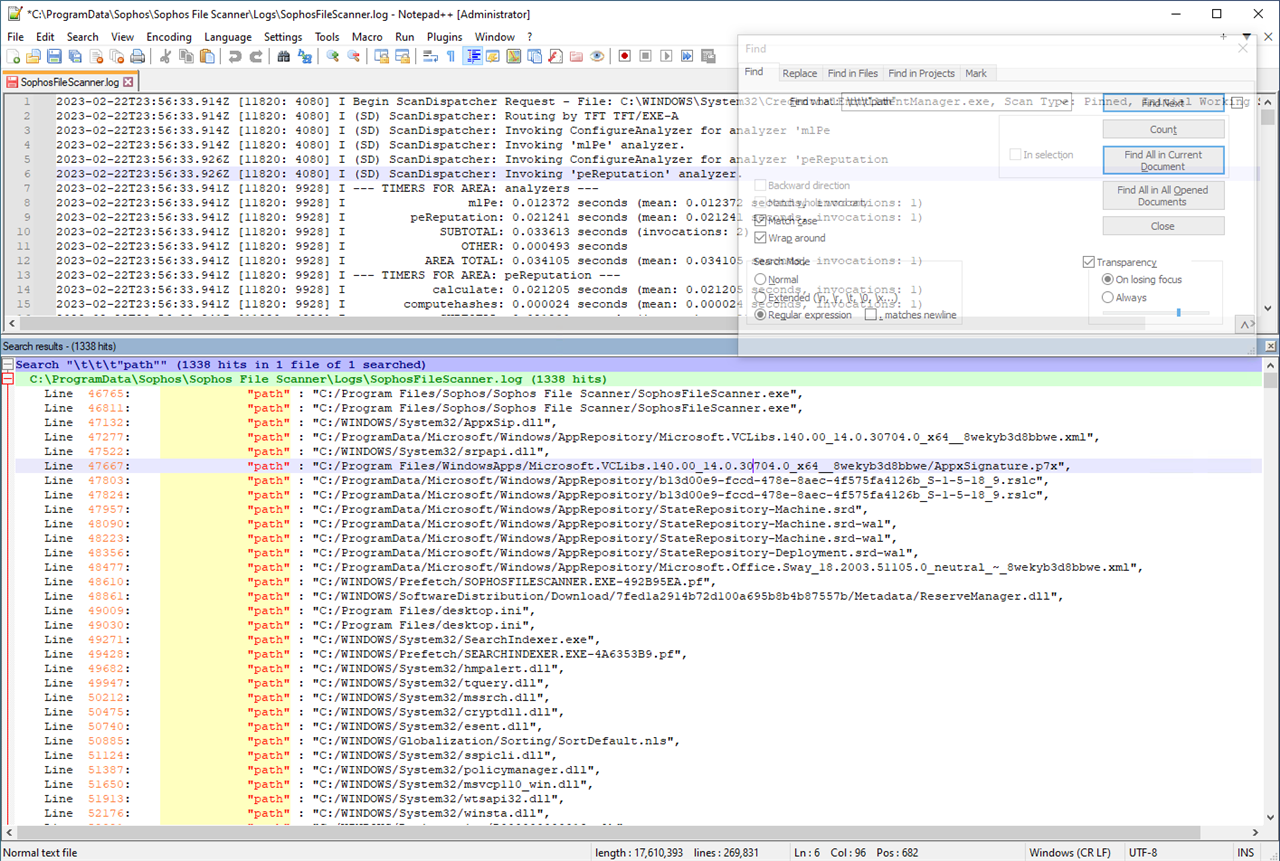
Log rotation, write filtered logs to a different file:
If you need to retain logs for a longer timespan, we can adjust the PowerShell command referenced earlier to write the logs to a new location. The file/folder can be specified as needed.
This is typically not needed as the log files in the normal log location will grow to 37MB before rotating to a new log file and appending “1,2,3...” to the subsequent files.
Get-Content "C:\ProgramData\Sophos\Sophos File Scanner\Logs\SophosFileScanner.log" -wait -tail 1 | where {$_ -match 'I End ScanDispatcher Request' -and $_ -notmatch 'SophosFileScanner.log'} >> C:\Windows\Temp\SophosFileScannerFULL.txt
Note: This will cause additional entries to be written to the logs as Sophos scans the write operations we’re performing by running this command. These can be filtered/replaced using Notepad++ afterwards.
Exclusions
Now that you've narrowed down the directories and/or files that are being scanned, you may proceed to apply the necessary exclusions.
References:
Global Exclusions - Sophos Central Admin
Windows scanning exclusions - Sophos Central Admin
Added the techvids video
[edited by: Gladys at 4:09 PM (GMT -7) on 13 Jul 2023]