

Disclaimer: This information is provided as-is for the benefit of the Community. Please contact Sophos Professional Services if you require assistance with your specific environment.
Check out our related Community Techtips episode available on-demand!
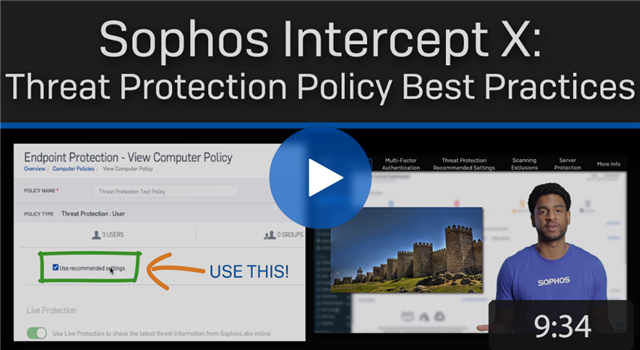
Our latest video on Sophos Techvids outlines best practices for configuring your threat protection policy for Intercept X in Sophos Central.
Special thanks to for the information below!
Intercept X is a powerful product. It's got multiple layers of Protection to protect against lots of different threat vectors and doesn't rely on one specific form of scanning. As we all know, however, great power comes with great responsibility. That responsibility, in our case, comes in the form of Policy configuration.
Misconfigured policies leads to critical pieces of that threat protection fortress of defence being inactive when the bad guy's attack and put you in a position you do NOT want to be in as the IT guy. We know there's a ton of configuration options available, and it can be a bit daunting at first.
Let's break down the threat protection policy so you can configure your policy as securely as possible.
Table of Contents
MFA
Before we jump into the policy, we need to talk about Multi-Factor Authentication or MFA. With MFA turned on, logging in Central will require a second factor. We have different options available like Google Authenticator or SMS codes, Pick one that works for you.
MFA makes it harder for a bad actor to compromise your account because they need access to that second factor and can’t just guess or brute force your password. Remember, MFA works on the principle that two different attributes are harder to compromise than one. A password is something you KNOW, but an authentication code is something you HAVE because it constantly changes and is only accessible from the device set up to generate it.
Access to your dashboard is the most important safety system you have, so don’t let it fall into the wrong hands.
To turn on MFA, go to Global Settings, scroll down to Multi-Factor Authentication, and we recommend enabling "All admins need MFA". More info on MFA: https://docs.sophos.com/central/Customer/help/en-us/central/Customer/common/concepts/MultiFactorAuthentication.html
Note: This is now enabled by default on all Sophos Central accounts.
Endpoint Threat Protection Policy
To get to the Threat Protection Policy navigate to Endpoint>Policies> and either select an existing policy or create a new policy. Click the settings tab once you're in a policy to view the configuration settings.
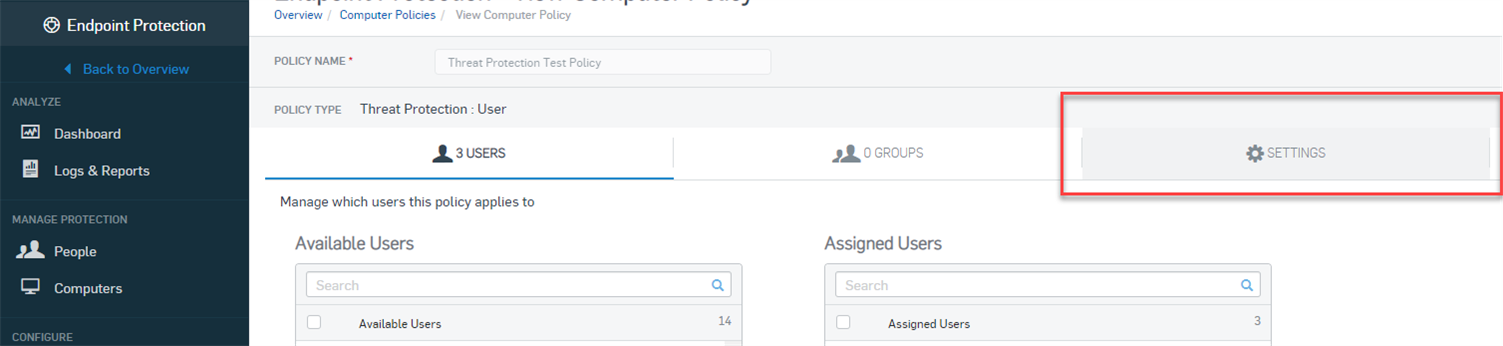
Now, these settings are going to look different for the Endpoint policy than the Server policy. For the most part, the settings are identical, but the placement of settings is a little different. We’ll go through the endpoint policy first, then cover the differences in the server policy.
Recommended Settings
Right off the jump, we see, "Use Recommended Settings".
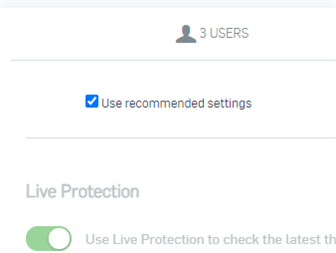
We recommend leaving this turned on. As long as you've installed Intercept X on the devices in your environment, they'll get a policy that we deem secure today, and we'll update it accordingly when we add new features in the future.
Now there's more to the policy like Scheduled system scans, device isolation, and exclusions, but we'll talk about those in a minute.
Initial Scan Settings
- Live Protection allows the Antivirus to look up the latest threat information from Sophos Labs online on items that are being scanned.
- Deep Learning is Machine learning or AI that can detect threats without the use of traditional signatures.
- It scans Portable executable files, or PEs, before execution and provides a confidence score on if the PE is malicious or not
- This scan is fast and is always done on a PE – even if you’ve excluded it, but if you excluded a PE it will disregard the result of the scan and allow the PE through. Since it doesn’t need a signature it has the ability to detect poly-morphic malware or even malware that has never been seen before – 0-day threats
- We test the detection models extensively before release to reduce the number of false-positives but there’s a small chance they can still happen.
- More info: https://docs.sophos.com/central/Customer/help/en-us/central/Customer/common/concepts/MalwareAdviceDeepLearning.html
- Real-time Scanning is your primary protection on the device.
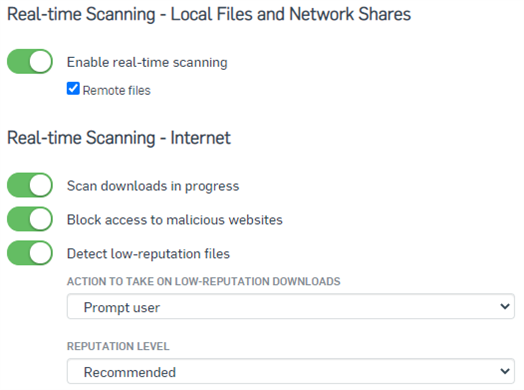
- It determines if the endpoint will scan PEs at execution. This includes (in order):
- The Reputation scan
- The Deep Learning scanner
- The traditional signature-based scan
- The Application Control scan
- If you turn real-time scanning off – all those other elements won’t work.
- Options:
- Scan downloads in progress
- Block access to malicious websites: This denies access to websites that are known to host malware.
- Detect low-reputation files: This warns if a download has a low reputation. The reputation is based on a file's source, how often it is downloaded, and other factors. You can specify:
- Action to take on low-reputation downloads: If you select Prompt user, users will see a warning when they download a low-reputation file. They can then trust or delete the file. This is the default setting.
- Reputation level: If you select Strict, medium-reputation, as well as low-reputation files, are detected. The default setting is Recommended.
- Remediation - Remediation is what actions to take once a threat is actually detected. We can see the "Enable Threat Case creation" slider on, which means when a threat is detected is will generate a threat case in the Threat Analysis Center. Threat cases are incredibly beneficial when investigating what happened when dealing with an infection, so you’ll want to keep that turned on.
- Keep in mind, not every detection will generate a Threat Case. More info on threat cases: https://support.sophos.com/support/s/article/KB-000036336?language=en_US
Why do we have so many scans you ask? It’s like a stack of sifts. Some scans are better at detecting different types of things or are more efficient. Stacking them together means if a detection happens at one layer, we don’t proceed to the next. That allows us to optimize protection and performance.
Runtime protection
Active Exploits
Active Exploits are actions that known good applications can be forced to take – which can be malicious. Think of macros in Word Docs – Word is a good application and won’t be stopped by out PE scanning. However, the Macro you just loaded makes it call PowerShell, and edit your local environment variables changing the path for File Explorer to a malicious PE that came bundled with the Word Doc.
Basically, Active Exploit Mitigation looks at what an application is doing and determines if that action is malicious or of concern, regardless of which PE or process is doing the action.
The runtime protection settings are your “active exploit” protection, monitoring behavior after files have been executed and they are trying to do damage. We recommend all these settings to be turned on.
- "Cryptoguard" is your main ransomware protection for document files, which are commonly targeted.

- It looks at specific file extensions and is triggered if a PE or process changes more than a threshold number of files in a specific time period. That change results in a suspicious alteration to the file, like the file is deleted or the extension is changed. This means that some archiving software can trigger CryptoGuard but we have exclusions to prevent this
- "Protect from master boot record ransomware" protects devices from Ransomware that encrypts the MBR, which may prevent startup, and from attacks that wipe the hard disk.
- "Protect critical functions in web browsers (Safe Browsing)" protects web browsers from being exploited.

- Keep in mind this isn’t web control or download protection. Those are important layers of security as well, which you can configure in the Web control policy. More info on the web control policy: https://docs.sophos.com/central/Customer/help/en-us/central/Customer/concepts/ConfigureWebControl.html
- This is looking for things like Javascript injections, SQL Cross site scripting, and other exploits that the website can force your web browser to action on your device.
- "Mitigate exploits in vulnerable applications." and "Protect process" protects applications and processes that are most prone to exploitation.
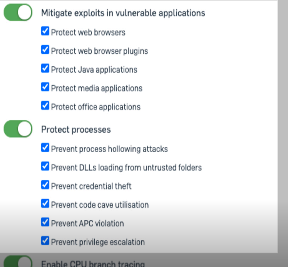
- We have options for which types to protect, but we recommend turning on all of them. These are common exploitation vectors like JAVA, Office Docs, and so on. These applications aren’t malicious, it’s the data being fed into them, making them do something malicious
- "CPU branch tracing" is specific to Intel processors and allows for tracing of processor activity for detections.

- It tries to figure out all the elements of the branching and seeing if something is trying to maliciously manipulate them. Depending on what is running on a system there is different benefits/drawbacks to this protection. for low application load servers (like a file server) there is little impact - not only will there be less scenarios where that kind of protection will trigger but there will also be less impact on performance. On the other hand, high load servers are exposed more often to these sorts of things but also could have too high an impact on performance.
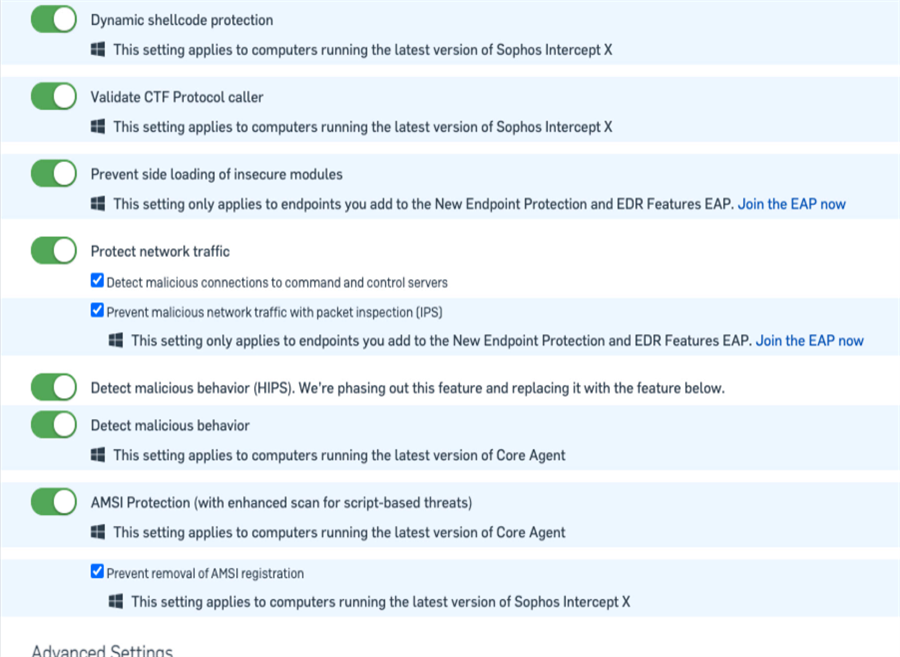
- EAP/New Features section:
- The settings highlighted blue are new features we've either just released into the software or features that are only available in our early access programs. So if the settings say join the EAP now, they only apply to devices in the EAP.
Advanced Settings
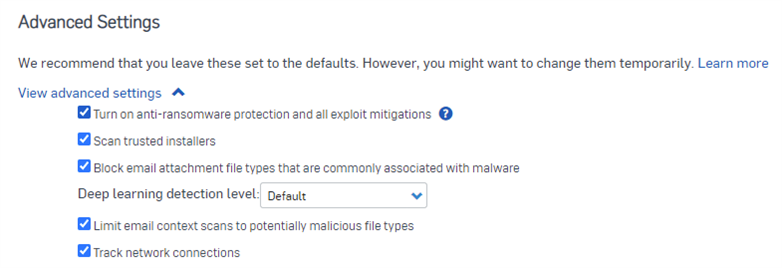
- The advanced settings contain some options more for troubleshooting that should only ever be disabled temporarily. These settings can turn off features that can open major vulnerabilities so you don’t want to be playing around. Leave these as the default settings.
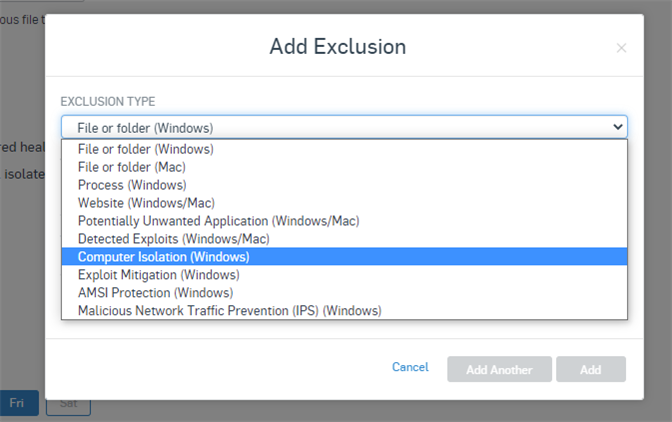
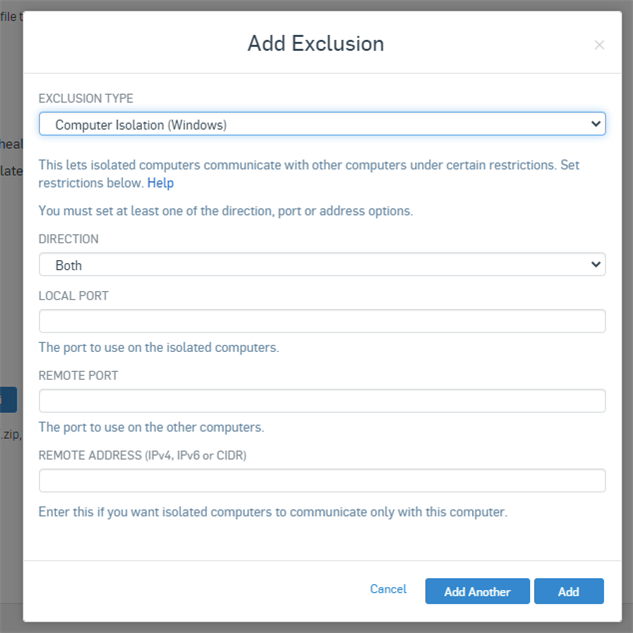
Device Isolation

- Device isolation is designed to prevent lateral movement of malware, such as worms, onto critical infrastructure. It injects a block into the network stack of the device when a red health status is detected.
- No network traffic will be allowed from that device except to Sophos, or to defined devices and ports you’ve configured in the policy. You can configure these defined devices and ports as exclusions in the exclusion section.
- That can be great for malware infections, but since things like update failures and missing services will also trigger isolation, you have to balance against user experience and your security posture. Only turn this setting on for systems that have access to critical areas of your network. More info: https://support.sophos.com/support/s/article/KB-000038424?language=en_US
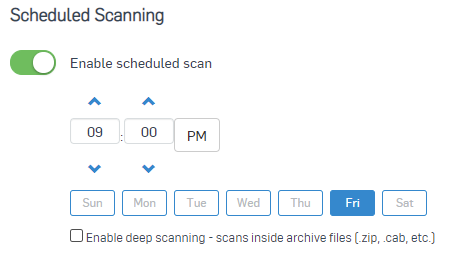
Scheduled Scans
-
We suggest configuring a scheduled scan for once a week. In an incident response scenario, you may need to perform these more frequently.
Preventing an attack is more effective than trying to stop it once it's underway. Detections on a system through scheduled scans can alert you that further investigation is necessary - ie., something has changed. Sophos Labs continually publishes new detections. A file we did not look for with older detection data may be detected with an updated database later on. A scheduled scan provides you with a second check in case something gets through real-time protection.
Exclusions

Now to the danger zone, we go with exclusions. In some situations, exclusions may be unavoidable. Try to use a scalpel when making exclusions, not a hammer. What we mean is to try to be as exact and precise as possible. Don't exclude entire drives. Exclude specific files or detections instead of entire folders. We do health checks on customers and sometimes see things like the "D" through "H" drives excluded which is very risky.
Remember, any PE that falls under an exclusion will have no restrictions on running. It will be able to do whatever malicious action it wants.
Before making exclusions, read through our documentation on scanning exclusions, and while making exclusions, read the exclusion description that's displayed to make sure you're using the right type of exclusion.
- Threat Protection Policy doc: https://docs.sophos.com/central/Customer/help/en-us/central/Customer/concepts/ConfigureMalwareProtection.html
- Scanning Exclusion Wildcards and Variables: https://docs.sophos.com/central/Customer/help/en-us/central/Customer/references/ep_ExclusionVariablesWindows.html
- Recommended Vendor Exclusions https://support.sophos.com/support/s/article/KB-000033519?language=en_US
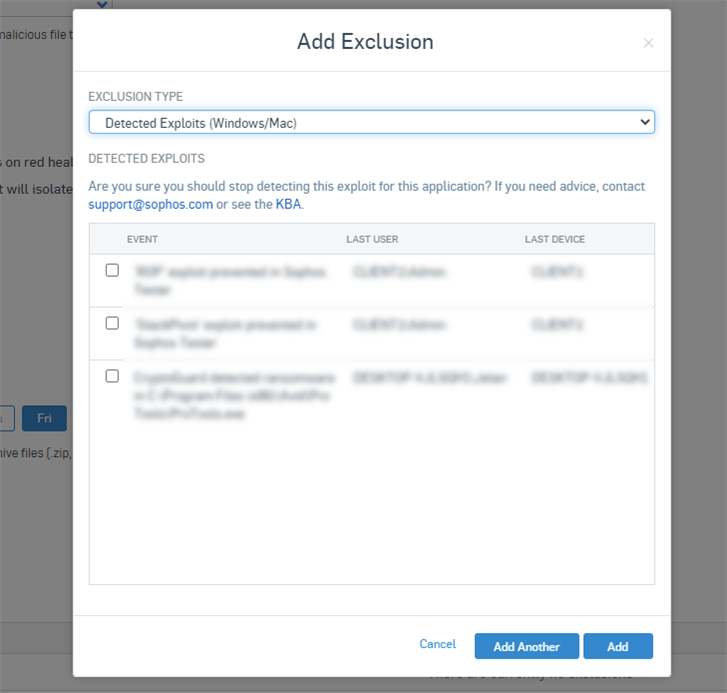
For example, if Active Exploit Mitigation detects a threat, it will show up in the Detected Exploits option.
 `
`
Trying to make a file or folder exclusion for that detection won’t work because that applies to the real-time scanning, not active exploit mitigation.
If you're putting exclusions into your policy, create separate policies for the users or devices that need those exclusions if possible to minimize the scope of the exclusions. We've seen some messy situations due to improper use of exclusions, and we don't want that happening to you, so be careful!
Server Threat Protection policy
Switching over to the server-side of things, while all the settings are pretty much the same, they're ordered a little different. All the intercept X advanced features live at the top, and the Standard protection is underneath. If you have the Intercept X advanced license then enable all the advanced features for full protection.
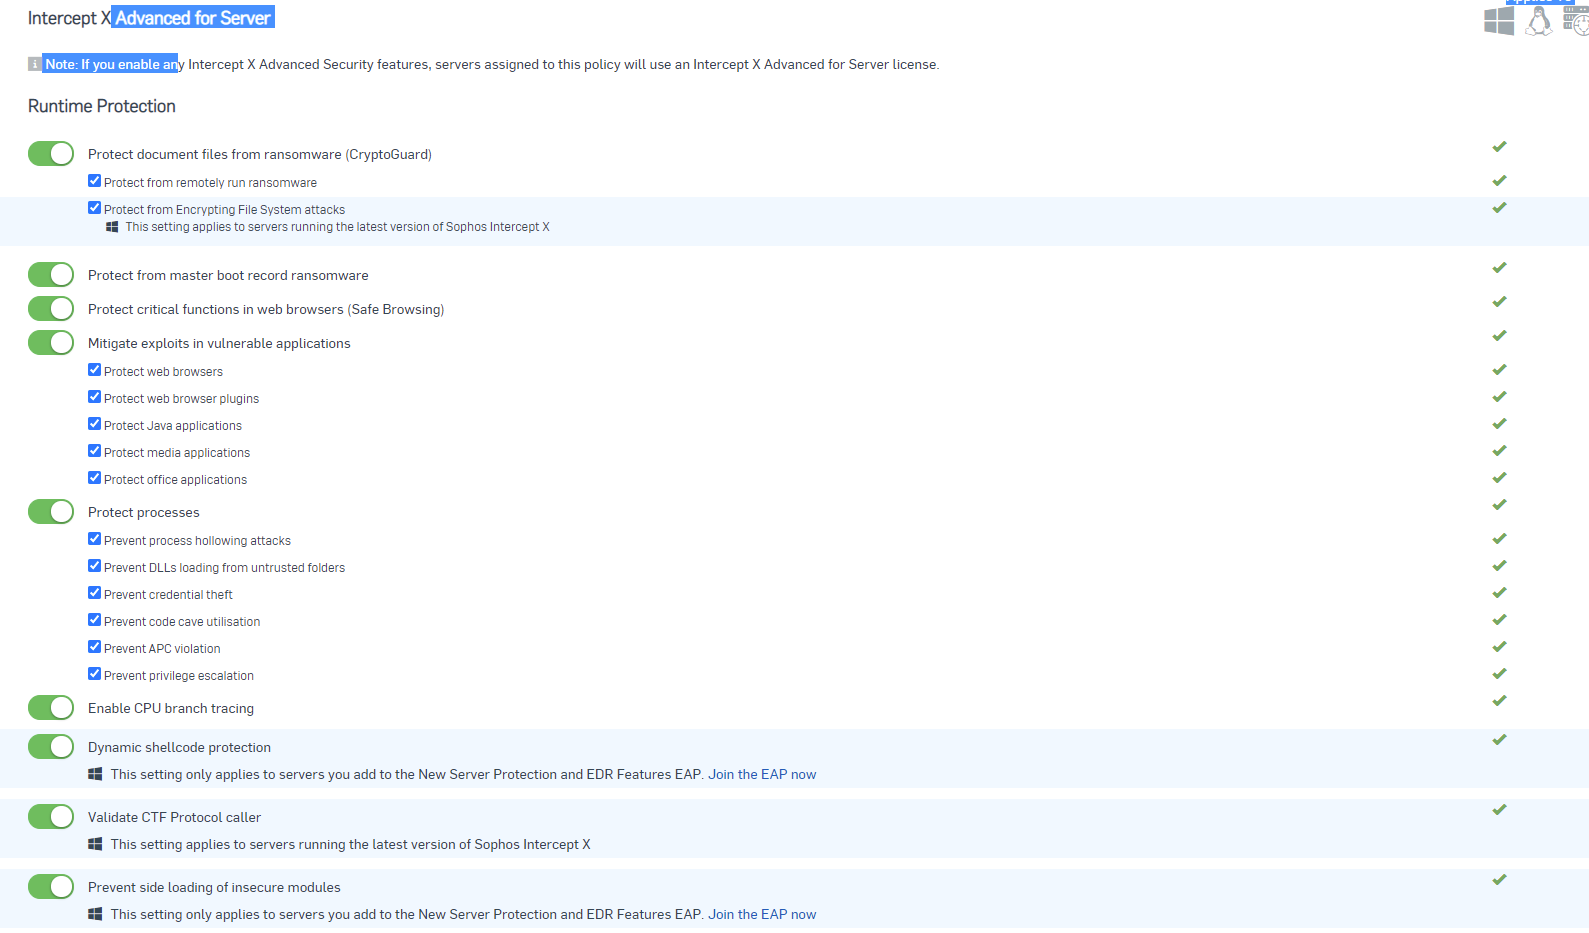
When you create a new policy, all the recommended settings will be turned on, but the intercept X advanced options don’t have the use "recommended settings" check box we saw on the endpoint side. The Server Protection default settings section does have an enable all check box which we recommend leaving checked.
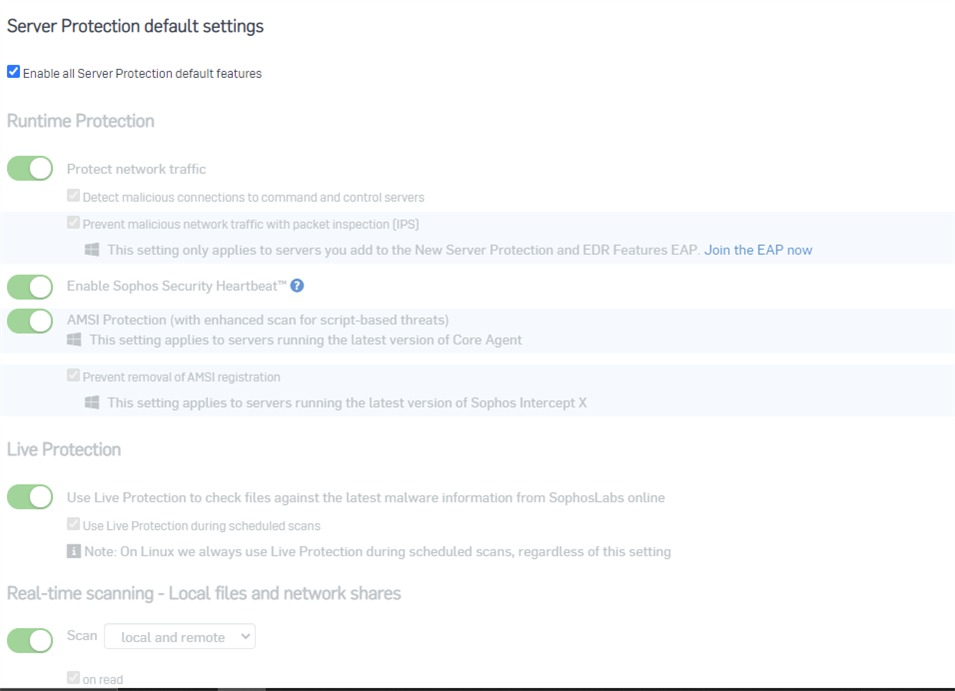
Server protection can be more sensitive than endpoint so you may need to configure these settings more to optimize performance. Again all these settings are the same as what I mentioned for endpoint, minus the device isolation. More info: https://docs.sophos.com/central/Customer/help/en-us/central/Customer/concepts/ServerConfigureMalwareProtection.html
scheduled scans
[edited by: Qoosh at 10:34 PM (GMT -7) on 19 Sep 2023]

 Quote
Quote