This discussion has been locked.
You can no longer post new replies to this discussion. If you have a question you can start a new discussion

Reclaim free space from UTM VM

I'm running the UTM VM appliance on ESXi 5.1, and there's a mismatch regarding the disk usage between the UTM and ESXi. Specifically, the UTM claims to be using 7.1 GB total, while ESXi is reporting that it is using 32.7 GB. Note that the virtual disk is thin provisioned, with a maximum allocation of 50 GB.

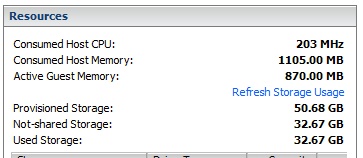
I've included captures from the UTM and ESXi below.

Any suggestions on how I can correct this? Thanks for your help.

/root # df -h --total
Filesystem      Size  Used Avail Use% Mounted on
/dev/sda6       5.2G  2.3G  2.7G  47% /
udev            501M   72K  501M   1% /dev
tmpfs           501M     0  501M   0% /dev/shm
/dev/sda1       331M   14M  300M   5% /boot
/dev/sda5        17G  4.1G   12G  27% /var/storage
/dev/sda7        22G  678M   20G   4% /var/log
/dev/sda8       1.3G   17M  1.2G   2% /tmp
tmpfs           501M   20K  501M   1% /var/sec/chroot-httpd/dev/shm
tmpfs           501M   80K  501M   1% /var/storage/chroot-reverseproxy/dev/shm
tmpfs           501M   80K  501M   1% /var/storage/chroot-smtp/tmp/ram
total            47G  7.1G   38G  16%


This thread was automatically locked due to age.
Parents
  • I've only allocated 20 GB to my rebuilt VM, so it shouldn't be possible for the same thing to happen again in the future. Thanks everyone for chiming in.
    FYI, minimum recommended is 40GB.
    __________________
    ACE v8/SCA v9.3

    ...still have a v5 install disk in a box somewhere.

    http://xkcd.com
    http://www.tedgoff.com/mb
    http://www.projectcartoon.com/cartoon/1
  • The recommended minimum is up from Scott's comment above: 60GB.

    It will be interesting to learn the result of your test, Mokaz.

    Cheers - Bob

     
    Sophos UTM Community Moderator
    Sophos Certified Architect - UTM
    Sophos Certified Engineer - XG
    Gold Solution Partner since 2005
    MediaSoft, Inc. USA
  • Hey all,

    So, i've done some testings with the method mentioned above. It effectively fills up every volumes with Zero bits and then remove the zeroed file. Though, after having moved the VM across datastores through Storage vMotion, the VM stills eat up 80GB at the ESXi level while claiming 24GB of space usage at the UTM level.

    So not much of a change here indeed.. Next test will be to VeeamZip the VM in order to see how much that backup consumes. I'l dig further into this.

    Kind regards,
    -m-


    EDIT: DataStores are all VMFS6 on a full vSphere 6.5 infra
    EDIT2: well actually, i've ended up reinstalling a fresh UTM, conf backup + restore + /var/log contents + home grown scripts and tools (nano/htop). 16 GB used now...

Reply
  • Hey all,

    So, i've done some testings with the method mentioned above. It effectively fills up every volumes with Zero bits and then remove the zeroed file. Though, after having moved the VM across datastores through Storage vMotion, the VM stills eat up 80GB at the ESXi level while claiming 24GB of space usage at the UTM level.

    So not much of a change here indeed.. Next test will be to VeeamZip the VM in order to see how much that backup consumes. I'l dig further into this.

    Kind regards,
    -m-


    EDIT: DataStores are all VMFS6 on a full vSphere 6.5 infra
    EDIT2: well actually, i've ended up reinstalling a fresh UTM, conf backup + restore + /var/log contents + home grown scripts and tools (nano/htop). 16 GB used now...

Children
  • Old thread...

    So if you run into that issue where your UTM is eating up storage space on your VMFS datastore, that's what I did:

    1. Make a configuration backup from your production VM
    2. provision a new VM with the same physical properties as your production VM
    3. Install the latest ASG code on it (same code as your production box) / map your management IP (this is temporary, like .253 if your prod is .254)
    4. Go to the webmin interface of the new VM (.253), enter some bogus information (name, city blabla)
    5. Select "Restore Backup"
    6. Click "Upload File"
    7. Click "Finish"

    You shall have a brand new box with the exact same configuration as your previous VM.

    For me doing all of this behind an IPsec tunnel on the "live" UTM to be replaced, this proven to be slightly more on the sportive side so to speak. If you're on the believers side, here is what I've done remotely in order to savagely reclaim 200 GB of storage again:

    1. Just before step 7 above, open your newly deployed VM settings from your HyperVisor management tool
    2. Pre-disconnect any bound network interface, do not save yet
    3. In webmin, click "Finish" after you've uploaded the backup file within the restore procedure on the new VM WebMin
    4. Jump back to your HyperVisor, click SAVE on your new VM settings, making sure every network interfaces involved are administratively disconnected. You gotta be quick here otherwise you'll find yourself in a huge mess.
    5. Just wait for the openssl dhparam generation to finish eating up your CPU (10/15 minutes on the new VM here)
    6. once done, logon the new VM console within your HyperVisor using the restored backup file root/password combo
    7. shutdown the new VM / shutdown -h now
    8. edit the new VM and reconnect all the network interfaces while keeping the VM OFF for now
    9. ssh to your production box as root, pre type "shutdown -h now" on your console, DO NOT shutdown yet
    10. Power on your newly provisioned VM
    11. Jump back on your ssh session to your production VM and strike enter

    Sit back relax, it'll come back on =)

    I've done that a second time after I've deleted the previously monstrous VM (production replaced one) and cloned the newly provisioned one to the exact same VM name as before. This to have things right on the datastore, reflecting previously used namings etc. So here again, ssh to your production box, pre-type "shutdown -h now", power on the cloned one, strike enter, pop a beer !

    Cheers,
    m.