Important note about SSL VPN compatibility for 20.0 MR1 with EoL SFOS versions and UTM9 OS. Learn more in the release notes.

IPsec Remote Access from iOS using certificates not asking for password

Hi guys

I can't see the wood for the trees -- so please forgive me this (probably stupid) question:

When using PSK for IPsec without certificates, everything is working properly. It asks for password (or I save my password) click Connect and it works.

However, when using Certificates, there is a timeout and it does not ask for password at all when connecting.

I have generated two locally-signed certificate in the Certificate's menu as explained in the knowledge base articles. The remote certificate using Advanced Settings > Certificate ID > DER ASN1 DN (X.509) and the local certificate using Advanced Settings > Certificate ID > DNS with the FQDN of the firewall.

Then I clicked Export Configuration and created three new files with the public key, private key and CA certificate and generated the required PFX file for iOS.

openssl pkcs12 -cafile ca.pem -inkey private.key -in public.pem -export -out ios.pfx

I imported the Certificate on my iPad, created the VPN profile and tried to connect. It says connecting for almost a minute and then disconnects with the error:

Received IKE message with invalid SPI (AA85045D). Deny Session: Couldn't authenticate the remote gateway. Check the authentication settings on both devices.

But it won't prompt for username / password.

Am I doing it wrong?

And why is IKEv2 still not supported? ugh :/


Edited TAGs
[edited by: Erick Jan at 11:07 PM (GMT -7) on 7 Oct 2024]
Parents
  • For those who are trying to achieve the same but cannot get it working as well, please find below a step by step article:

    Go to Certificates > Certificate Authorities and download your CA.

    Copy the Default.pem to your Desktop and rename Default.pem to CA.crt. Verify the certificate by running (optional):

    openssl x509 -in certificate.crt -text -noout

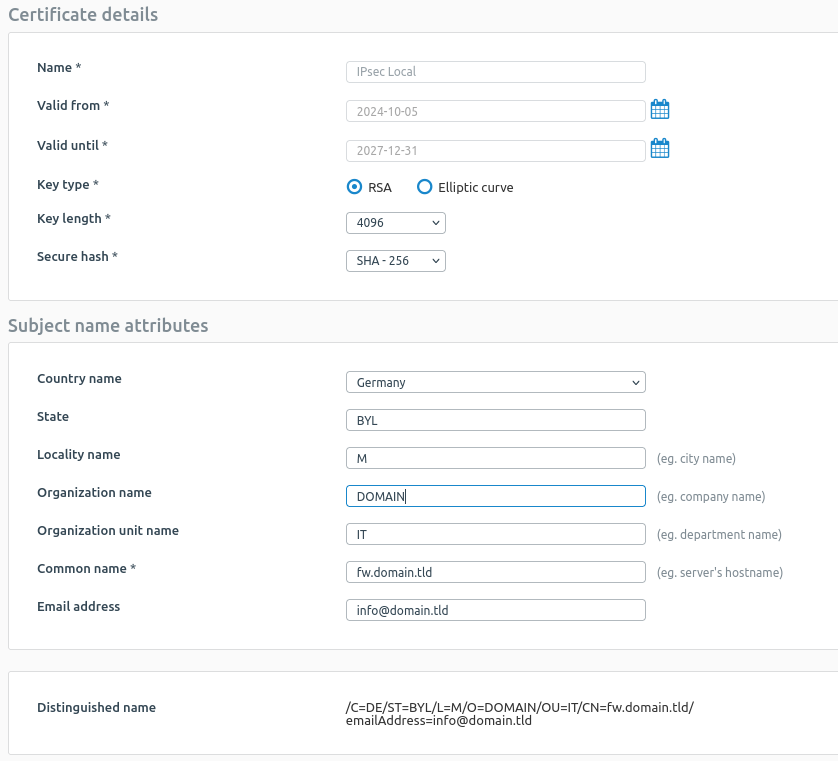
    Go to Certificates > Certificates and create a new Server certificate, e. g. IPsec Local. Click Add > Generate locally-signed-certificate:

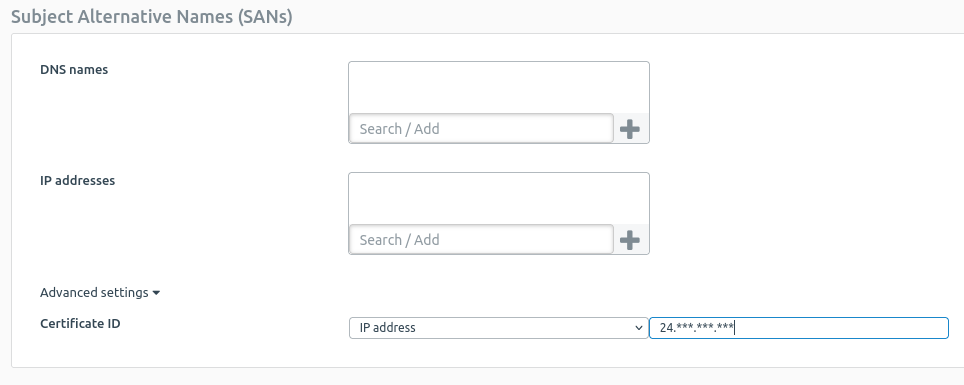
    Scroll down and click Advanced settings. Select IP address and enter the static IP address of your WAN / firewall.

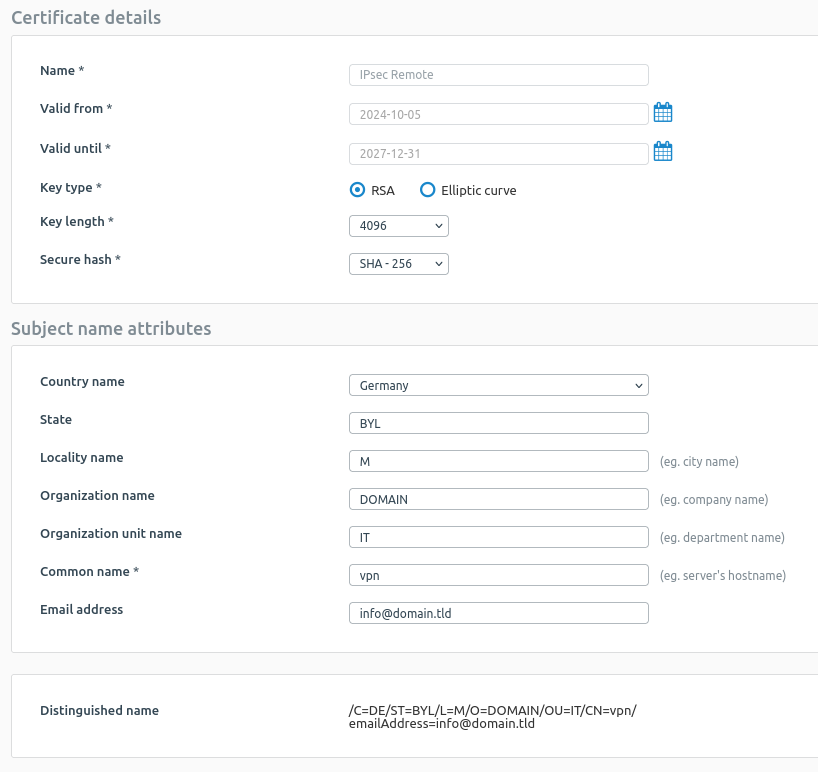
    Click Save! Now create a new Client certificate, e. g. IPsec REMOTE. Click Add > Generate locally-signed-certificate:

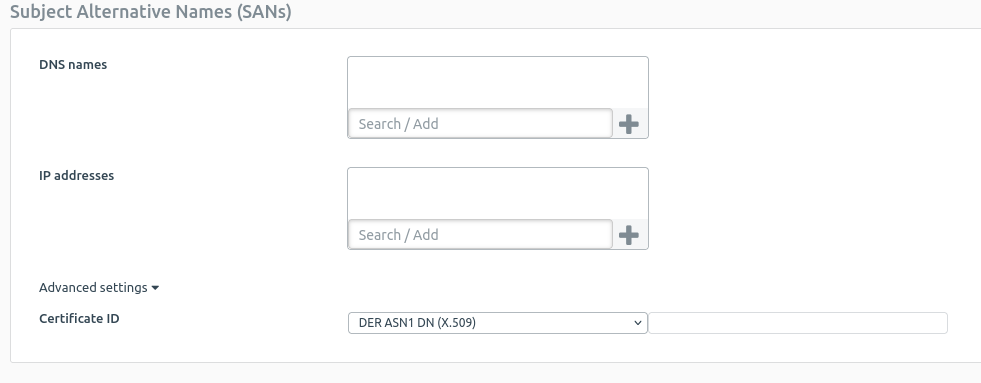
    Scroll down and click Advanced settings. Select DER ASN1 DN (X.509) from list.

    Click Save! You now have two certificates, a local and a remote certificate!

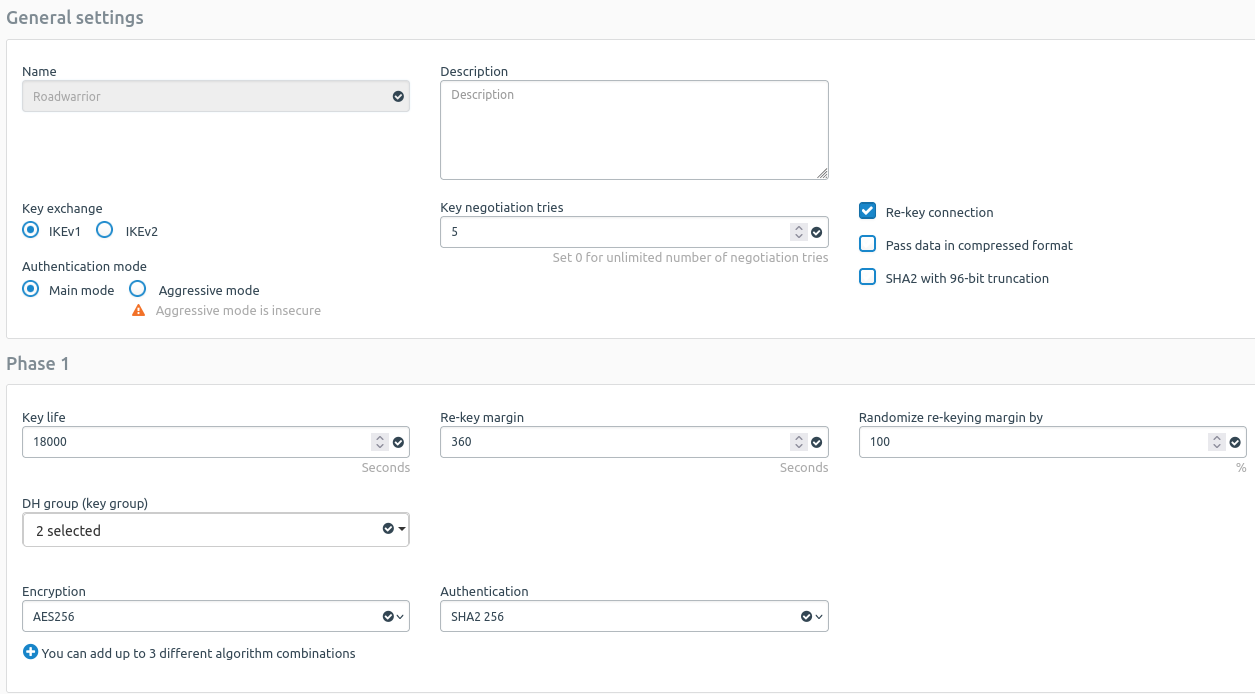
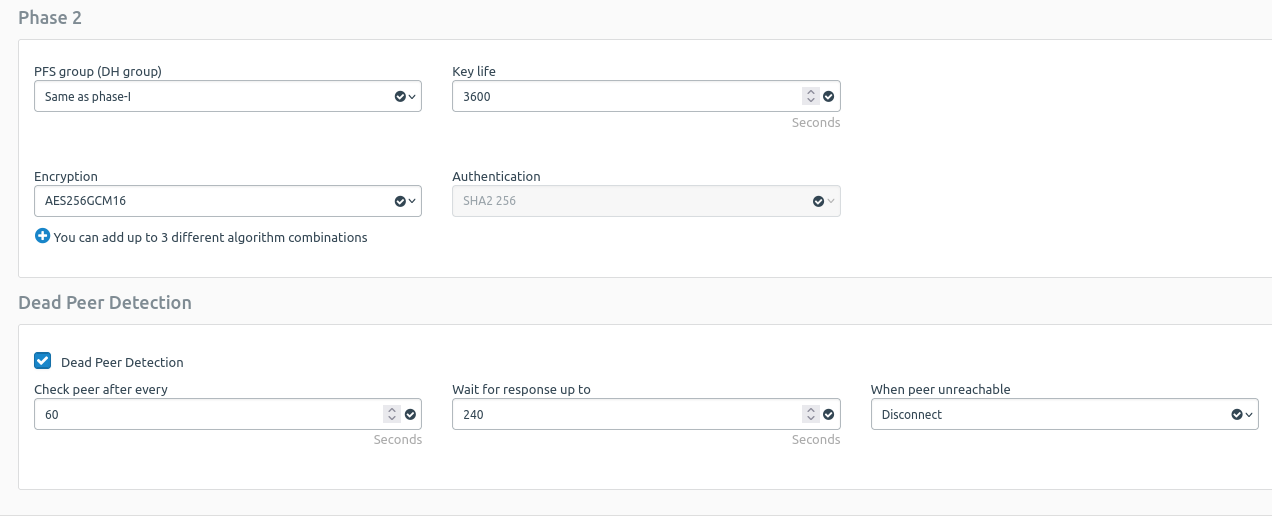
    Go to Profiles > IPsec profiles and create a new Roadwarrior profile.

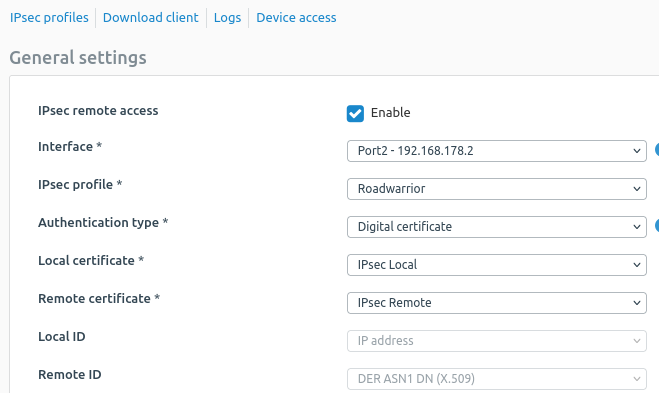
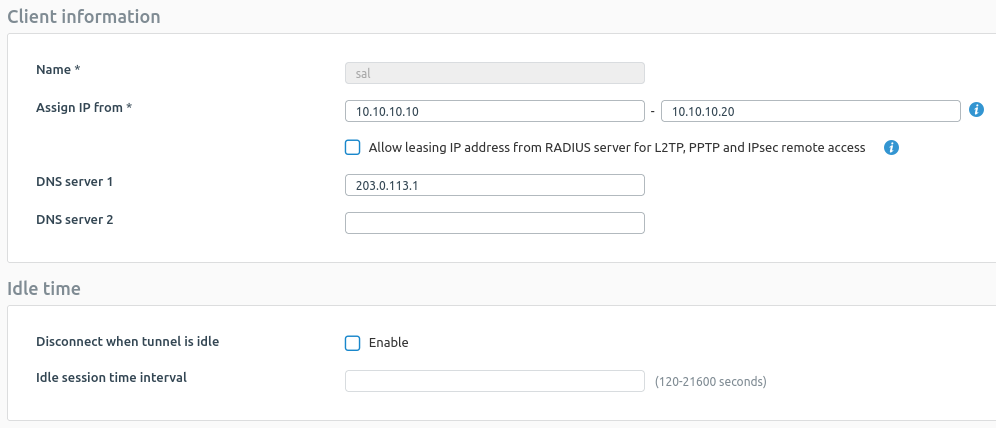
    Click Save and go to Remote access VPN. Configure the IPsec VPN as shown in the screenshot:

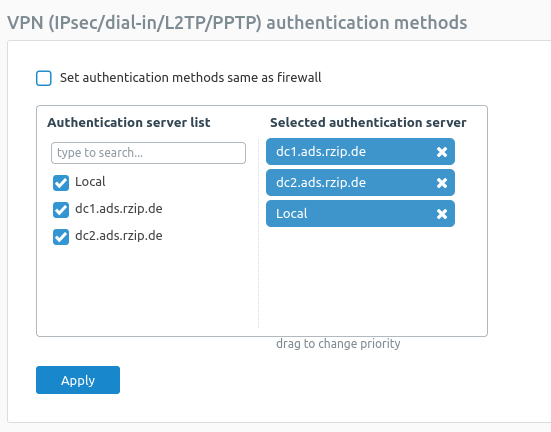
    Don't forget to add a valid user and most important, make sure your authentication source e. g. LDAP is allowed to authenticate through VPN in Authentication > Services:

    And allow the User to use IPsec VPN in Authentication > Users and click on the account of your choice!

    Go back to Remote access VPN > IPsec, then scroll down and click Export connection. Open the .TGB file with a text editor.

    Scroll down to: "Public-Client-Key]"

    Copy and paste the contents below to a new file and save as public.pem on your Desktop!

    -----BEGIN CERTIFICATE-----
    ...
    -----END CERTIFICATE-----

    Scroll down to: "Public-RootCA-Key]"

    Copy and paste the contents below to a new file and save as ca.pem on your Desktop!

    -----BEGIN CERTIFICATE-----
    ...
    -----END CERTIFICATE-----

    Scroll down to" Secret-Client-Key]"

    Copy and paste the contents below to a new file and save as private.key on your Desktop!

    -----BEGIN PRIVATE KEY-----
    ...
    -----END PRIVATE KEY-----

    Now create the PFX file required by iOS using the following command:

    openssl pkcs12 -CAfile Desktop/ca.pem -inkey Desktop/private.key -in Desktop/public.pem -export -out Desktop/vpn.pfx

    Important: you must choose a password for this certificate, otherwise you won't be able to use it on iOS!

    The newly created vpn.pfx and the above created CA.crt are now required on your iPhone / iOS, e. g. using an (interna)l Nextcloud and by emailing it to yourself.

    Click the CA.crt in order to add it to your profile. Go to Settings > VPN and Device Management.

    Click on your CA, enter your PIN and Install the CA to the Trusted Store.

    Go back to your E-Mail or Nextcloud and click the vpn.pfx. Then go back to Settings > VPN and Device Management.

    Click on your imported profile, enter the PFX password and click Install.

    Now Add a new VPN configuration. Choose Type: IPsec

    Description: VPN

    Server: <the static IP address of your WAN / firewall>

    Account: <name of the LDAP account>

    Password: <password of the LDAP account>

    Use certificate: ENABLE

    Choose your newly imported certificate! Click Add / Save.

    You should now be able to connect!

Reply
  • For those who are trying to achieve the same but cannot get it working as well, please find below a step by step article:

    Go to Certificates > Certificate Authorities and download your CA.

    Copy the Default.pem to your Desktop and rename Default.pem to CA.crt. Verify the certificate by running (optional):

    openssl x509 -in certificate.crt -text -noout

    Go to Certificates > Certificates and create a new Server certificate, e. g. IPsec Local. Click Add > Generate locally-signed-certificate:

    Scroll down and click Advanced settings. Select IP address and enter the static IP address of your WAN / firewall.

    Click Save! Now create a new Client certificate, e. g. IPsec REMOTE. Click Add > Generate locally-signed-certificate:

    Scroll down and click Advanced settings. Select DER ASN1 DN (X.509) from list.

    Click Save! You now have two certificates, a local and a remote certificate!

    Go to Profiles > IPsec profiles and create a new Roadwarrior profile.

    Click Save and go to Remote access VPN. Configure the IPsec VPN as shown in the screenshot:

    Don't forget to add a valid user and most important, make sure your authentication source e. g. LDAP is allowed to authenticate through VPN in Authentication > Services:

    And allow the User to use IPsec VPN in Authentication > Users and click on the account of your choice!

    Go back to Remote access VPN > IPsec, then scroll down and click Export connection. Open the .TGB file with a text editor.

    Scroll down to: "Public-Client-Key]"

    Copy and paste the contents below to a new file and save as public.pem on your Desktop!

    -----BEGIN CERTIFICATE-----
    ...
    -----END CERTIFICATE-----

    Scroll down to: "Public-RootCA-Key]"

    Copy and paste the contents below to a new file and save as ca.pem on your Desktop!

    -----BEGIN CERTIFICATE-----
    ...
    -----END CERTIFICATE-----

    Scroll down to" Secret-Client-Key]"

    Copy and paste the contents below to a new file and save as private.key on your Desktop!

    -----BEGIN PRIVATE KEY-----
    ...
    -----END PRIVATE KEY-----

    Now create the PFX file required by iOS using the following command:

    openssl pkcs12 -CAfile Desktop/ca.pem -inkey Desktop/private.key -in Desktop/public.pem -export -out Desktop/vpn.pfx

    Important: you must choose a password for this certificate, otherwise you won't be able to use it on iOS!

    The newly created vpn.pfx and the above created CA.crt are now required on your iPhone / iOS, e. g. using an (interna)l Nextcloud and by emailing it to yourself.

    Click the CA.crt in order to add it to your profile. Go to Settings > VPN and Device Management.

    Click on your CA, enter your PIN and Install the CA to the Trusted Store.

    Go back to your E-Mail or Nextcloud and click the vpn.pfx. Then go back to Settings > VPN and Device Management.

    Click on your imported profile, enter the PFX password and click Install.

    Now Add a new VPN configuration. Choose Type: IPsec

    Description: VPN

    Server: <the static IP address of your WAN / firewall>

    Account: <name of the LDAP account>

    Password: <password of the LDAP account>

    Use certificate: ENABLE

    Choose your newly imported certificate! Click Add / Save.

    You should now be able to connect!

Children
No Data