Disclaimer: This information is provided as-is without any guarantees. Please contact Sophos Professional Services if you require assistance with your specific environment.
Overview
This knowledge base article explains how to set up an IPsec connection from the Sophos UTM to Microsoft Azure.
This article goes through each step required to have a functional virtual network to connect to Azure. Please adapt these steps to fit your existing environment.
The following sections are covered:
- How to set up the Azure environment
- How to set up the UTM
- Additional information
- Related information
Applies to the following Sophos products and versions
Sophos UTM
How to set up the Azure environment
The example below describes the steps to build a new environment but can be easily adapted to an existing environment.
Create the Virtual Network
The Virtual Network defines the address space used in Azure, as well as what subnets are in that network.
- Sign in to the Azure Portal.
- Click Create a resource.
- Search for Virtual network and click Create.
- Under the Basics tab, configure the following:
- Subscription
- Resource group - select an existing resource group or create a new one.
- Name
- Region
- Click Next : IP Addresses.
- Under the IP Addresses tab, configure the following:
- IPv4 address space - The address space should be bigger than the subnet address range as we will need at least two subnets for this setup.
- Example: Address space: 10.0.0.0/16
- Example: Subnet address range 10.0.0.0/24
- Subnet name - create a new subnet by clicking Add subnet.
- Subnet address range
- IPv4 address space - The address space should be bigger than the subnet address range as we will need at least two subnets for this setup.
- Click Next : Security.
- Leave the settings as defaults but you can configure this according to your environment.
- Click Next : Tags.
- Leave the settings as defaults but you can configure this according to your environment.
- Click Next : Review + create.
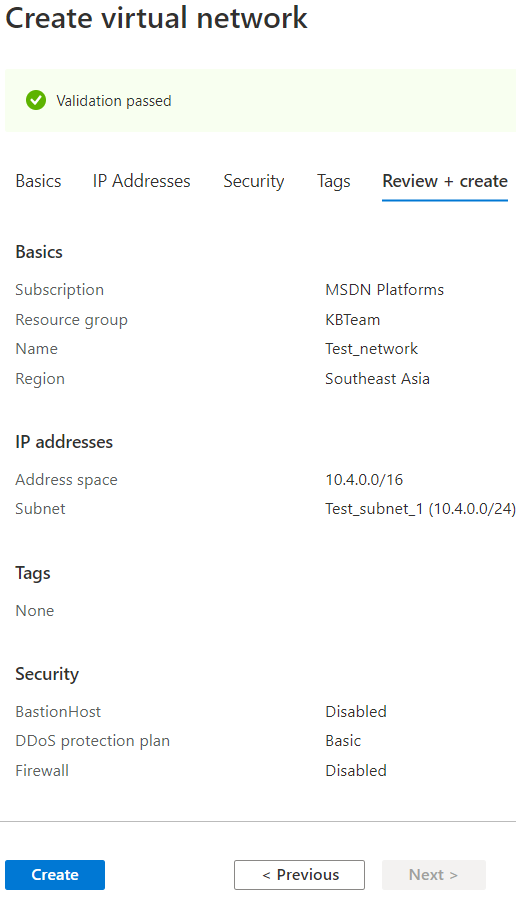
- Click Create.
Create the Virtual Network Gateway
The Virtual Network Gateway defines the external IP with which VPN tunnels can be created. It also defines which networks can be accessed by those VPNs.
- Go back to Azure's home page and click Create a resource.
- Search for Virtual Network Gateway and click Create.
- Under the Basics tab, configure the following:
- Subscription
- Name
- Region
- Gateway type - VPN
-
VPN type - Policy-based
- SKU
- Generation
- Virtual network - select the virtual network that was created.
- Gateway subnet address range - this will be filled out automatically, you can change the range as long as it is within your virtual networks address space.
- Public IP address - Create new (follow the prompts to automatically generate a new public IP)
- Public IP address name
- Click Next : Tags.
- Leave the settings as defaults but you can configure this according to your environment.
- Click Next : Review + create.
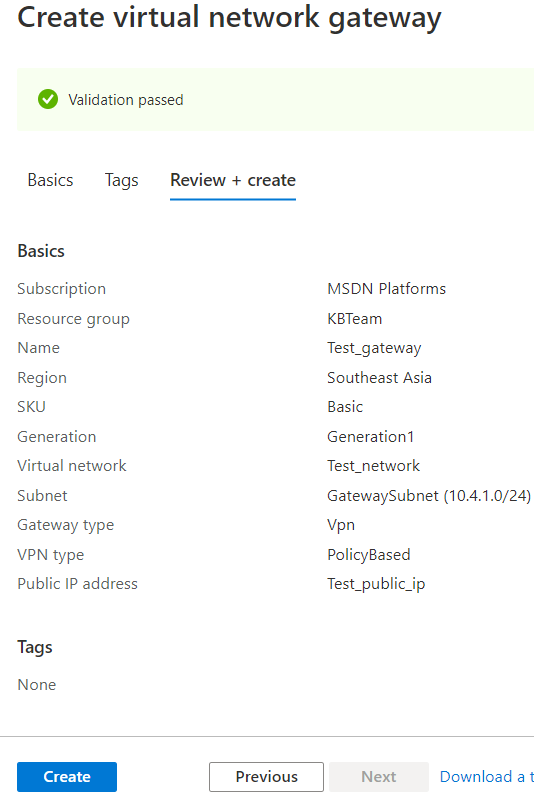
- Click Create.
Create the Local network gateway
The Local network gateway specifies the public IP and private IP's of local networks that may establish a connection to Azure.
- Go back to Azure's home page and click Create a resource.
- Search for Local Network Gateway and click Create.
- Configure the following:
- Name
- Endpoint - IP address
- IP address - the public IP address of the on-premise UTM
- Address space - the local network of the on-premise UTM
- Subscription
- Resource Group - select the existing resource group
- Location

- Click Create.
Create the Connection
The connection defines a specific VPN tunnel and which networks may access it.
- Go back to Azure's home page, search for Virtual network gateways, and select it.
- Click on the virtual network gateway that was created earlier.
- Click Connections > Add.
- Configure the following:
- Name
- Connection type - Site-to-site (IPsec)
- Local network gateway - select the local network gateway that was created earlier.
- Shared key (PSK) - create a PSK.
- IKE Protocol - IKEv1 (UTM only supports IKEv1. Azure supports both IKEv1 and IKEv2, and IKEv2 is the default.)
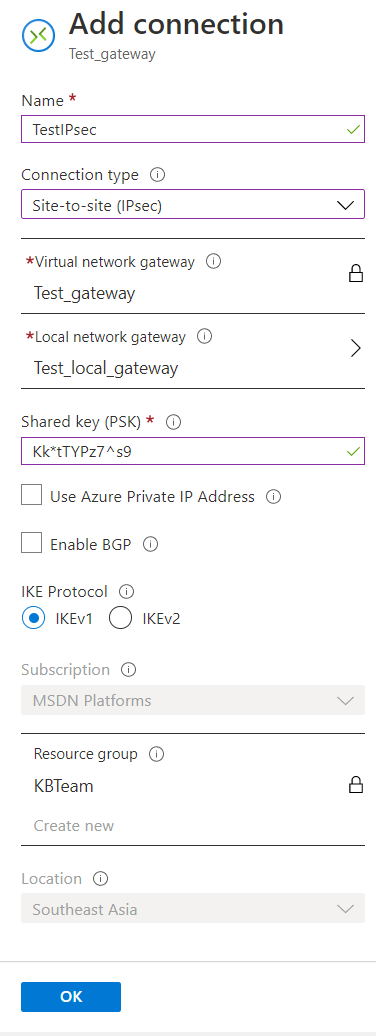
- Click OK.
How to set up the UTM
The UTM will be set up like any normal IPsec tunnel except that we must make an encryption policy specific to Azure's requirements.
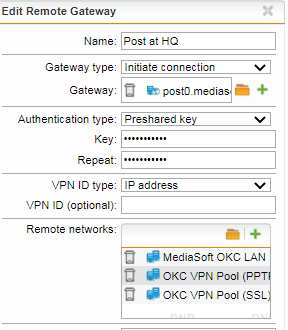
Create the Remote Gateway
This defines the remote address the UTM will connect to.
- Sign in to the Webadmin of the Sophos UTM.
- Navigate to Site-to-Site VPN > IPsec > Remote Gateways.
- Configure the following:
- Name
- Gateway type - Initiate connection
- Gateway - create a network object for the Gateway IP address. This is the public IP address of the Azure Virtual Network Gateway.
- Authentication type - Preshared key
- Key - this must match the key used on the Azure connection.
- Repeat - this must match the key used on the Azure connection.
- Remote networks - define the networks that will be accessed on Azure.
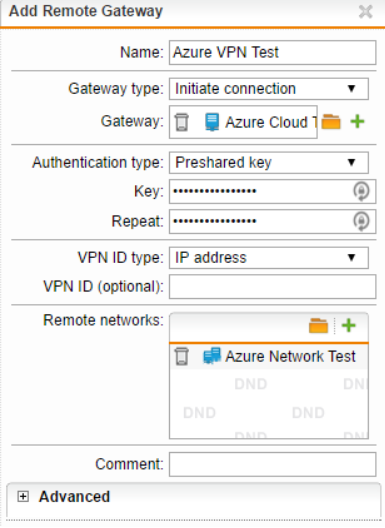
- Click Save.
Create the IPsec Policy
The IPsec Policy defines the encryption and other security parameters used by the IPsec tunnel. Azure has specific requirements and we have found that these settings work best.
- Navigate to Site-to-Site VPN > IPsec > Policies.
- Click on + New IPsec Policy.
- Configure the following:
- Name
- IKE encryption algorithm - AES 128
- IKE authentication algorithm - SHA1
- IKE SA lifetime - 28800
- IKE DH group - Group 2: MODP 1024
- IPsec encryption algorithm - AES 128
- IPsec authentication algorithm - SHA1
- IPsec SA lifetime - 3600
- IPsec PFS group - None
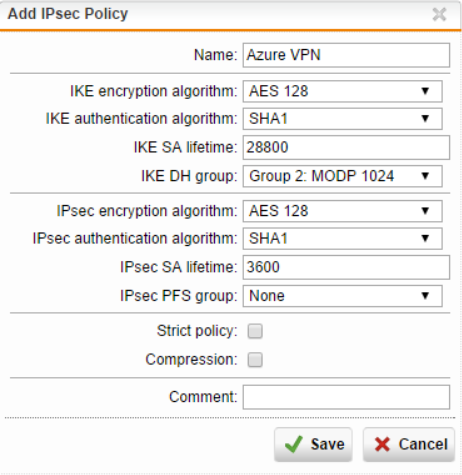
Note: If the tunnel keeps disconnecting or experiencing a slow connection, try to enable Strict policy.
- Click Save.
Create the IPsec Connection
This creates the IPsec tunnel by selecting a Remote Gateway, Policy, and defining which local networks can access the tunnel.
- Navigate to Site-to-Site VPN > IPsec > Connections.
- Configure the following:
- Name
- Remote gateway - select the remote gateway that was created earlier.
- Local interface - this should be the gateway used to establish the IPsec connection. It is usually the WAN interface.
- Policy - select the IPsec policy that was created earlier.
- Local Networks - define the networks that will have access to the IPsec tunnel.
- Automatic firewall rules - enable
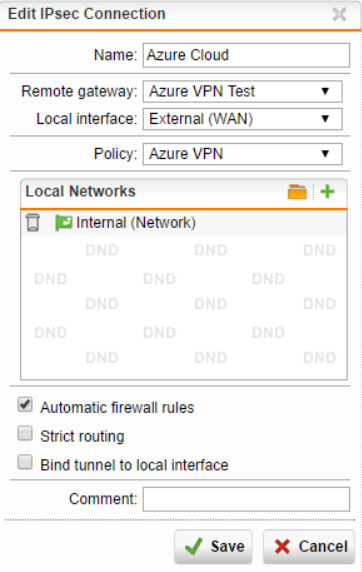
- Click Save.
Additional information
- When creating the IPsec tunnel on the UTM, make sure to check Automatic firewall rules, otherwise, you will need to manually create firewall rules to and from the Azure and local subnets.
- Verify there are no firewall rules in Azure that are preventing traffic from the UTM's network to the local networks.
- A Source NAT (SNAT) rule is not necessary to communicate between subnets, if you are having problems with communication between Azure and the Local subnet, verify that there is no Masquerade or SNAT rule interfering with the traffic.
Related information
- Configuring an existing IPSec tunnel to send all traffic to a central UTM
- Microsoft Documentation: Azure Virtual Network
- About VPN devices and IPsec/IKE parameters for Site-to-Site VPN Gateway connections.
Previous article ID: 126995
Added the following: Note: If the tunnel keeps disconnecting or experiencing a slow connection, try to enable Strict policy.
[edited by: DominicRemigio at 3:55 AM (GMT -7) on 8 Oct 2021]