

Disclaimer: This information is provided as-is for the benefit of the Community. Please contact Sophos Professional Services if you require assistance with your specific environment.
Overview
Sophos firewalls running version 18.0 and above supports secure SD-WAN offering on Microsoft Azure Virtual WAN allowing an administrator to seamlessly connect to workloads hosted in Azure Virtual networks globally. This can replace costly, inflexible networks as the entire network can be dynamically sized to match current traffic workload to optimize performance and minimize cost.
Integration with Azure Virtual WAN offers Sophos Firewall’s full suite of protection capabilities for securing applications and network traffic flows along with scalable SD-WAN connectivity to deploy the Microsoft Global Network as a secure enterprise WAN backbone instead of leased lines. The Azure virtual WAN uses a hub and spoke architecture to connect your hybrid data centers to other remote offices, backhauling the traffic flow thru a global connected Microsoft network.
This document highlights the step-by-step configuration involved in connecting Sophos firewalls located at an HQ to an Azure virtual WAN hub, accessing the virtual networks across multiple availability zones. This KB also outlines the configuration in connecting a remote office to the virtual WAN and backhauling traffic thru the Microsoft global network.
Note: You can also publish a route for Vnet from another tenant using the virtual WAN, for more information on this click here.
Network Setup
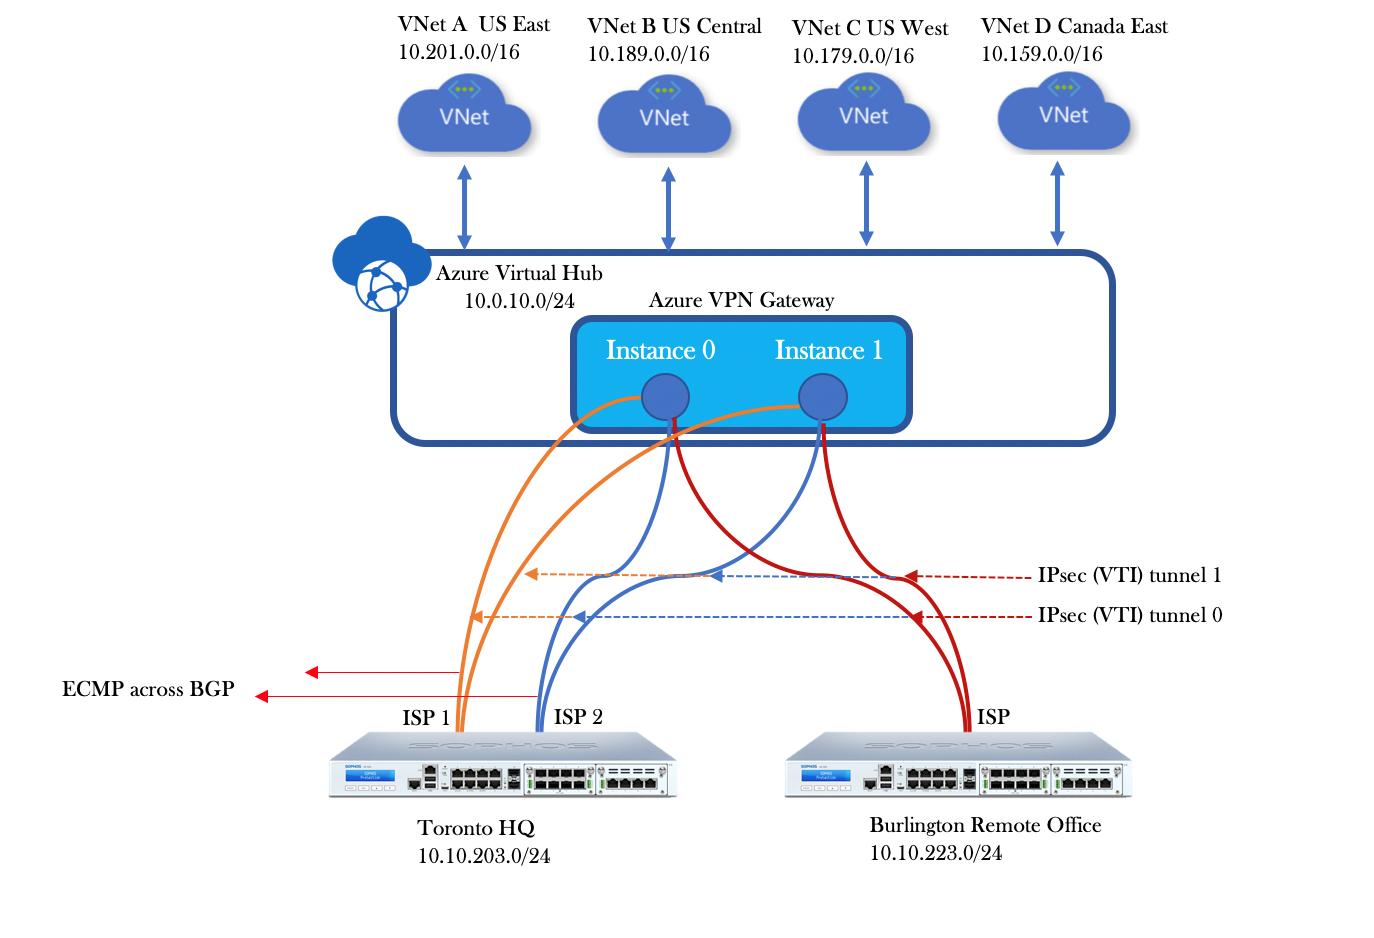
The above diagram shows a HQ/DC located in Toronto that uses the Azure virtual WAN infrastructure to backhaul traffic to a remote office located in Burlington, we will be using BGP protocol to establish a peering relation with the azure virtual wan.
The headquarters with 2 Internet service providers form adjacencies with azure peers and load balances the VPN traffic across the 2 ISP links using equal cost multi-path (ECMP) available in BGP.
Before you begin
- You need to have read/write access to the Sophos firewall UI and CLI (using SSH).
- You should have read/write access to an Azure portal with a valid subscription.
- Your vnets in an Azure subscription should not have any existing virtual network gateway, if you do it's recommended you remove any existing virtual network gateway like express route or VPN.
- Azure Virtual WAN supports only static IP addresses on your on-prem locations.
Configuration (Azure)
Step 1: Create a Virtual WAN
- From a browser login to the Azure portal and Sign – in with your credentials.
- On the search bar on the top of the screen type “virtual wan” and you should see the Virtual WANs like below, click Virtual WANs.

- Under Virtual WANs click
- On the Basics page fill in the following details
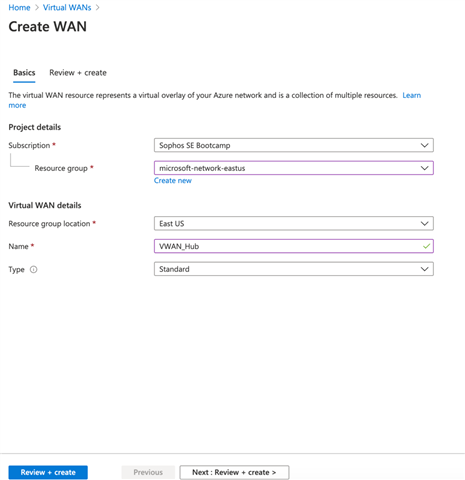
- Subscription: Select your subscription
- Resource group: create new or use existing
- Resource group location: Choose a resource location from the dropdown
- Name: Type the name you want to identify your virtual wan.
- Type: Select Standard if you want multiple ISP links to be connected to Virtual WAN.
- After you finish filling up the Basics click “review and create”
- After the validation is passed Azure will deploy the Virtual WAN
Step 2: Create a Virtual Hub
Note: (This can take approximately 30 minutes to deploy)
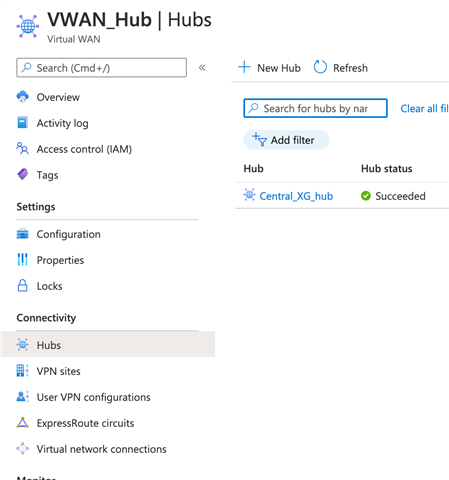
- Click the Virtual WAN created in step 1 which will open a new virtual wan blade.
- Click Hubs on the left side menu and click “New Hub”
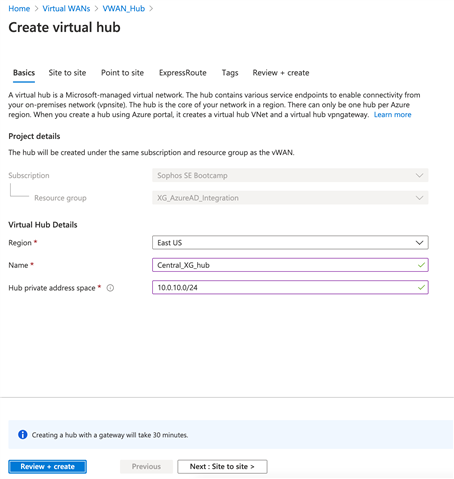
- This opens the Create Virtual Hub, specify the values below
- Region: Specify the Region from the drop down
- Name: Select a name to identify the Virtual hub
- Hub Private address Space: Select a /24 network which is unique in the entire Azure and on Prem eco system, this space is strictly dedicated to HUB. (We are using 10.0.10.0/24 for this KB)
- Click “Next: Site to site”
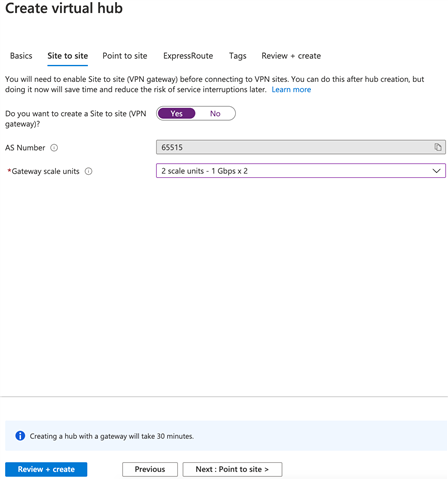
- Once the site to site opens specify the below values
- Do you want to create a Site to site (VPN gateway)?: Yes
- Gateway scale units: This creates 2 instances when a VPN gateway is provisioned in the virtual wan hub. Select from the drop down, if you select 2 Scale units – 1Gbps X 2, the virtual hub creates 2 instances each with 1Gbps providing an aggregate bandwidth of 2Gbps.
- Click on "Review + Create"
Step 3: Create VPN Sites (Toronto HQ)
In this step, we will be creating all the sites that connect to the Azure virtual hub to backhaul the traffic to other remote sites. For example, if you have a Head office in Toronto and a Branch office in Burlington MA you’ll create 2 sites, you can also define multiple ISP links per site in our example we have 2 WAN connections at the Toronto location.
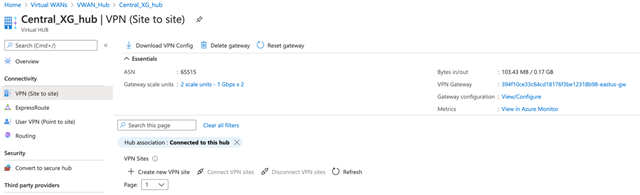
- Navigate to the Virtual_hub created in the previous step
- Click “VPN (Site to site)” from the left menu
- Click “+Create new VPN site”
- Azure Virtual hub automatically assigns a BGP ASN to this v-hub in our case it is 65515
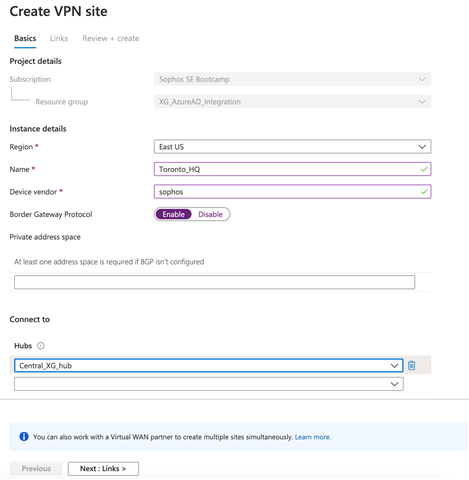
- Create new VPN site will open a new blade where you can define your Physical location
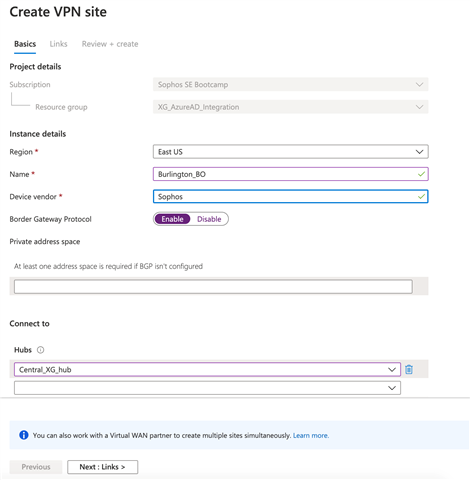
- Specify the below values on the Create VPN site blade
- Region: Select the region from the drop down that you want to deploy this VPN site
- Name: Specify a name with which you would like to identify this VPN site
- Device Vendor: Sophos
- Border Gateway Protocol: Enable Connect to Hubs from the drop down select the name of the hub you created in Step 2
- Click “Next:Links”
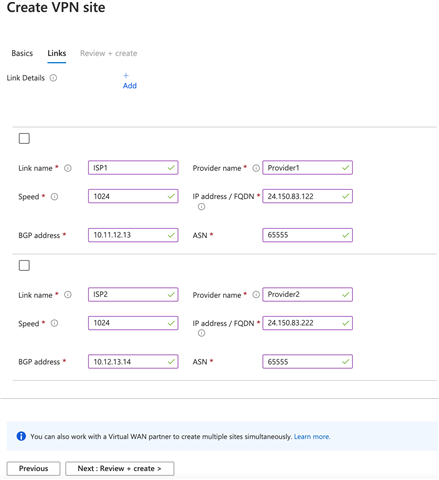
- Under the Links tab
- If you have more than one ISP on your physical location click Add
- Toronto has 2 ISPs that we need to add the details of
- Link Name: Your preference
- Provider Name: A name of your provider
- Speed: the Bandwidth from the provider
- IP Address/ FQDN: IP address of the interface on your Sophos Firewall
- BGP Address: Can be any /32 IP address, it can be any random IP address which does not overlap with any subnets in your eco system. In our case we are using 10.11.12.13 for ISP1 and 10.12.13.14 for ISP2.
- Click "Review and Create”
- Create a VPN site (Burlington BO): Similarly, create another VPN site for the Burlington_BO
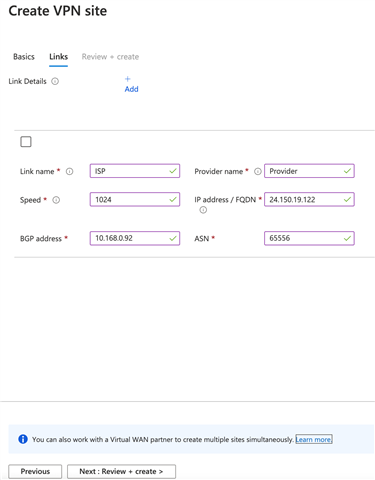
- For Burlington BO we selected a completely random BGP address and a unique ASN 65556
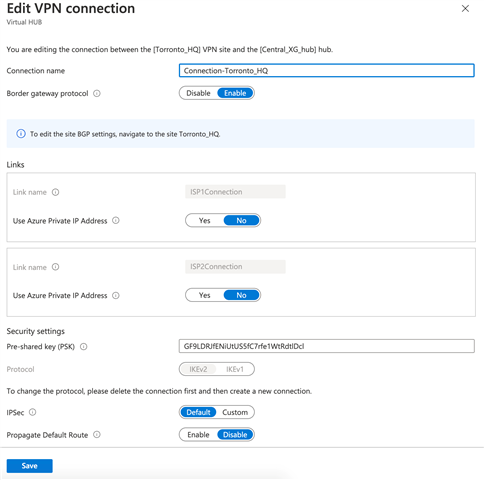
- Change the Pre shared key on the Toronto_HQ site, this is needed if the Sophos firewall in that site is using more than one ISP to connect to the v-hub. (not needed for the Burlington_BO)
- Click Toronto_HQ and click on “Edit VPN connection” on the right-hand side
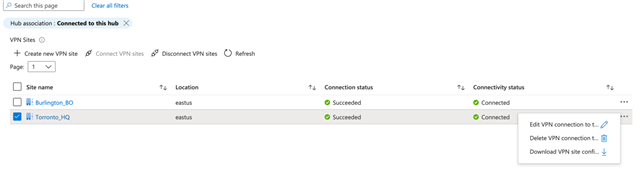
- Under the “Edit VPN connection” click on the pre-shared key and update the key to something of your choice.
Step 4: Download the VPN config file
- From the v-hub under the VPN (site to site) on the left menu click “Download VPN config”
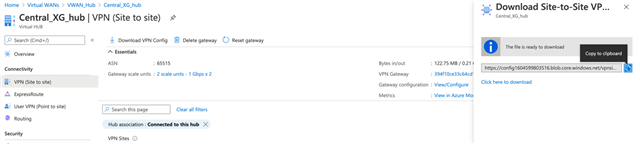
- This will create an azure blob storage link, click “copy to clipboard” and download the config from another tab on the browser.
- Under the same v-hub blade click “Gateway configuration: View/Configure”

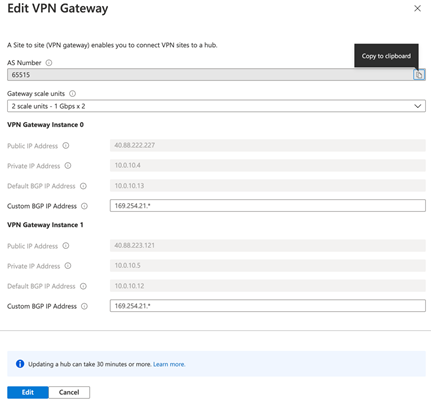
- The Public IP address is the peer IP of the VPN
- Default BGP IP address is taken from the ip subnet assigned to the v-hub
- You will have 2 unique IP addresses per instance
Step 5: Attach the Vnets to the Virtual Hub
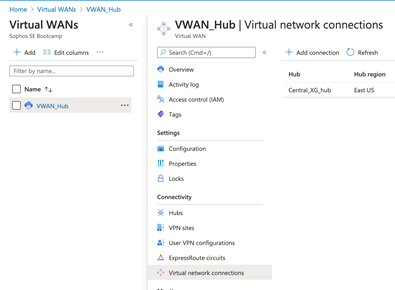
- On your azure portal Navigate to the Virtual WANs blade and click on the Virtual WAN created in step 1
- Click “Virtual Network connections” on the left side menu
- Click “+ Add Connection”
- This will open a new blade to attach the Vnet to this vhub
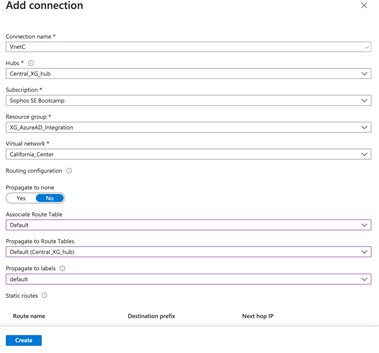
- Under Add connection blade, specify the following values below
- Connection Name: A name to identify this vnet connection
- Hubs: from the drop down select the v-hub created in step 2
- Subscription: Select the subscription
- Resource group: Select the resource group from the drop down under which vnet is deployed
- Virtual Network: select the virtual network you want to propagate the prefix for
- Propagate to none: No
- Associate Routing Table: Default
- Propagate to Route Tables: Default (v-hub name)
- Propagate to Labels: Default
- Click on “Create”
- Under Add connection blade, specify the following values below
Note: Repeat Step 5 for all the other vnets in the Azure subscription
Configuration on the Sophos firewalls: (Toronto Sophos firewall)
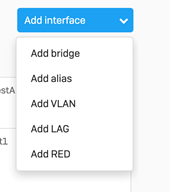
- Login to the Sophos firewall navigate to Configure > Network > Interfaces > Click Add interface drop-down and add 2 aliases to the LAN interface of the firewall and create aliases for the BGP addresses defined in Step 3 of the Azure configuration, in our scenario that would be 10.11.12.13 and 10.12.13.14.
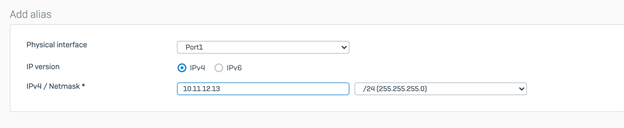
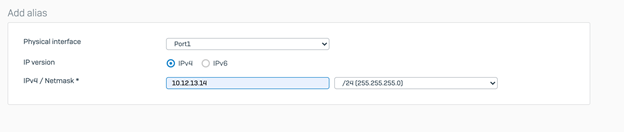
This is needed because the Azure tunnel interfaces should be able to reach the BGP peer addresses across all the VPN termination points (Virtual tunnel interfaces on Sophos Firewall) - Open the Configuration downloaded from the Azure virtual hub in step 4 of the Azure config on text editor, and copy highlight the following parameters, For example, you will need the following highlighted parameters to configure the tunnel
This should have 3 IPsec tunnel configuration for each of the ISP defined for Toronto HQ as well as the Burlington BO
{"configurationVersion":{"LastUpdatedTime":"2020-12-01T03:55:44.3961831Z","Version":"a8336102-1192-4921-91ab-171db1371608"},
"vpnSiteConfiguration":
{"Name":"Torronto_HQ","IPAddress":"24.150.83.122","BgpSetting":{"Asn":19,"BgpPeeringAddress":"10.12.13.14","BgpPeeringAddresses":null,"PeerWeight":32768},"LinkName":"ISP2","Office365Policy":{"BreakOutCategories":{"Optimize":false,"Allow":false,"Default":false}}},"vpnSiteConnections":
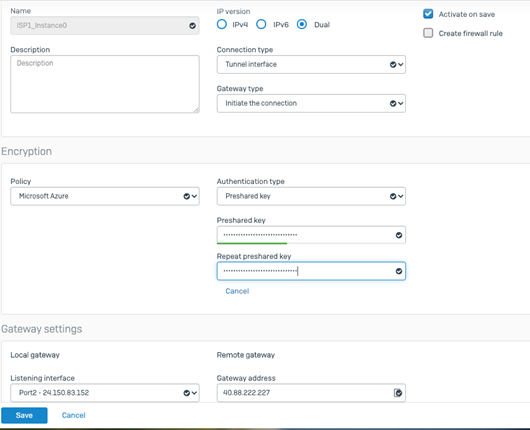
[{"hubConfiguration":{"AddressSpace":"10.0.10.0/24","Region":"EastUS","ConnectedSubnets":["10.201.0.0/16","10.189.0.0/16"]},"gatewayConfiguration":{"IpAddresses":{"Instance0":"40.88.222.227","Instance1":"40.88.223.121"},"BgpSetting":{"Asn":65515,"BgpPeeringAddresses":{"Instance0":"10.0.10.13","Instance1":"10.0.10.12"},"CustomBgpPeeringAddresses":{"Instance0":[null],"Instance1":[null]},"PeerWeight":0}},"connectionConfiguration":{"IsBgpEnabled":true,"PSK":"GF9LDRJfENiUtUS5fC7rfe1WtRdtlDcl","IPsecParameters":{"SADataSizeInKilobytes":102400000,"SALifeTimeInSeconds":3600}}}]}, - Create site-to-site VPN tunnels to each of the azure instances by navigating to Configure > VPN > IPsec > Add
With the following parameters below, between instance 0 and ISP1- Name: Name it according to the ISP and Instance number
- IP Version: Dual
- Activate on Save: Checked
- Connection type: Select “Tunnel Interface” from dropdown
- Gateway type: Initiate the connection from dropdown
- Policy: Select “Microsoft Azure” from the dropdown
- Authentication type: Pre shared Key, copy the psk from the azure config file
- Local Gateway: Select the Local Gateway IP address
- Remote Gateway: select the instance 0 IP address from the config file
- Repeat Step 3 to create an IPsec tunnel between ISP1 and Instance1, ISP2 and Instance0, ISP2 and Instance1 you should be able to build 4 tunnels for 2 ISPs.

- Navigate to Network Interfaces, the tunnel interfaces will create XFRM interfaces under the WAN interfaces of the Sophos firewall, configure the IP addresses for each of the XFRM interfaces created by the VPN config, these IP addresses can be any random IP address, that does not conflict with your existing network.
In this scenario, we configured 11.11.11.11, 12.12.12.12, 22.22.22.22, 33.33.33.33 with a /24 across all the XFRM interfaces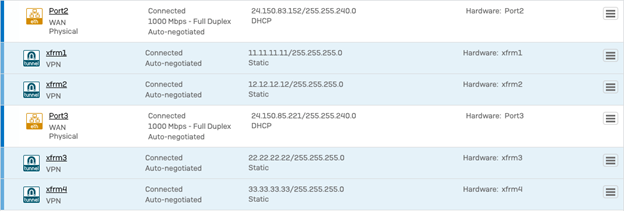
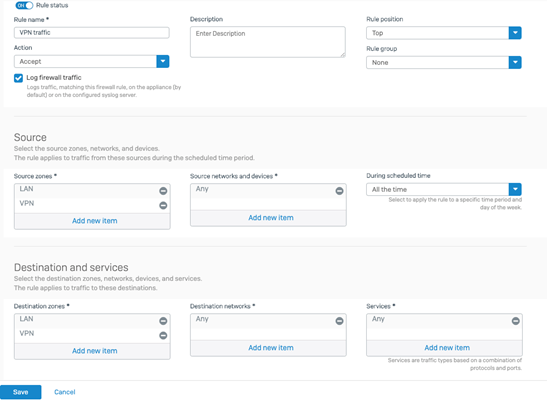
- Navigate to Protect > Rules and Policies > Firewall Rules > Click “Add firewall rule” > Click “New firewall rule”, this will allow the traffic to flow between the internal networks and azure vnets.
- Add the firewall rule with the following parameters,
- Rule name: Name the firewall rule
- Rule position: top
- Rule group: None
- Action: Accept
- Source zone: Select LAN and VPN
- Destination Zone: Select VPN and LAN
- Click Save
- Add the firewall rule with the following parameters,
- Configure the BGP on the Toronto HQ, navigate to Configure > Routing > BGP, add the following parameters
Router ID: 10.11.12.13 (you can also use 10.12.13.14 as the router ID)
Local AS: 65555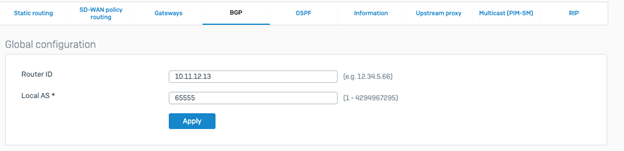
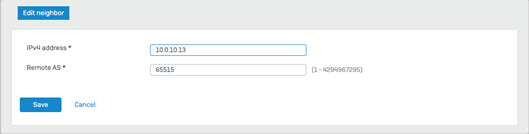
- Under neighbors click Add and provide the remote BGP peers on the Azure side in our scenario from the config, click save
- 10.0.10.13 is BGP peer associated with instance 0
- 10.0.10.12 is the BGP peer associated with instance1

- Under Networks click Add and add local networks prefixes that needed to be propagated across the BGP to the Azure side.

- Under neighbors click Add and provide the remote BGP peers on the Azure side in our scenario from the config, click save
- SSH into the Sophos firewall select option 5 and option 3, under the advanced shell enter the following commands.
- This will load the zebra console
XG210_WP03_SFOS 18.0.3 MR-3# telnet localhost zebra
XG210_WP03_SFOS 18.0.3 MR-3# telnet localhost zebra Command 1 Trying 127.0.0.1... Connected to localhost. Escape character is '^]'. router> router> router> enable Command 2 router# router# configure terminal Command to enter the terminal router(config)# ip route 10.0.10.13 255.255.255.0 xfrm1 Add a route to reach 10.0.10.13 via xfrm1 router(config)# ip route 10.0.10.13 255.255.255.0 xfrm3 Add a route to reach 10.0.10.13 via xfrm3 router(config)# ip route 10.0.10.12 255.255.255.0 xfrm2 Add a route to reach 10.0.10.13 via xfrm2 router(config)# ip route 10.0.10.12 255.255.255.0 xfrm4 Add a route to reach 10.0.10.13 via xfrm3 router(config)# do write write the configuration Configuration saved.. router(config)#exit XG210_WP03_SFOS 18.0.3 MR-3# exit Exit from the advanced shell
- This will load the zebra console
- Select option 0 which takes you to the main menu, selection option 3, option 1 and option 3 which will load the BGP CLI configuration. Enter the following commands, 10.0.10.13 and 10.0.10.12 are the BGP peers on the remote Azure side.
bgp> enable bgp# bgp# configure terminal switch to configuration mode bgp(config)# router bgp 65555 Enter the BGP configuration bgp(config-router)# neighbor 10.0.10.13 ebgp-multihop 3 bgp(config-router)# neighbor 10.0.10.12 ebgp-multihop 3 bgp(config-router)# maximum-paths ibgp 3 bgp(config-router)# do wr Configuration saved.. bgp(config-router)#
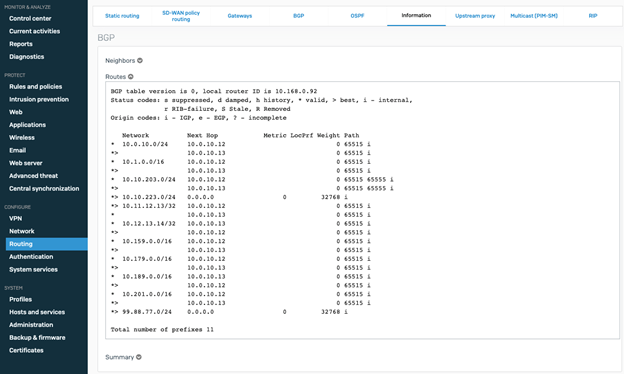
- Verify if BGP was able to successfully establish neighborship and exchange the network prefixes,
- Exit out of the config mode
bgp# sh ip bgp
BGP table version is 0, local router ID is 10.11.12.13
Status codes: s suppressed, d damped, h history, * valid, > best, i - internal,
              r RIB-failure, S Stale, R Removed
Origin codes: i - IGP, e - EGP, ? - incomplete
Network Next Hop Metric LocPrf Weight Path * 10.0.10.0/24 10.0.10.12 0 65515 i *> 10.0.10.13 0 65515 i * 10.1.0.0/16 10.0.10.12 0 65515 i *> 10.0.10.13 0 65515 i *> 10.10.203.0/24 0.0.0.0 0 32768 i * 10.10.223.0/24 10.0.10.12 0 65515 65556 i *> 10.0.10.13 0 65515 65556 i *> 10.11.12.13/32 10.0.10.13 0 65515 i *> 10.12.13.14/32 10.0.10.12 0 65515 i * 10.159.0.0/16 10.0.10.12 0 65515 i *> 10.0.10.13 0 65515 i * 10.168.0.92/32 10.0.10.12 0 65515 i *> 10.0.10.13 0 65515 i * 10.179.0.0/16 10.0.10.12 0 65515 i *> 10.0.10.13 0 65515 i * 10.189.0.0/16 10.0.10.12 0 65515 i *> 10.0.10.13 0 65515 i * 10.201.0.0/16 10.0.10.12 0 65515 i *> 10.0.10.13 0 65515 i * 99.88.77.0/24 10.0.10.12 0 65515 65556 i *> 10.0.10.13 0 65515 65556 i Total number of prefixes 12 bgp#
-
You can verify that the BGP was able to receive the prefixes from the Azure side as well as the remote Burlington BO which are marked in green.
Note: Sophos firewall will perform Equal cost Multipath (ECMP) load balancing between the ISPs, Azure does not support ECMP between the instances.
- Exit out of the config mode
Configuration on the Sophos firewalls: (Burlington Sophos firewall)
Follow the same steps as mentioned for the Toronto firewall, the difference being that 2 IPsec tunnels are needed as there’s only 1 ISP at the Burlington site. The configuration file downloaded will have the information you need to build the configuration similar to the Toronto HQ.
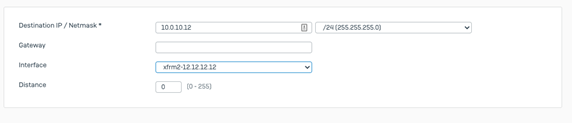
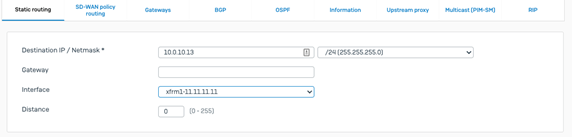
The only differentiator would be Step #8: where you can configure a simple static route rather than logging in to the Zebra console for adding the static routes.
- 8. Configure the static routes, login to the Burlington Sophos firewall UI, under Configure > Routing > Static routing > Add

Note: the XFRM interfaces on the Burlington office can be a assigned a different IP address than the HQ
- Verify if the BGP prefixes from the Azure Vnets and the Toronto HQ is propagated across the BGP on the Burlington site. From the UI, navigate to Configure > Routing > information > Under BGP
This should connect both the physical site backhauling the traffic across Microsoft Azure s connected global network.
Added TAGs
[edited by: Raphael Alganes at 7:47 AM (GMT -7) on 17 Sep 2024]