

"Note: Please contact Sophos Professional Services if you require direct assistance with your specific environment."
This recommended read goes over how to set up Sophos Central Email.
This configuration will cover examples of DNAT rules and usage of a 3rd Party DNS provider to go over the configuration examples of Domain Validation, MX records, and SPF Records.
In this recommended read we’ll go over:
- 1. Validate your Domain
- 2. Configure Domain Direction, Inbound Destination, and IP/FQDN.
- 3. Add a Mailbox Manually for email flow testing
- 4. Confirm outbound traffic is working (Configuring Send Connector)
- 5. Change your MX records to point to Sophos Central Email GatewayNote: This will cause downtime during the testing. To minimize downtime, you can import or sync all of the mailboxes that need email flow before changing your MX records.
- 6. Test Email flow
- 7. Restrict delivery of email to Sophos IP addresses
- 8. Update your SPF record for your domain
- 9. Update DKIM record for your domain
Configuring Sophos Central Email Gateway flow
1. Validate your Domain
In Central Go to Configure >> Settings >> Domain Settings/Status >> Add Domain
Enter your domain and click Verify Domain Ownership, in the new window that pops up you’ll see a TXT Value, copy and enter this value in your Public DNS (Do not close the Verify Domain Ownership window).

Go to your Public DNS provider and enter the TXT Value
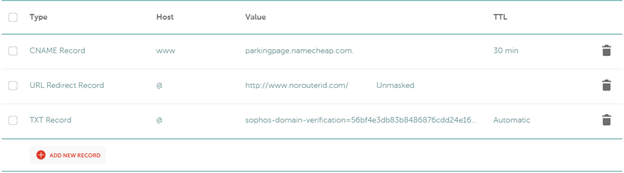
In NameCheap we go to Domain List >> (Select your domain and click) Manage >> Advanced DNS >> Host Records >> Add New Record
Type = TXT Record, Host @, Value = TXT Value shown in Sophos Central, TTL = Automatic
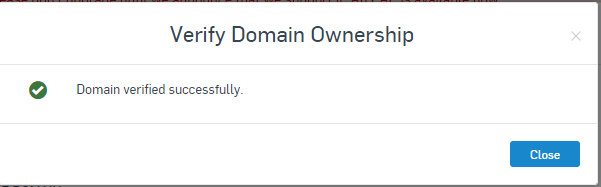
Wait for around 1-60 minutes, and go back to Sophos Central, Configure >> Settings >> Domain Settings >> and click Verify
You should get the following:
Note: If you get an error here, and you have confirmed you entered the correct TXT Value on your DNS and waited over 60 minutes, it’s possible that the Domain might have been used in a previous Central account, which will cause issues with the Verification in that case, open a case with Support and provide any details about using this domain in the past or having added it in a different Central Account.
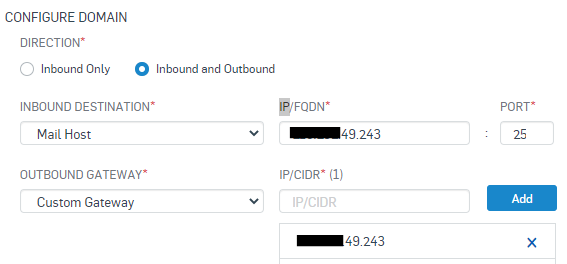
2. Configure Domain Direction, Inbound Destination, and IP/FQDN.
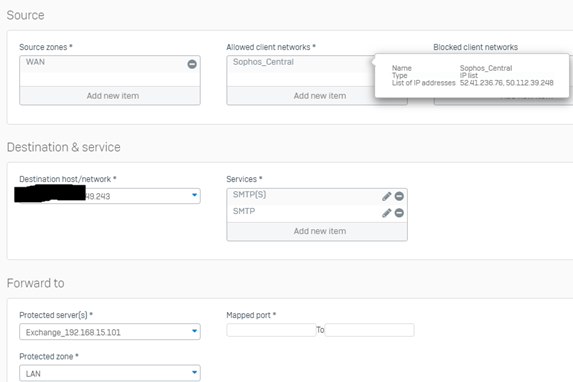
In this Recommend Read we’ll configure Inbound and Outbound, using a Custom Gateway, (in a future RR we will use GSUITE and O365), our Email Server will be Exchange.
Inbound Destination
IP/FQDN
Port
Outbound Gateway = Custom Gateway
IP/CIDR
3. Add a Mailbox Manually for email flow testing
Go to Manage Protection >> Mailboxes >> Add >> Add Mailbox
Mailbox TypeName
Email
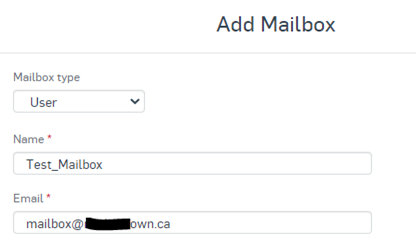
After clicking Save the Mailbox should show under the Mailboxes Menu and the Username should show under the People Menu.


4. Confirm outbound traffic is working (Configuring Send Connector)
a) Confirm the test Mailbox exists in Exchange or create a Mailbox for it
Exchange Admin Center >> Recipients >> Mailboxes.
First, you need to know the Outbound Relay Host used by your Sophos Central Email, you can find it in:
Sophos Central Email Gateway >> Configure >> Settings >> Domains Settings / Status >> Configure External Dependencies >> Outbound Settings

Note: You MUST enter the one assigned to your region; otherwise email flow won’t work.
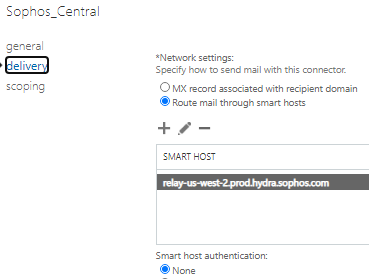
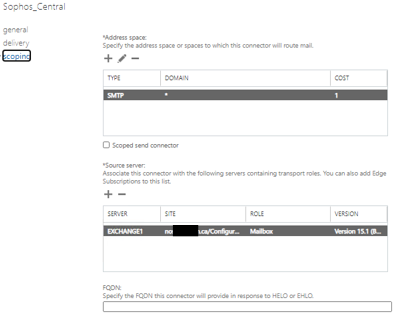
b) Create a test Send Connector to send email to Sophos Central Email in Exchange
Note: This will cause some downtime for outbound email
Exchange Admin Center >> Mail Flow >> Send Connectors >> +
Name
Type
Network Settings
Smart Host Authentication
Address Space
Source Server
Note: Make sure your Firewall isn’t acting as an MTA
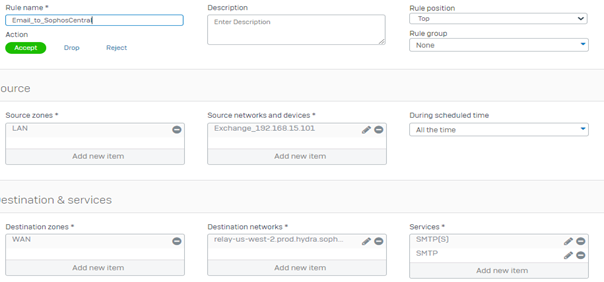
c) For an added layer of security, you can configure your Firewall to only allow port 25 and 587 for outgoing email communication to Sophos Central
In our example we’ll be using Sophos XG as the border router, the XG is configured in Legacy Mode and SMTP relay under System >> Administration >> Device Access >> Local Service ACL >> SMTP Relay for LAN and WAN is disabled (if your Exchange server is in a different Zone, make sure to disable also SMTP Relay in this Zone).
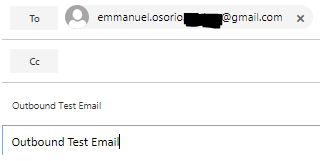
d) Send a Test email from the mailbox registered in Sophos Central
I will be using a testing Gmail address for this demonstration.
Check the mailbox we sent the email to.

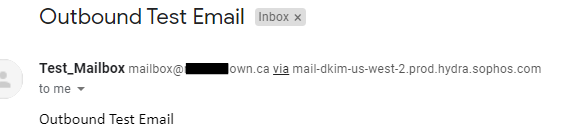
To confirm the email was relayed from Central in Gmail click the … (3) dots within the message and Click Show Original.
You should be able to find the following line to confirm the email was sent through Central Email
Received: from mail.delivery-11-us-west-2.prod.hydra.sophos.com (mail.delivery-11-us-west-2.prod.hydra.sophos.com. [34.212.96.110])
Sophos Central Email should also show the email, you can check under Email Gateway >> Logs & Reports >> Email Security Logs

Note: If you send email from a Mailbox not added in Sophos Central, you will receive a “Mail Delivery System bounce message” in the sender mailbox. This is because Central only relays/accepts outbound emails from Mailboxes added in Sophos Central.
5. Change your MX records to point to Sophos Central Email Gateway
Note: This will cause downtime during the testing. To minimize downtime, you can import or sync all of the mailboxes that need email flow before changing your MX records.
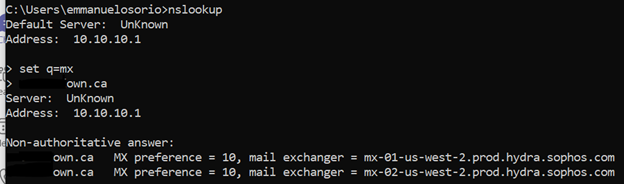
a) Localize the MX records for your Sophos Central Email Gateway region
Email Gateway >> Configure >> Settings >> Domain Settings / Status >> Configure External Dependencies >> Inbound Settings 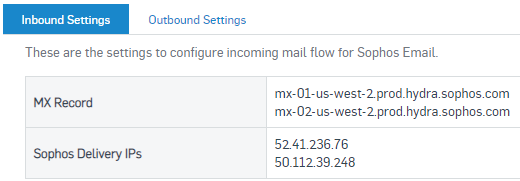
You MUST confirm and use the Email Gateway MX records for your region, if you use MX records for a different region your email traffic won’t work.
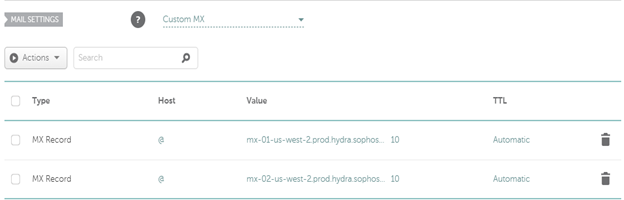
b) Go to your DNS provider to change your MX records to point to Sophos Central.
Note: Only keep Sophos Central MX Records; if you keep additional MX records, some email might not flow through your Central Email Gateway, exposing you to threats, spam, etc.
You can confirm if your MX records have been updated by entering your domain on the following website https://mxtoolbox.com/; if your MX records have propagated, you should see the following:

You can get this information using a Command Prompt
6. Test Email flow
To test Inbound Email Flow, we used the Test Gmail account address we used previously.
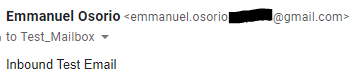
Once sent, in Central Email you should see an entry for this email under:
Email Gateway >> Logs & Reports >> Message History

Note: Central might have a slight delay showing the email in the GUI even after it has been delivered; this is normal.
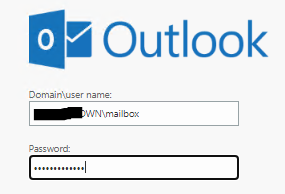
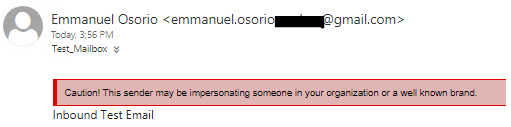
Open Outlook and you should see the email in the mailbox
(The banner you’re seeing is related to the feature called Impersonation Protection, you can find more information about it in the following link).
To double confirm the email went through Sophos Central you can open the email in Outlook by clicking in Show Message Details, you should see the following entry:
Received: from ip-172-17-100-231.us-west-2.compute.internal (ip-172-17-100-231.us-west-2.compute.internal [127.0.0.1]) by outbound-50-112-39-248-us-west-2.prod.hydra.sophos.com (Postfix) with ESMTP id 4DrW9X2M5kzvPrl
If you don’t see this in the email or Central hasn’t show the email, the email didn’t pass through Central, it can be for many reasons, your MX records have not propagated, the sender has a stale entry for your MX records, you have additional MX records.
7. Restrict delivery of email to Sophos IP addresses
Now that email flow is working, you can add one more layer of security to your email flow, by restricting the delivery IPs to only Sophos Central, at your Firewall and or Exchange level.
To know what IPs central will be using to deliver email go to
Email Gateway >> Configure >> Settings >> Domain Settings/ Status >> Inbound Settings

If we check the details of the received email, we can see one of the IPs being used to send the email to our organization.
Received: from outbound-50-112-39-248-us-west-2.prod.hydra.sophos.com ([50.112.39.248]:30802)
To restrict access to these IPs you do it on Exchange directly by going to:
Exchange Admin Center >> Mail Flow >> Receive Connectors >> Client FrontEnd YourMailServerName >> On the Security Lab you can leave all the defaults selected
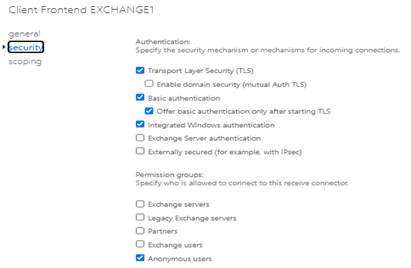
Scoping >> Remote Network Settings >> + >> You would need to add your assigned Sophos Central IPs, and depending on your Firewall configuration, the Firewall Internal IP, this in case your DNAT rule is Masquerading the Sender IP.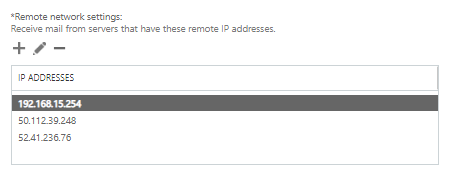
Note: If your Mail flow is more complex, please modify with caution.
To add an extra layer of protection, you can also restrict on your Firewall/Router only Sophos Central IPs connection to Port 25 (by default) or any custom port you might use, this should block any direct Telnet attempt on Port 25 to your Firewall from any IPs other than Central.
At this point, you should have inbound and outbound email flow working.
Note: Only the mailboxes added in Sophos Central, are the only ones allowed to Send and Receive email; remember to add all the mailboxes that will be receiving and sending email, and their Aliases; failing to do this will cause emails not to be delivered.
8. Update your SPF record for your domain
Now that Central Email will be delivering your email, you need to update your SPF record to show this change in your email flow.
The SPF record used by Central is v=spf1 include:_spf.prod.hydra.sophos.com
We need to add this to your DNS provider as a TXT record; here is an example of how the SPF record should look like:
Type
HostValue
Note: This SPF record only marks Central Email as the allowed sender for your domain; if you have additional ways of sending email outbound from your domain, you would need to add it in your SPF record, for example, another Public IP that doesn’t route email via Central Email.
v=spf1 ip4:216.99.43.102 include:_spf.prod.hydra.sophos.com -all
9. Update DKIM record for your domain
DKIM allows you to sign and authenticate your outbound emails.
The DKIM has to be added in the last relay right before the email goes out.
To add a DKIM Key go to Email Gateway >> Settings >> Domain Settings/Status >> select the domain you want to add a DKIM for >> DKIM Keys >> Add Key
After clicking Add, wait for a moment, and the DKIM will be updated
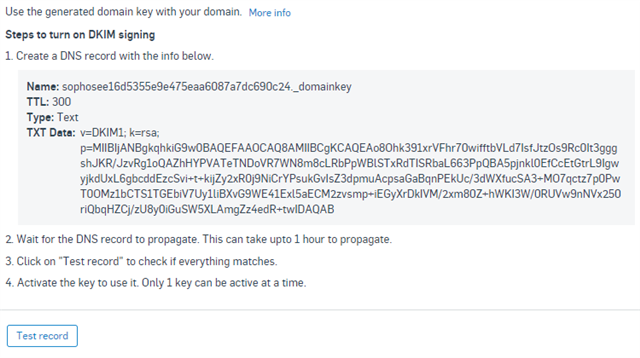
Go to your DNS provider, in this case, NameCheap and add as a TXT record:
Type = TXT Record
Host = sophosee16d5355e9e475eaa6087a7dc690c24._domainkey
Value = v=DKIM1; k=rsa; p=MIIBIjANBgkqhkiG9w0BAQEFAAOCAQ8AMIIBCgKCAQEAo8Ohk391xrVFhr70wifftbVLd7IsfJtzOs9Rc0It3gggshJKR/JzvRg1oQAZhHYPVATeTNDoVR7WN8m8cLRbPpWBlSTxRdTISRbaL663PpQBA5pjnkl0EfCcEtGtrL9IgwyjkdUxL6gbcddEzcSvi+t+kijZy2xR0j9NiCrYPsukGvIsZ3dpmuAcpsaGaBqnPEkUc/3dWXfucSA3+MO7qctz7p0PwT0OMz1bCTS1TGEbiV7Uy1liBXvG9WE41Exl5aECM2zvsmp+iEGyXrDkIVM/2xm80Z+hWKI3W/0RUVw9nNVx250riQbqHZCj/zU8y0iGuSW5XLAmgZz4edR+twIDAQAB
TTL = 5 min

Note: Notice the Value, is a single line and it contains a space after the ";".
Wait between 5 minutes to 1hr for the DNS records to replicate and click: Test Record
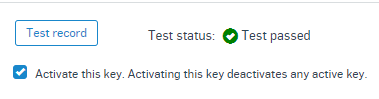
After the test passes select: "Activate this Key" so your outbound email starts being signed.
RELATED INFORMATION
Added tags
[edited by: Raphael Alganes at 6:10 AM (GMT -7) on 7 Jun 2023]
