

Disclaimer: This information is provided as-is for the benefit of the Community. Please contact Sophos Professional Services if you require assistance with your specific environment.
Special Thanks to Carlos Agrelo for the solution !
For customers that wish to automatically deploy the Sophos Central Server agents onto Azure there are a few currently supported methods detailed in this KB. The methods described take advantage of start up scripts which can be used to ensure that new VMs are launched with the Sophos Server agent installed.
This may not be ideal for some larger organizations that already have an existing estate in Azure or for those that have set up multiple accounts with distributed administration which may result in situations where users are able to launch VMs without attaching the proper deployment scripts, leading to decreased host security across their estate.
To address the issue we created the below procedure which relies on some Azure automation services, and uses the customers' unique Sophos Central agent download URL's to make sure the Sophos Server agent is pushed to all VMs in a specified Azure account.
Please note that this is not an officially supported method at this time so is provided 'as is'.
Prerequisites
In order to apply the instructions below, you'll need the following:
- An Azure subscription.
- An Automation account to hold the runbook and authenticate to Azure resources.
- At least one Azure VM.
- A storage account.
Important note
The following process will install the Sophos Server Agent on all Virtual Machines found in the customer's Azure Subscription. If the customer has any Sophos XG Firewalls or other kind of preconfigured VMs present in their account, the script will fail trying to install the agent on those workloads and could have an impact on the services associated with that VM. Please be aware of this before running the script.
If you need help modifying the script to run only on a specific Resource Group or set of VMs, reach out the Public Cloud team (publiccloud@sophos.com) and we will be happy to assist you.
Step-by-step guide
Installation Files
Download the following file:sophos-deploy-server-agent.zip
Included files are:
- readme.txt
- sophos-azure-automation-script.ps1 main runbook
- sophos-script-deploy-windows-agent.ps1 windows script for the deployment of Sophos server agent.
Step 1 - Customize Windows VM extension script
To customize your Windows VM extension script, follow these steps:
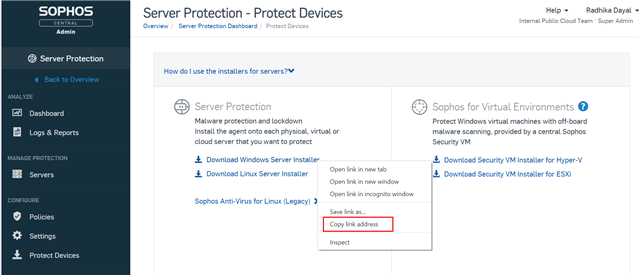
- In Sophos Central, navigate to Server Protection > Protect Devices (direct link).
- Right click on Download Windows server Installer and click on Copy link address. Paste this into a notepad.
- In your local computer, unzip and open the downloaded sophos-deploy-server-agent.zip folder.
- Open sophos-script-deploy-windows-agent.ps1 in a notepad .
- Replace the <LinkToInstaller> with the link to the correct Server Installer taken from Sophos Central, as part of step 2.
4. Ensure that the name of the file is- sophos-script-deploy-windows-agent.ps1 and save it.
Step 2 - Create your Linux VM Extension script
To create your Linux VM extension script, follow these steps:
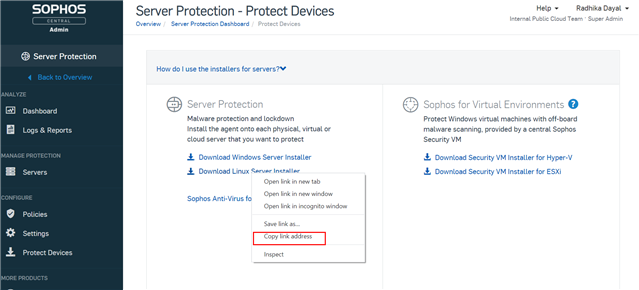
- In Sophos Central, navigate to Server Protection > Protect Devices (direct link).
- Right click on Download Linux Server Installer and click on Copy link address. Paste this into a notepad. Ensure that you copy the link for linux installer instead of the legacy Sophos Anti-Virus for Linux which is now legacy .
- Create a new plain text file with the code below, replacing the "Link to installer" with the link to the correct Server Installer taken from Sophos Central as part of the previous step:
#! /bin/bash
wget "Link to installer" -P /tmp/
sleep 5
cd /tmp
chmod a+x /tmp/SophosSetup.sh
sudo ./SophosSetup.sh
- Save the file with the name: sophos-script-deploy-linux-agent.sh
Step 3 - Create a container
To create a container in the Azure portal, follow these steps:
- Navigate to your storage account in the Azure portal.
- In the left menu for the storage account, scroll to the Blob service section, then select Containers.
- Select the + Container button.
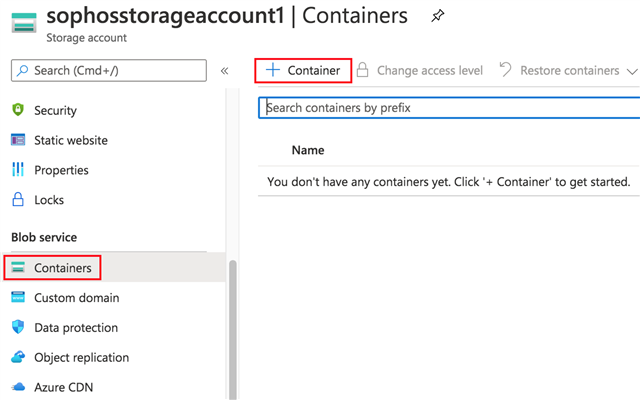
- Give the container the name sophos-container-deploy-server-agent
- Set the level of public access to Private (no anonymous access).
- Select Create to create the container.
Step 4 - Upload the block blobs
To upload the block blobs to your new container in the Azure portal, follow these steps:
- In the Azure portal, navigate to the container you created in the previous section.
- Select the container to show a list of blobs it contains. This container is new, so it won't yet contain any blobs.
- Select the Upload button to open the upload blade and browse your local file system to find the sophos-script-deploy-windows-agent.ps1 file.
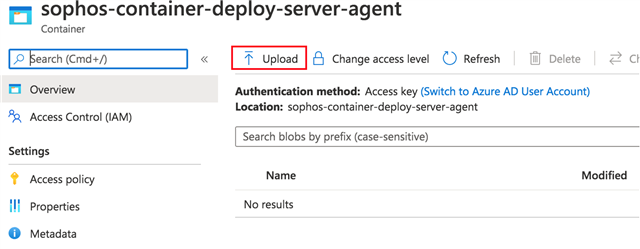
- Select the Upload button.
- Repeat the process for the sophos-script-deploy-linux-agent.sh file.
- Click the sophos-script-deploy-linux-agent.sh just uploaded.
- In the Blob blade, make a note of the Linux Script Block Blob URL. This URL should have the following format:
https://<storage-account-name>.blob.core.windows.net/sophos-container-deploy-server-agent/sophos-script-deploy-linux-agent.sh
Step 5 - Create the runbook
- In the Azure portal, open your Automation account.
- Select Runbooks under Process Automation to open the list of runbooks.
- Create a new runbook by selecting Create a runbook.
- Give the runbook the name sophos-runbook-deploy-server-agent
- In this case, you're going to create a PowerShell runbook. Select PowerShell for Runbook type.
- Click Create to create the runbook and open the text editor.
Step 6 - Add code to the runbook
- Your runbook is currently empty. Copy the content of the sophos-azure-automation-script.ps1 and paste it in the body of the script.
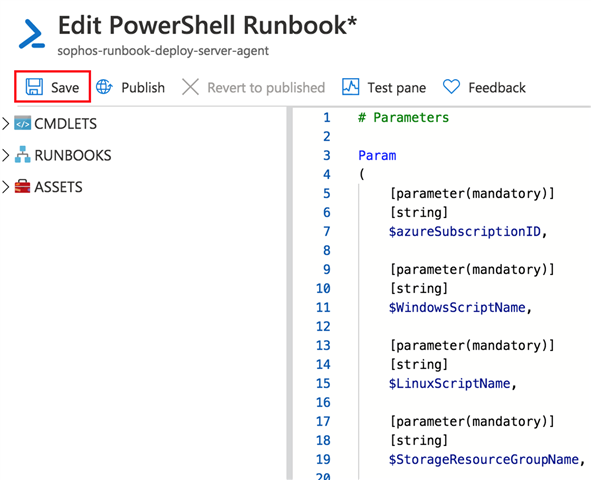
- Save the runbook by clicking Save.
Step 7 - Publish and start the runbook
The runbook that you have created needs to be published before you can run it in production.
- Click Publish to publish the runbook and then Yes when prompted.
- Scroll left to view the runbook on the Runbooks page, and note that the Authoring Status value is set to Published.
- Scroll back to the right to view the page for sophos-runbook-deploy-server-agent
- Select Start and provide the parameters required for run the runbook:
- Azure Subscription ID
- Windows Script Name: sophos-script-deploy-windows-agent.ps1
- Linux Script Name: sophos-script-deploy-linux-agent.sh
- Storage Resource Group Name
- Storage Account Name
- Storage Container Name: sophos-container-deploy-server-agent
- Linux Script URL
- Select Ok.
- A job pane is opened for the runbook job that has been created. Although you can close this pane, leave it open right now so that you can watch the job's progress. The job status is shown in the Status field under the Essentials sector.
- Click All Logs to open the Streams pane for the runbook job.
- Click Refresh till the Status field shows Completed.
- Close the Streams pane and the Job pane to return to the sophos-runbook-deploy-server-agent page.
Step 8 - Validate the installation process
- In Sophos Central, navigate to Server Protection > Servers > Azure VMs (direct link).
- Validate if all your running VMs are shown in the list.
Added Disclaimer
[edited by: GlennSen at 3:09 PM (GMT -7) on 5 Apr 2023]